My First Clojure Backend Using Ring, Jetty and Compojure
In this post I discuss how I built my first web-app, RemindMe, using Clojure! The app is deployed here: https://remind.otee.dev
Project Scope
The RemindMe app aims to replicate how flash cards work in the real world. Quoting from Wikipedia:
A flashcard or flash card (also known as an index card) is a card bearing information on both sides, which is intended to be used as an aid in memorization. Each flashcard bears a question on one side and an answer on the other
Similar to real world flash cards, RemindMe displays a question, which is selected randomly from a set of questions. The user has the option to see a hint or go to the next question (which will again be randomly selected from the question pool). If the user chooses to the see the hint, the hint to that question will be displayed and the user will again have the choice to either proceed to the next question or see the solution. Lastly, if the user chooses to see the solution, the relevant solution is displayed along with the option to proceed to the next question.
I wanted to build RemindMe, as a tool to recall my solutions to LeetCode problems. For this reason, the app describes each question as a ‘problem’. Also, while the text of each problem is lifted from LeetCode, the hints and solutions are mine. (Always happy to update my solutions with more optimal ones. Pull requests are welcome!)
The app reads a JSON file (data.txt) to access the set of problems, solutions and hints. When we want to add a new problem, we will need to update the JSON file.
Here are the routes supported by this app:
/problem/:id: This route loads the problem corresponding to theidpath parameter./next: This route redirects to a randomly selected/problem/:idroute/: Same as/next, it redirects to a new problem route/hint/:id: Generates a JSON payload containing the hint for the respective problem (to be used by client-side JavaScript).:/solution/:id: Generates a JSON payload containing the hint and solution for the respective problem (to be used by client-side JavaScript).
Here’s a demo of the RemindMe
Goal
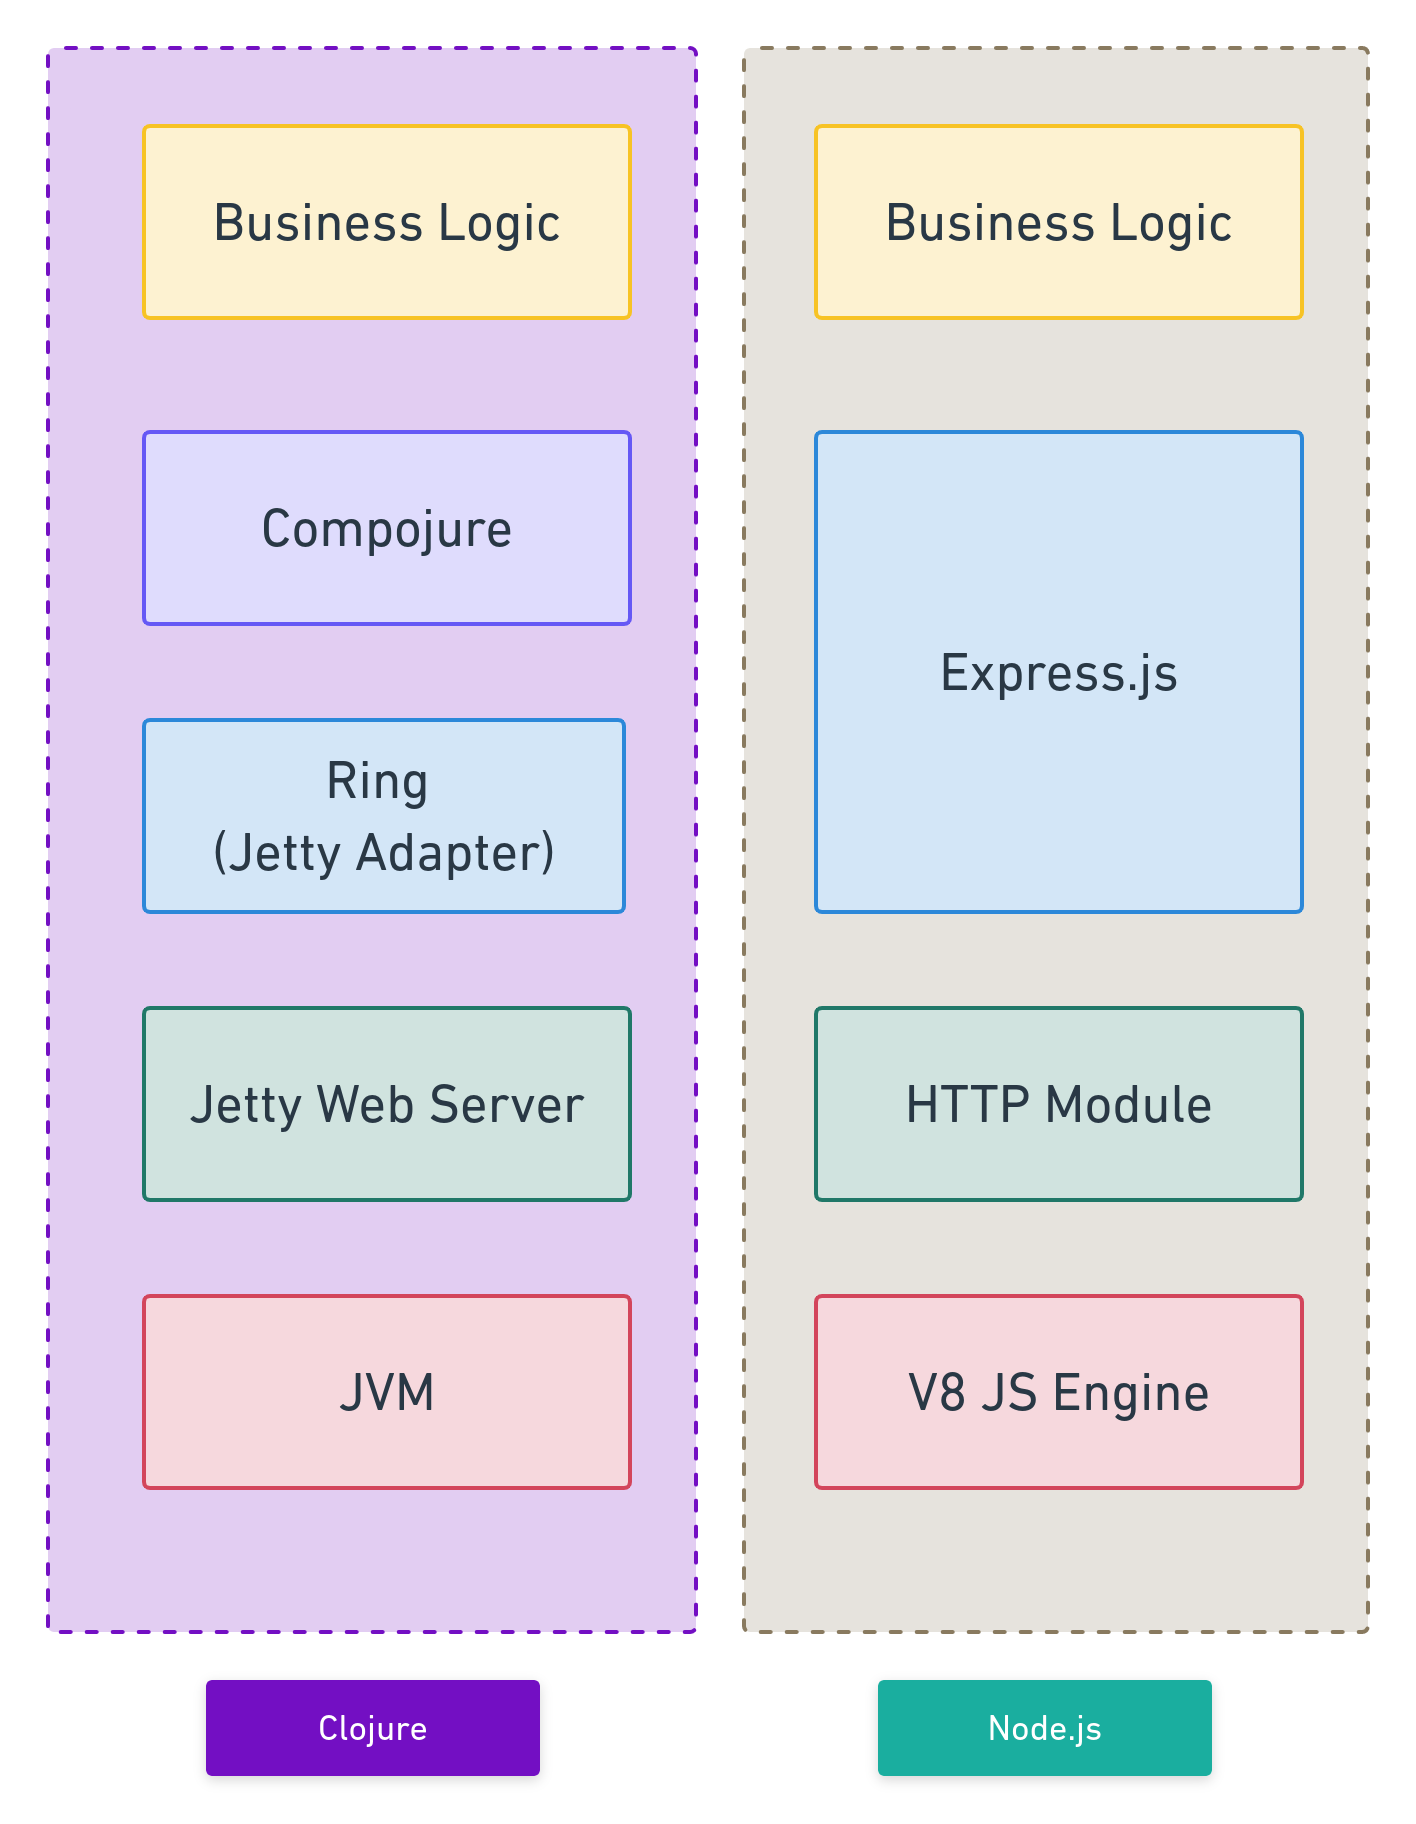
The primary goal is to learn how to build and deploy a project using Clojure. But before embarking on this journey, I first built an identical app using Node.js and the Express framework. This was helpful, as I did not have to spend much time focusing on the core business logic of the app and its front-end, while working with Clojure and the Ring framework. The Node.js version of the application is hosted on this GitHub Repository: https://github.com/oitee/remind-me
Thus, the goal of this project is to re-implement the backend of RemindMe, using Clojure, and the Ring framework. This project is hosted on a separate repository, called aspire.
Step 0: Adding Dependencies to a Leiningen Project
In a Leiningen project, dependencies and versions are added to the project.clj file (similar to the package.JSON file in Node projects). Each time we add or remove any dependency, we should run lein deps to install/remove the project’s dependencies.
For this project, we will need three dependencies:
-
Ring: Ring is a web-framework which is analogous to Express in Node.js. It is used for easier management of HTTP requests, through routes, handlers and middlewares. To quote from its own documentation,
By abstracting the details of HTTP into a simple, unified API, Ring allows web applications to be constructed of modular components that can be shared among a variety of applications, web servers, and web frameworks.
-
Ring-Jetty: Since Clojure does not come with a built-in HTTP server, unlike Node.js, we need to implement a HTTP server. Ring comes with a default support for Jetty, a Java web-server.
Ring-Jetty is the web server that comes with Ring. It is a Clojure wrapper around Jetty. It is perfectly fine and acceptable and has the easiest setup in my opinion. If you are going to use Ring, it’s the best option. In addition, it is well-maintained and has a lot of users. (Eric Normand)
We will use Ring-Jetty in this project. We can do this by including
ring-jetty-adapterin our dependencies. -
Compojure: This is a routing library for Ring that allows for easy handling of routes.
Once the above three dependencies are added, the project.clj will look like this:
(defproject aspire "0.1.0-SNAPSHOT"
  :description "FIXME: write description"
  :url "http://example.com/FIXME"
  :license {:name "EPL-2.0 OR GPL-2.0-or-later WITH Classpath-exception-2.0"
            :url "https://www.eclipse.org/legal/epl-2.0/"}
  :dependencies [[org.clojure/clojure "1.10.0"]
                 [ring/ring-core "1.9.5"]
                 [ring/ring-jetty-adapter "1.9.5"]
                 [compojure "1.6.2"]]
  :main ^:skip-aot aspire.core
  :target-path "target/%s"
  :profiles {:uberjar {:aot :all}})
Now, we need to run lein deps on Linux command line:
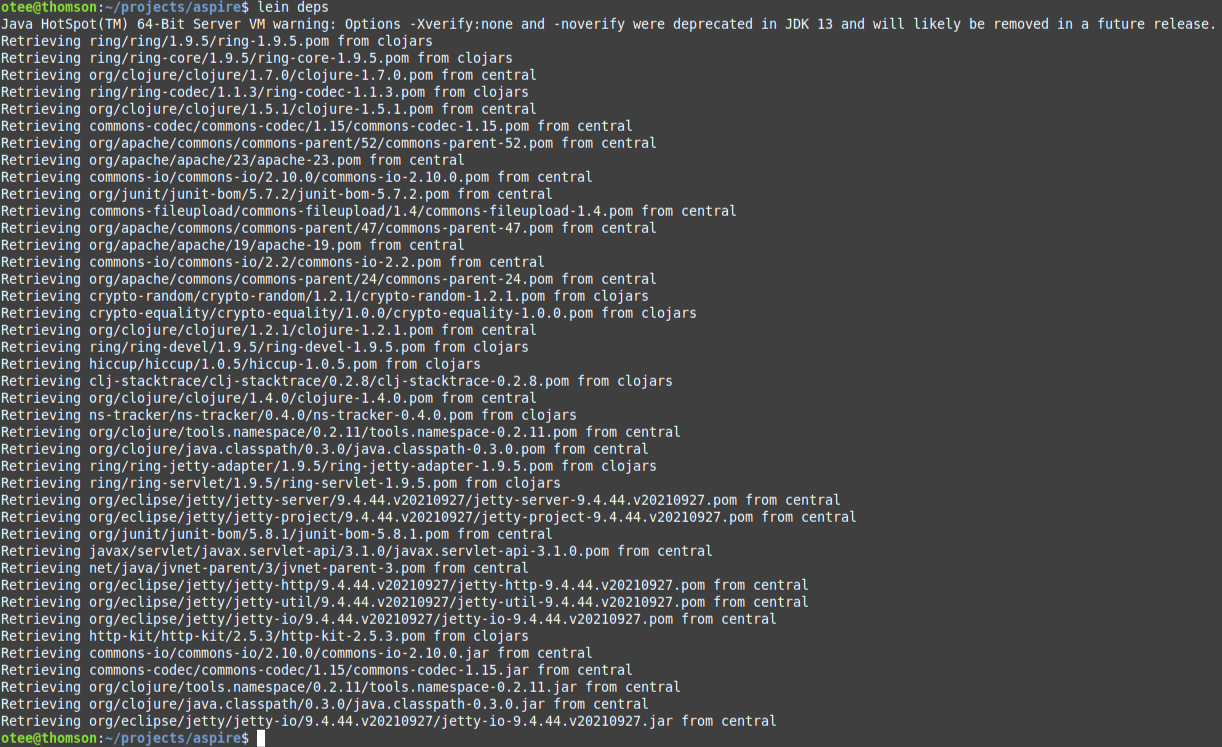
Beware: it may download the entire internet, when we first run lein deps. 😛
Step 1: Starting a ‘hello world’ server
To start a simple “hello world” server, we need to first write a handler function that will respond to every request.(documentation)
We then pass this handler to the run-jetty function to respond to requests. The run-jetty function starts an HTTP server that listens on a port and when a request is received on this port, calls the handler function. Later on, when we write more complicated code, the handler function will decide (based on request parameters, routes, methods etc) on how to respond to a certain request. In short, jetty is the HTTP server, run-jetty converts Clojure functions to work well with the Java jetty library.
(ns aspire.core
  (:gen-class)
  (:require [ring.adapter.jetty :as jetty]
            [clojure.pprint]))

(defn handler [request]
  (clojure.pprint/pprint request)
  {:status 200
   :headers {"Content-Type" "text/html"}
   :body "Hello World"})

(defn -main
  [& args]
  (jetty/run-jetty handler
                   {:port 3000
                    :join? true}))
Note that we always respond with hello world, and therefore requests to any path will receive the same response. If we print the request object, we can see all the necessary information that will be required for routing requests (eg. URI).
{:ssl-client-cert nil,
 :protocol "HTTP/1.1",
 :remote-addr "[0:0:0:0:0:0:0:1]",
 :headers
 {"sec-fetch-site" "none",
  "host" "localhost:3000",
  "user-agent"
  "Mozilla/5.0 (X11; Linux x86_64) AppleWebKit/537.36 (KHTML, like Gecko) Chrome/97.0.4692.71 Safari/537.36",
  ...
  "sec-gpc" "1"},
 :server-port 3000,
 :content-length nil,
 :content-type nil,
 :character-encoding nil,
 :uri "/aaa",
 :server-name "localhost",
 :query-string nil,
 :body
 #object[org.eclipse.jetty.server.HttpInputOverHTTP 0x2c9dcdc6 "HttpInputOverHTTP@2c9dcdc6[c=0,q=0,[0]=null,s=STREAM]"],
 :scheme :http,
 :request-method :get}
Step 2: Routing
In the above snippet, we used one function to respond to all requests. However, this would be hard while managing requests with different HTTP methods and/or paths.
As our project supports multiple routes, we will use routes provided by compojure to determine how a request on a certain route should be responded to (similar to an Express.js app).
So, the previous handler function should be replaced with app:
(ns aspire.core
  (:gen-class)
  (:require [ring.adapter.jetty :as jetty]
            [clojure.pprint]
            [compojure.core :as compojure]
            [compojure.route :as compojure-route]))

 (compojure/defroutes app
  (compojure/GET "/" [] "Hello World")
  (compojure-route/not-found "Page not found"))

(defn -main
  [& args]
  (jetty/run-jetty app
                   {:port 3000
                    :join? true}))
Note that:
defroutesis a macro that returns a Ring handler function. It allows us to define and combine multiple routes under one umbrella (rather, handler).- Individual
compojureroutes are macros as well (and they can be used on a stand-alone basis, i.e., withoutdefroutes) compojureroute macros are based on HTTP methods, i.e.,GETPUTetc.- The path of a request is matched with the first argument of a route macro (notice the
"/"aftercompojure/GET) - The last argument forms the response for that specific route. Once the HTTP method and path match, this argument will form the response. Instead of being a data value, it can be a function as well, which will have access to the incoming request to form the response.
- The second argument in the
GETmacro is used for parameters: form and query parameters (we will not be using it for this project) - There is a way to have a fall-back route, i.e.,
not-found, to send a response when none of the routes match (here, we are using thePage not foundresponse, when nothing matches).
Step 3: Adding Routes of ‘RemindMe’
These are the routes used in the Node.js version of the project:
router.get("/", renderHome);
router.get("/problem/:id", getProblem);
router.get("/next", goToNext);
router.get("/hint/:id", getHint);
router.get("/solution/:id", getSolution);
We can re-write these routes using compojure and provide specific route handler functions for each route:
(compojure/defroutes app
  (compojure/GET "/" params home)
  (compojure/GET "/problem/:id" params problem-by-id)
  (compojure/GET "/next" params next-problem)
  (compojure/GET "/hint/:id" params hint)
  (compojure/GET "/solution/:id" params solution)

  (compojure-route/not-found "Page not found"))
There are two things to note here:
- If the URL has a parameter in the path, we can use
:to refer to that parameter in the route. This kind of route definition is similar to that of Express.js. - The second argument to
GETis not a vector any more; we are just giving it a name (params) although we may not use it.
Now, let’s write the route handlers (i.e., the third argument to each compojure route). Let’s start with problem-by-id. Note that we need to access the parameter in the URL path. This can be accessed from the request map. We can print the request map to see the relevant params key.
(defn problem-by-id
  [request]
  (clojure.pprint/pprint request)
  "Problem Page")
Once we send a request to the path /problem/foo, we can see the entire request map:
{:ssl-client-cert nil,
 :protocol "HTTP/1.1",
 :remote-addr "[0:0:0:0:0:0:0:1]",
 :params {:id "foo"},
...
 :scheme :http,
 :request-method :get}
We can access the params key to see the value of our path parameter and write our handlers accordingly:
(defn home
  [request]
  "Home Page")

(defn problem-by-id
  [request]
  (let [id (:id (:params request))]
    (str "Problem Page for " id)))

(defn next-problem
  [request]
  "Next Problem Page")

(defn hint
  [request]
  (let [id (:id (:params request))]
    (str "Hint for " id)))

(defn solution
  [request]
  (let [id (:id (:params request))]
    (str "Solution for " id)))
Each of the above functions are mentioned in our compojure routes, such that when the request path and method match, the relevant function will be invoked.
Step 4: Code Reorganisation
Currently, all the handlers and routes are in the same namespace. We can split them into three namespaces: one for starting the server, one for defining the routes, and one for the route handlers:
aspire.core: This will start the serveraspire.routes: This will define the routesaspire.handlers: This will have the route handler functions
At this point, the project structure looks like this:
.
├── LICENSE
├── project.clj
├── README.md
├── resources
├── src
│   └── aspire
│       ├── core.clj
│       ├── handlers.clj
│       └── routes.clj
└── test
    └── aspire
        └── core_test.clj
aspire.core contains the server launching code:
(ns aspire.core
  (:gen-class)
  (:require [ring.adapter.jetty :as jetty]
            [clojure.pprint]
            [aspire.routes :as routes]))

(defn -main
  [& args]
  (jetty/run-jetty routes/app
                   {:port 3000
                    :join? true}))
aspire.routes contains the route definitions:
(ns aspire.routes
  (:require [compojure.core :as compojure]
            [compojure.route :as compojure-route]
            [aspire.handlers :as handlers]))

(compojure/defroutes app
  (compojure/GET "/" params handlers/home)
  (compojure/GET "/problem/:id" params handlers/problem-by-id)
  (compojure/GET "/next" params handlers/next-problem)
  (compojure/GET "/hint/:id" params handlers/hint)
  (compojure/GET "/solution/:id" params handlers/solution)

  (compojure-route/not-found handlers/not-found))
aspire.handlers contains the route handler functions:
(ns aspire.handlers)

(defn home
  [request]
  "Home Page")

(defn problem-by-id
  [request]
  (let [id (:id (:params request))]
    (str "Problem Page for " id)))

(defn next-problem
  [request]
  "Next Problem Page")

(defn hint
  [request]
  (let [id (:id (:params request))]
    (str "Hint for " id)))

(defn solution
  [request]
  (let [id (:id (:params request))]
    (str "Solution for " id)))

(defn not-found
  [request]
  "404: Page not Found")
Step 5: Implementing the Business Logic
Now that we have up the web server, defined our routes and route-handlers, we can build the actual product features, by appropriately defining the route handler functions. To do this, we need a templating engine and a way to read data from a JSON file.
- Templating Engine: The Node.js version of the app used Mustache templating engine. So, we need to support Mustache in Clojure as well. This will ensure that the front-end remains un-changed. For this, we can use
de.ubercode.clostache/clostacheas a dependency (documentation) - Data reading: The actual contents of the project (such as descriptions and solutions of problems etc) are stored in a JSON file which we need to read for serving the request. For this, we can use
org.clojure/data.jsonas a dependency (documentation)
Model Component
The JSON file containing the problem sets looks like this:
[
  {
    "id": "find-peak-element",
    "problemTitle": "Find Peak Element",
    "problemDescription": "A peak element is an element that is strictly greater than its neighbors. Given an integer array nums, find a peak element, and return its index. If the array contains multiple peaks, return the index to any of the peaks. You may imagine that nums[-1] = nums[n] = -∞. You must write an algorithm that runs in O(log n) time.",
    "hint": "Start with the middle element",
    "solution": "Start with mid element.\n        If this is a peak, then return it.\n        If this element is less than the next element, it means this element is part of an asceding slope. So, make lo = mid + 1,\n        If this element is less than the earlier element, move to the earlier sub-array, ie, hi = mid - 1\n        At the end, if lo === hi, lo is the peak element. Because it would mean we have reached the end of the array. And edges are peaks, if their adjacent element are smaller than them."
  },
  {
    "id": "boats-to-save-people",
    "problemTitle": "Boats to Save People",
    "problemDescription": "You are given an array people where people[i] is the weight of the ith person, and an infinite number of boats where each boat can carry a maximum weight of limit. Each boat carries at most two people at the same time, provided the sum of the weight of those people is at most limit.\n\n        Return the minimum number of boats to carry every given person.\n        ",
    "hint": "Start with sorting the array",
    "solution": "Sort the array.\n        For each people[hi] + people[lo] > limit, hi-- and boats++.\n        For others, hi-- lo++ boats++\n        At the end, if hi == lo (indicating that there was an odd number of elements), boats++"
  },
...
]
We need to parse this JSON file by using clojure.data.json
(ns aspire.db
  (:require [clojure.data.json :as json]))

(def data
  (json/read-str (slurp "resources/data.txt")
                 :key-fn keyword))
The read-str function (from the namespace clojure.data.json), takes a JSON string and converts it into a valid Clojure data-structure. Owing to the nature of the data contained in the JSON file, data will be a vector of hash-maps.
Note that we pass an additional argument to read-str, called :key-fn keyword. This ensures that the keys of the hash-maps generated by read-str are keywords instead of strings. Here’s how the hash-map looks like:
[{:id "find-peak-element",
  :problemTitle "Find Peak Element",
  :problemDescription
  "A peak element is an element that is strictly greater than its neighbors. Given an integer array nums, find a peak element, and return its index. If the array contains multiple peaks, return the index to any of the peaks. You may imagine that nums[-1] = nums[n] = -∞. You must write an algorithm that runs in O(log n) time.",
  :hint
  "Start with the middle element",
  :solution
  "Start with mid element.\n        If this is a peak, then return it.\n        If this element is less than the next element, it means this element is part of an asceding slope. So, make lo = mid + 1,\n        If this element is less than the earlier element, move to the earlier sub-array, ie, hi = mid - 1\n        At the end, if lo === hi, lo is the peak element. Because it would mean we have reached the end of the array. And edges are peaks, if their adjacent element are smaller than them."}
 {:id "boats-to-save-people",
  :problemTitle "Boats to Save People",
  :problemDescription
  "You are given an array people where people[i] is the weight of the ith person, and an infinite number of boats where each boat can carry a maximum weight of limit. Each boat carries at most two people at the same time, provided the sum of the weight of those people is at most limit.\n\n        Return the minimum number of boats to carry every given person.\n        ",
  :hint "Start with sorting the array",
  :solution
  "Sort the array.\n        For each people[hi] + people[lo] > limit, hi-- and boats++.\n        For others, hi-- lo++ boats++\n        At the end, if hi == lo (indicating that there was an odd number of elements), boats++"}
...
]
Now, we need to convert this vector into a hash-map, where each id will map to the respective hash-map (representing a problem set)
(def data-map
  (reduce
   (fn
     [accumulator element]
     (let [id (:id element)]
       (assoc accumulator id element)))
   {}
   data))
data-map is an id-to-problem-set hash-map. This will help in retrieving problems from their respective ids.
Also, we need two additional functions for our route-handlers:
get: to get a problem set from anid, andrandom-id: for returning a randomly chosenidfrom thedata-map
(defn get
  [id]
  (data-map id))

(defn random-id
  []
  (:id (rand-nth data)))
Route Handlers
We need to write the route handlers for each route. Let’s start with the route handler for /problem/:id
If the id parameter is correct, this route handler should generate the home page, with the necessary details of the respective problem set.
To achieve this, we need to render a template file (home.mustache), using clostache
(ns aspire.handlers
  (:require [clostache.parser :as mustache]
            [aspire.db :as db]))

(defn problem-by-id
  [request]
  (let [id (:id (:params request))
        data (db/get id)]
    (if-not data
      (str "Problem cannot be loaded, as ID is not valid " id)
      (mustache/render-resource "templates/home.mustache"
                                {:title (:problemTitle data)
                                 :description (:problemDescription data)}))))
The render-resource function of clostache.parser is a templating engine. The first argument should be the location of the template file. As per its documentation, render-resource can “render a resource from the classpath”.
A classpath is a “a sequence of paths that Clojure (or Java) checks when looking for a Clojure source file”. In a Leiningen project, the following directories are included in the classpath by default: the src, test, classes, test-resources, and resources directories(source). This means that our template file should be placed in any of these directories, to allow render-resource to access it. Accordingly, the template file (home.mustache) is placed in a sub-directory (templates) inside the resources directory of the project.
To write the route-handler for /next, we need to know how to send a redirection response. For this, we need to require ring.util.response name-space and use the redirect function therein:
(ns aspire.handlers
  (:require [clostache.parser :as mustache]
            [aspire.db :as db]
            [ring.util.response :as ring-response]))

(defn next-problem
  [request]
  (ring-response/redirect (str "/problem/" (db/random-id))))
The other route handlers are similarly constructed. (see the code here).
Deployment
In order this to run this project on our Google Cloud Platform (GCP) VM, we have to complete the following steps:
- Compile the code into a Java JAR
- Register our program as a service with
Systemd - Install an NGINX config file and set up a DNS entry
Compiling the Code to JAR
Because Clojure is hosted on the Java Virtual Machine, Clojure applications are run the same way as Java applications are run.
How does Java source code get complied?
- First, the Java Compiler converts the source code to Java Byte Code
- Once a program is converted into Java Byte Code, it can be executed by the Java Virtual Machine, which is the runtime environment for Java (Source)
- The Java Byte Code gets stored in class files; a Java ARchive file, also called JAR, can store a collection of class files (source)
Clojure source code gets converted to a specific JAR which can be executed by the JVM.
As our project is built using Leiningen, we can use lein jar to create the JAR file of our project. This file will be stored in the target directory of our project. Instead of simply using lein jar, we can use lein uberjar, which will create a JAR file containing the source code of our project, along with all its dependencies. A uberjar is a “a single standalone executable jar file”, which makes it easier to deploy. Once a uberjar is prepared, we can run it by simply using java -jar command. Optionally, we can use lein clean to clean our target directory. To run multiple commands successively, we can use lein do. So, here is how we first clean our target directory and then compile our project into a single JAR file:
$ lein do clean, uberjar

Java HotSpot(TM) 64-Bit Server VM warning: Options -Xverify:none and -noverify were deprecated in JDK 13 and will likely be removed in a future release.
Compiling aspire.core
2022-01-24 18:38:32.790:INFO::main: Logging initialized @1495ms to org.eclipse.jetty.util.log.StdErrLog
WARNING: seqable? already refers to: #'clojure.core/seqable? in namespace: clojure.core.incubator, being replaced by: #'clojure.core.incubator/seqable?
WARNING: seqable? already refers to: #'clojure.core/seqable? in namespace: clostache.parser, being replaced by: #'clojure.core.incubator/seqable?
WARNING: get already refers to: #'clojure.core/get in namespace: aspire.db, being replaced by: #'aspire.db/get
Compiling aspire.db
WARNING: get already refers to: #'clojure.core/get in namespace: aspire.db, being replaced by: #'aspire.db/get
Compiling aspire.handlers
Compiling aspire.routes
Created /home/otee/projects/aspire/target/uberjar/aspire-0.1.0-SNAPSHOT.jar
Created /home/otee/projects/aspire/target/uberjar/aspire-0.1.0-SNAPSHOT-standalone.jar
In order to run the project from a JAR, we need to ensure that we are not reading any files from the local file system. In the present project, all the non-Clojure files are read from the classpath. In the case of data.txt, which hosts the JSON data-set, we cannot directly use the file-path while slurping it. Instead, we have to use the resource method to read file from the classpath instead:
(slurp (clojure.java.io/resource "data.txt"))
Deploying the uberjar to GCP VM
Now that we have our JAR file, we need to send it across to our VM on GCP (alias calculus). We can do this by using the rsync command, which enables the transfer of files over SSH. Interestingly, it synchronizes the data being transferred between the different machines: ensuring that only those files are transferred which are new or updated.
rsync /home/otee/projects/aspire/target/uberjar/aspire-0.1.0-SNAPSHOT-standalone.jar calculus:/home/oitee.codes/projects
Once the JAR is deployed, we can run it on the VM using:
java -jar -Xmx32m /home/oitee.codes/projects/aspire-0.1.0-SNAPSHOT-standalone.jar
The -Xmx flag is used to specify the maximum heap memory allocation for running a Java program. When we use -Xmx32m, we restrict the memory allocation to 32 MB.
Registering with systemd
We need to use systemd, to ensure that our application runs consistently. To set up systemd for our application, we need to write a new configuration file (remind.service) in /lib/systemd/system.
sudo nano /lib/systemd/system/remind.service
This file should contain the following details:
[Unit]
Description=remind
Documentation=https://github.com/oitee/aspire#readme
After=network.target

[Service]
Environment=PORT=4003
Type=simple
User=oitee.codes
ExecStart=/usr/bin/java -Xmx32m -jar /home/oitee.codes/projects/aspire-0.1.0-SNAPSHOT-standalone.jar
Restart=on-failure

[Install]
WantedBy=multi-user.target
For a more detailed explanation of each of these terms, see this useful post or my earlier post on setting up my VM on Google Cloud Compute.
Note that we need to specify the value of the internal port(PORT=4003) where our server will be listening under the Environment entry. Also, under the ExecStart entry, we cannot use java; instead we have to mention the location of the executable Java file, i.e., /usr/bin/java. (/usr/bin is the “primary directory of executable commands on the system”).
Now, we need to run the following commands, to have systemd run our application (for more on this, read this previous post):
sudo systemctl daemon-reload
sudo systemctl start remind.service
sudo systemctl enable remind.service
This should run our application. To see the status of the status of our application, we can use the following command:
sudo systemctl status remind.service

● remind.service - remind
     Loaded: loaded (/lib/systemd/system/remind.service; enabled; vendor preset: enabled)
     Active: active (running) since Mon 2022-01-24 09:25:30 UTC; 18s ago
       Docs: https://github.com/oitee/aspire#readme
   Main PID: 178875 (java)
      Tasks: 22 (limit: 1159)
     Memory: 119.4M
     CGroup: /system.slice/remind.service
             └─178875 /usr/bin/java -Xmx32m -jar /home/oitee.codes/projects/aspire-0.1.0-SNAPSHOT-standalone.jar

Jan 24 09:25:30 calculus systemd[1]: Started remind.
Jan 24 09:25:33 calculus java[178875]: 2022-01-24 09:25:33.385:INFO::main: Logging initialized @2707ms to org.eclipse.jetty.util.log.StdErrLog
Jan 24 09:25:35 calculus java[178875]: WARNING: seqable? already refers to: #'clojure.core/seqable? in namespace: clojure.core.incubator, being replaced by: #'clojure.core.incubator/seqable?
Jan 24 09:25:35 calculus java[178875]: WARNING: seqable? already refers to: #'clojure.core/seqable? in namespace: clostache.parser, being replaced by: #'clojure.core.incubator/seqable?
Jan 24 09:25:35 calculus java[178875]: WARNING: get already refers to: #'clojure.core/get in namespace: aspire.db, being replaced by: #'aspire.db/get
Jan 24 09:25:35 calculus java[178875]: 2022-01-24 09:25:35.264:INFO:oejs.Server:main: jetty-9.4.44.v20210927; built: 2021-09-27T23:02:44.612Z; git: 8da83308eeca865e495e53ef315a249d63ba9332; jvm 17.0.1+12-Ubuntu-120.04
Jan 24 09:25:35 calculus java[178875]: 2022-01-24 09:25:35.454:INFO:oejs.AbstractConnector:main: Started ServerConnector@4052913c{HTTP/1.1, (http/1.1)}{0.0.0.0:4003}
Jan 24 09:25:35 calculus java[178875]: 2022-01-24 09:25:35.456:INFO:oejs.Server:main: Started @4815ms
Using NGINX to redirect traffic from Port 80
To redirect requests to port 80 of our VM to the specific internal port our server will be listening to (4003) , we need to write a configuration file for NGINX. First, we should add a configuration file remind.otee.dev to the /etc/nginx/sites-available.
sudo nano /etc/nginx/sites-available/remind.otee.dev
This file should contain the following details:
server {
        listen 80;
        listen [::]:80;
        server_name remind.otee.dev;
        location / {
        proxy_pass http://127.0.0.1:4003;
        }
}
Now, we need to enable this configuration by adding a symbolic link to it in the /etc/nginx/sites-available directory:
sudo ln -s /etc/nginx/sites-available/remind.otee.dev /etc/nginx/sites-enabled/remind.otee.dev
Next, we should restart NGINX:
sudo systemctl status nginx
sudo systemctl restart nginx
Now that NGINX has been configured to redirect requests to remind.otee.dev to the internal port 4003, we need to set up the custom domain remind.otee.dev and then enforce HTTPS, by using the freely available Certbot tool provided by Lets Encrypt.
This concludes the deployment!🎉
The project is live at: https://remind.otee.dev
Further Improvements
Here are some of the improvements that can be added in future:
- Move the data-set to SQLite. This will allow us to write data on the file. For example, to track analytics of our app: the number of views, requests for hints and solutions
- Enable adding of new problem sets from the UI:
- This can be done by creating a ‘users’ table, with admin usernames and passwords (using good password storage principles as we did with Twirl)
- Maintaining sessions on addition routes (Middleware for cookie parsing)