For Your Eyes Only: Authentication using OAuth 2.0
How can we allow third-party apps to read our inbox without allowing them to send DMs on our behalf? How do we log-in using Google? What is OAuth and how does it work? These are some of the questions I will tackle in this post.
This post is divided into two parts. First, I discuss the basics of OAuth 2.0 Authorization Framework (hereinafter, ‘OAuth’). Next, I talk about how I built a simple app, using Google’s OAuth framework.
Before moving ahead, here’s a confession: much of the first part of this post has been written by reading the Internet Engineering Task Force’s (IETF) RFC No. 6749.
Part I: Understanding OAuth
Problem with traditional all-access approach
Traditionally, if a third-party application needed to request a protected resource from a server (e.g. the inbox of a user), it would need to provide the authentication credentials of the owner of that resource(i.e., the user). In other words, if a user wants to grant access to a third-party service provider (like an application that summarises new mails from your inbox), to their protected resources stored in a server (say, their Gmail inbox), the user would have to share their authentication credentials (i.e., their Gmail username and password) with the third-party application. This is inconvenient because:
- We need to trust the third-party application with our credentials (we know how storing passwords can be a tricky business)
- We cannot prevent the third-party application from mis-using their access (say, by maliciously sending spam mails to the user’s contacts)
- We cannot prevent the third-party application from using their access beyond a period of time (or more than once)
- Revoking access to a single third-party application is also a hassle: we cannot revoke access to one application without revoking access to all other third-party applications.
OAuth: A More Secure Way to Grant Access
OAuth addresses the above problems by introducing an authorization layer and separating the third-party service provider from the resource owner (i.e. the user).
OAuth is an open standard that allows resource owners (i.e. users) to securely grant third-parties access to their resources stored in a server. Instead of obtaining the user’s credentials, OAuth ensures that third-party applications obtain access tokens from the server.
An access token is a “string denoting a specific scope, lifetime, and other access attributes”. A third-party application has to first obtain an access token from an ‘authorization server’, after the resource owner provides their consent. This access token can be used to gain access to the specific resources of the user (subject to other restrictions, such as duration of access) that are actually needed by the third-party to provide their service. In the above example, the user will grant the mail-summarizing application access to read their recent mails from their Gmail account (and no more), by relying on the issuance of access tokens.
Key Players in OAuth
Before moving forward, it is important to note the important players in this authentication-authorization-access matrix:
- Resource Owner: This is the resource owner (or, user), who owns the protected resource and can grant access to it.
- Resource Server: The server actually hosting the protected resource
- Client: The third-party application which wants to gain access to a protected resource(s) of the resource owner
- Authorization Server: The server in charge of granting the client access tokens, after authenticating the resource owner and their authorization.
Authentication (AuthN) vs Authorization (AuthZ)
Authentication refers to the validation the identity of a user, i.e., whether users are who they claim to be. Authorization refers to the process of verifying what a user is permitted to have access to, i.e., what users can and cannot access. OAuth is an authorization framework; how authentication is done is not a part of its scope.
Key Steps
Essentially, OAuth involves four steps:
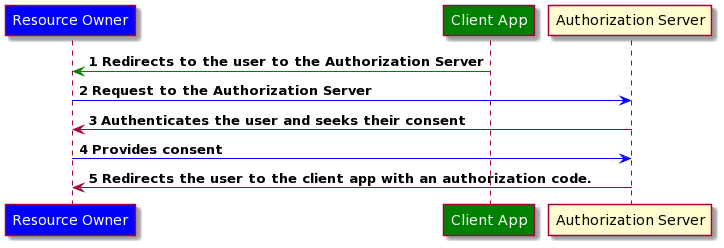
- Grant of authorization: The client app requests authorization from the resource owner (i.e., consent to gain access to their protected resource). The client app receives an authorization grant from the resource owner. Technically, the resource owner can grant the authorization themselves. But it is more secure (and therefore, ideal) if the grant of authorization is done via the authorization server. However, note that, the process of how the authroization server authenticates the resource owner (to generate the authorization grant) is outside the scope of OAuth framework. To quote the RFC:
The authorization server MUST first verify the identity of the resource owner. The way in which the authorization server authenticates the resource owner (e.g., username and password login, session cookies) is beyond the scope of this specification.
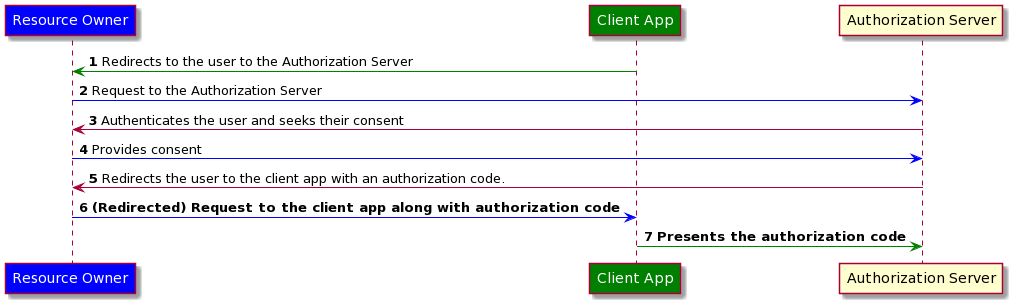
When the authorization server (acting as an intermediary) obtains the consent from the resource owner, it issues the client app with an ‘authorization code’. Essentially, “the client directs the resource owner to an authorization server, which in turn directs the resource owner back to the client with the authorization code”. Before redirecting the resource owner back to the client, the authorization server does the crucial task of authenticating the resource owner and seeking their consent.
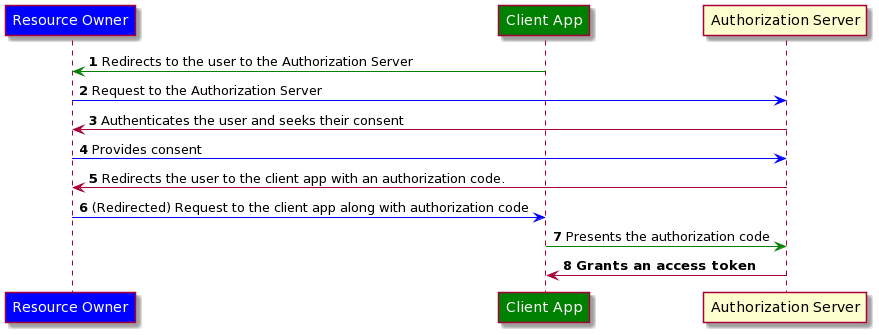
- Request for access token: Once the client app has obtained the authorization grant (representing that the resource owner has consented to the client’s request for accessing their resources), it requests an access token from the authorization server, by presenting the authorization grant. In the case where the authorization grant is managed by the authorization server, the client would be presenting the authorization code to the authorization server.
- Authentication of client: The authentication server first validates the client app. It also confirms the validity of the authorization grant. If all is well, it grants an access token to the client.
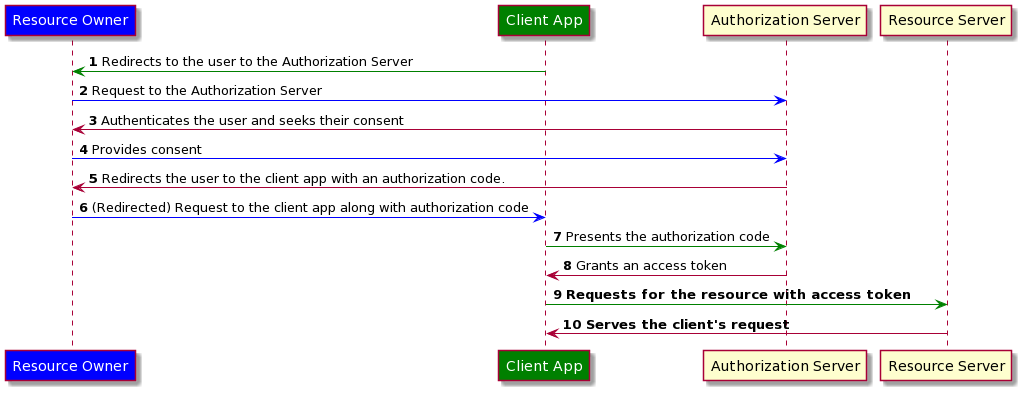
- Request for protected resource: The client app requests for the protected resource from the resource server, by presenting the access token. The resource server validates the access token and serves the client’s request.
Refresh Tokens
At the time of issuing access tokens, the authorization server may also issue refresh tokens to the client. A refresh token is used to obtain “a new access token when the current access token becomes invalid or expires”. Unlike access tokens, refresh tokens are “intended for use only with authorization servers and are never sent to resource servers”. Essentially, when the access token expires, the resource server will not permit the client app from gaining access to the protected resource. Instead, the client app will have to seek a new access token from the authorization server, by producing the refresh token that was issued along with the access token.
Client Registration
Before a client app can request for access tokens, it should register itself with the authorization server. At the time of registration, the authorization server (typically) issues the following:
- Client identifier: It is a unique string representing the client app. It is not a secret; it is exposed to the resource owner; it is not (solely) used for authenticating the client (at the time of grant of access tokens)
- Client secret: List of client credentials, which are used by the authorization server to authenticate the client.
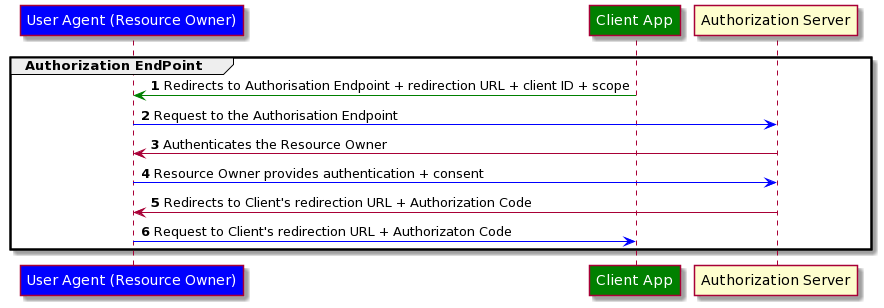
Protocol End-Points
The authorization process involves two server end-points: authorization end-point and token end-point.
Authorization End-Point
The client app redirects the user-agent (i.e., browser) of the resource owner to this location. The authorization server should serve GET requests to this end-point; optionally, it can support POST requests as well. Along with the redirection response, the client app includes the following parameters: the client identifier, the requested scope, and a redirection URL of the client. When the authorization server receives a request to this location (also called ‘authorization request’), it first verifies the identity of the resource owner and then sends a response containing the authorization code. The response redirects the user-agent of the resource owner back to a specific end-point of the client app’s server, namely, the redirection URL. This ‘redirection end-point’ is typically declared by the client app, at the time of registration. As a client can register multiple redirection end-points, the authorization server confirms that the redirection end-point mentioned in the authorization request tallies with one of the redirection URLs registered by the client app.
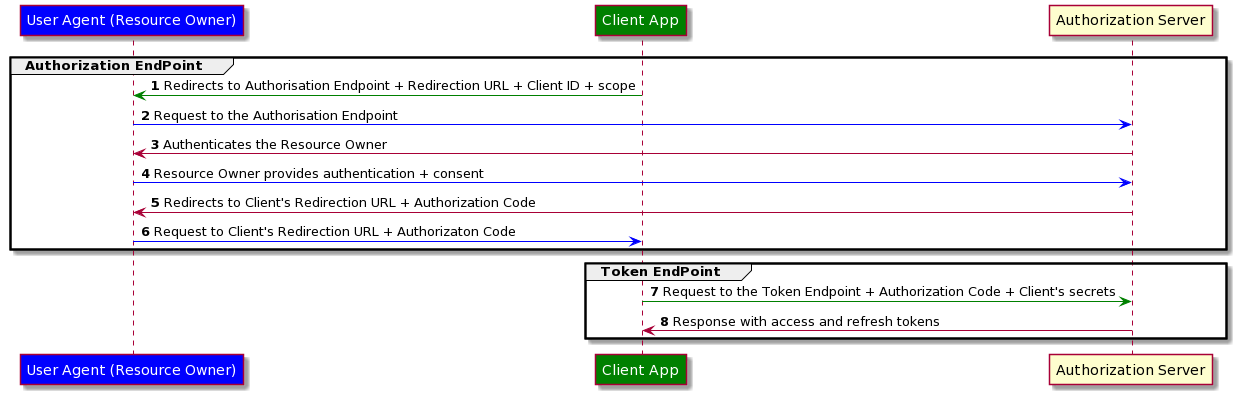
Token End-Point
This end-point is used by the client app to obtain an access token. Requests to this end-point should be made using the POST method only. At this stage, the authorization server authenticates the client app. To this end, the request contains the client’s secrets (generated at the time of registration). The authorization server checks the validity of the authorization code, verifies the client’s credentials etc. Thereafter, it issues the access token and the refresh token.
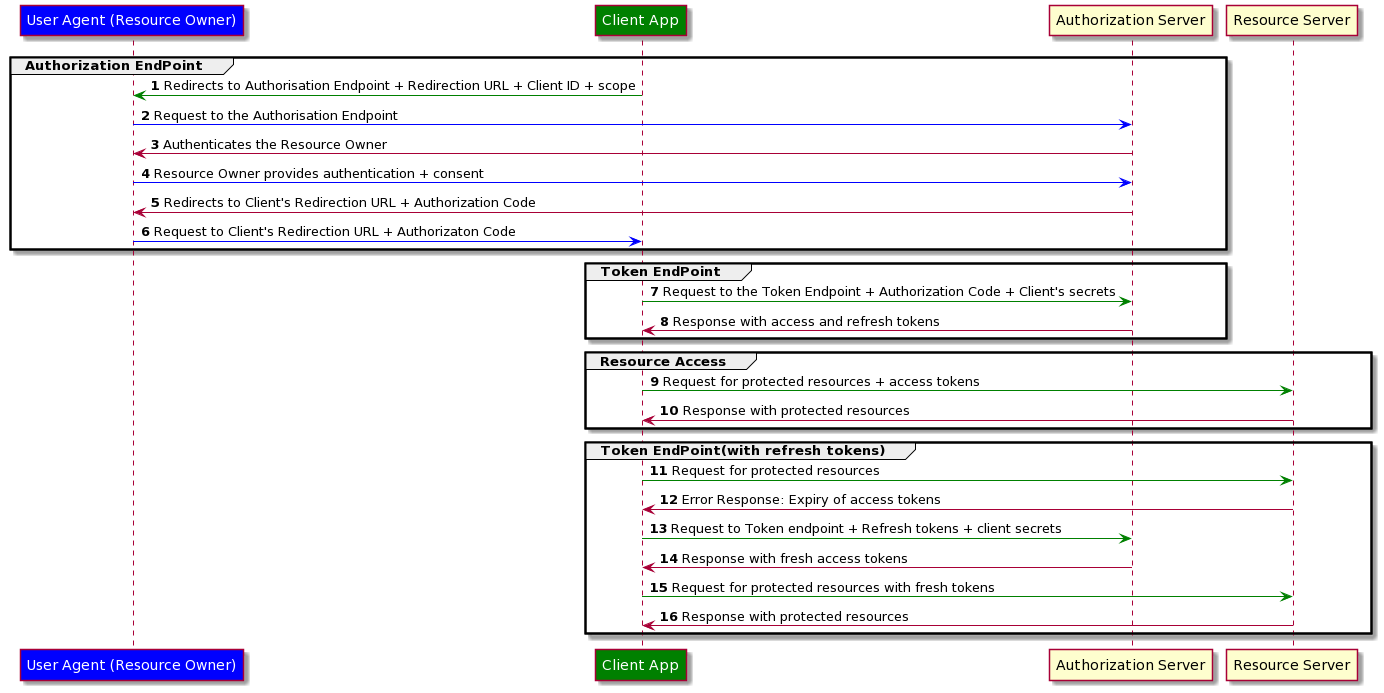
Once the access token is received, the client app can request for the protected resource(s) from the resource server.

When the access token expires, the request for resource(s) from the resource server will fail. At this point, the client app will have to make a fresh request for an access token from the authorization server. This request will be similar to the original request for tokens: it will be made to the token end-point, and it will be accompanied by the client app’s secrets.
Part II: Using OAuth to Access Google’s APIs
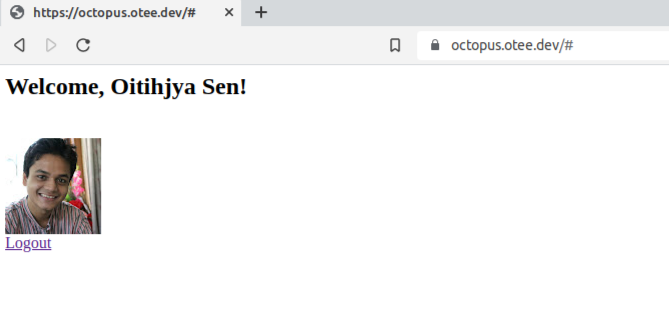
To see how OAuth actually works in practice, I have built a simple project, octopus. It is deployed here: https://octopus.otee.dev/. It does just one thing: allows users to log-in using their Google accounts. If successful, the profile photo and name of the user is displayed.
Goal
The goal of this project: to leverage Google’s authorization server, to
- Authenticate users: By doing this, we do not need to maintain a database to store users of the application (and their credentials)
- Access users’ information from Google: Using OAuth, we can access necessary information of users from the relevant resource server
Once access tokens and refresh tokens are generated, they are sent back to the user, as cookies. Thus, for subsequent requests by the same user, we rely on their cookies, to make requests with Google’s API.
Key Steps
Here is a brief walk-through of the steps that enables octopus to access Google APIs by using OAuth 2.0:
Obtain Client Credentials
First, we must register our client application and generate the client ID and client secret. This is done by visiting the ‘Credentials’ tab on the Google API Console. We also set the redirect URL(s) of our app.
Create an Authorization Request
The next step is to create an authorization request. The authorization end-point for Google’s authorization server is: https://accounts.google.com/o/oauth2/v2/auth. The request sent to this end-point should contain certain parameters (called ‘authorization parameters’), that can identify the client application (using the Client ID), specify the redirect URL, the scope of access etc.
Redirect the User to the Authorization End-Point
When the user needs to log-in, our app will redirect the user to the authorization end-point, by sending the authorization request created above. Here’s the authorization request created by octopus:
https://accounts.google.com/o/oauth2/v2/auth?
client_id=358241736286-fopbu1q67d0v4gdrlntshii0j30nh9jb.apps.googleusercontent.com&
redirect_uri=https://octopus.otee.dev/callBack&
scope=https://www.googleapis.com/auth/userinfo.profile&
response_type=code&
prompt=consent&
access_type=offline
Google Seeks User Consent
Once Google’s authorization server receives the authorization request, it authenticates the user and displays a consent window showing the name of the application and the scopes of access requested. Here’s the consent window displayed for octopus:

Redirection to Client’s Redirect URL
Once the user provides their consent, the authorization server redirects the user to the redirect URL of our app along with the authorization code. Here’s how the request to the redirection endpoint is generated by the authorization server:
https://octopus.otee.dev/callBack?
code=XXX&
scope=profile+https://www.googleapis.com/auth/userinfo.profile
Request for Access Tokens
Once our app receives the authorization code (at the redirection URL), it generates a request to the token end-point of the authorization server, namely https://oauth2.googleapis.com/token. This should be a POST request accompanied with certain parameters that authenticates our app (client ID and client secret), discloses the authorization code, specifies the redirect URL, etc. Here’s how the octopus generates a request for receiving access tokens:
/**
Values of the following variables are accessed using environment variables:
baseUrl (i.e., the domain name of the app)
clientID (i.e., the client ID of the app)
client_secret (i.e., the client secret of the app)
redirect_url (i.e., the redirect URL of the app)

Also, the variable ‘code’ carries the value of the authorization code received from the authorization server.
*/

const grant = "authorization_code";
const redirect_uri = `${baseUrl}/callBack`;
const params = new URLSearchParams();

params.append("client_id", clientID);
params.append("client_secret", client_secret);
params.append("code", code);
params.append("grant_type", grant);
params.append("redirect_uri", redirect_uri);
const tokens = await fetch("https://oauth2.googleapis.com/token", {
method: "post",
body: params,
}).then((res) => res.json());
Response with Access and Refresh Tokens
Google’s Authorization server responds with a JSON containing access and refresh tokens. Here’s an example of a JSON returned by the Authorization server:
{
access_token: 'XX',
expires_in: 3599,
refresh_token: 'XXXXX',
scope: 'https://www.googleapis.com/auth/userinfo.profile',
token_type: 'Bearer',
}
Making API Calls
Now that we have the access token, we can make requests with Google’s resource server which hosts the resource we need. In the case of octopus, the resource server end-point is https://www.googleapis.com/oauth2/v3/userinfo?alt=json. When we send a request with valid tokens, we get a response payload carrying essential details about the user:
{
id: '104...',
name: 'Oitihjya Sen',
given_name: 'Oitihjya',
family_name: 'Sen',
picture: 'https://lh3.googleusercontent.com/a-/AOh14GgD6lcmhewdz51x-t-uJACtZu8HstvP6csiBrRhBA=s96-c',
locale: 'en'
}
Using this response, we can display the user’s name and image:
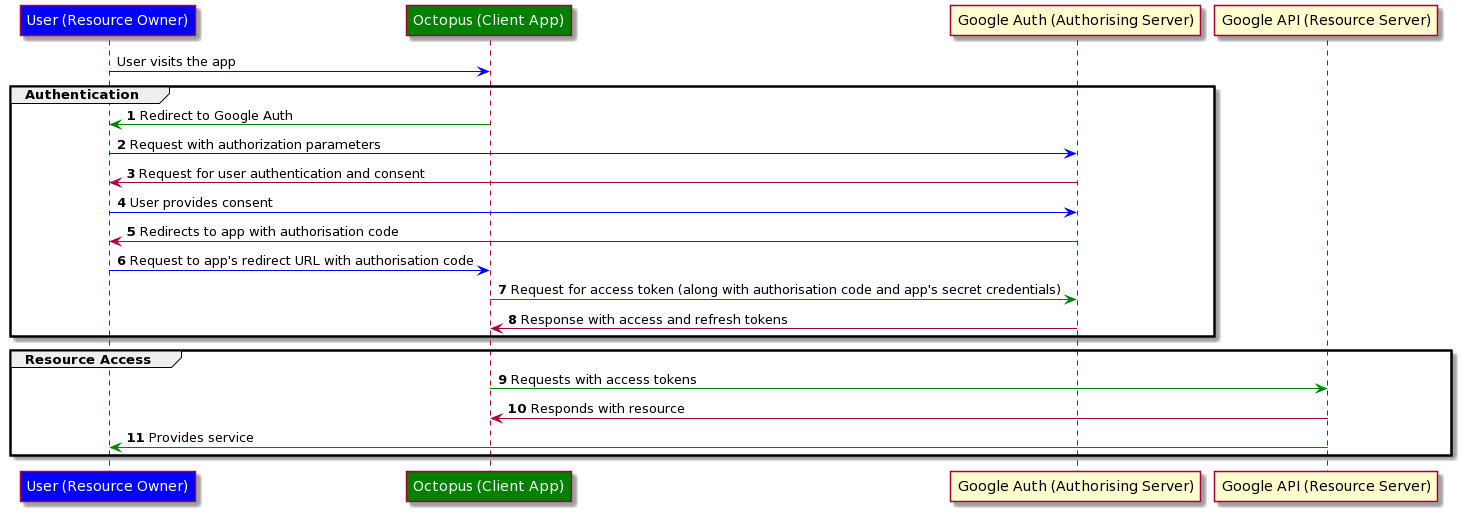
Here’s a sequence diagram summarising the key steps:
Concluding Thoughts
Clearly, OAuth is a useful and convenient way to allow third-party apps to safely access resources of users. But to make this work, there are several steps to follow (as explained above). As I was writing this post to explain these steps, there were a few questions that popped in my mind, which I shall briefly address here:
- Why is the client ID not a secret?
- Because it is used to merely identify the client at the time of seeking the user’s consent. Also, disclosing the client ID at the time of seeking the user’s authorization ensures that the authorization code is applicable only for that application and that user. It cannot be used by any other app to access resources of that user; nor can the same app use the same code to get access tokens of other users.
- Why can we not simply rely on authorization codes? Why do we need access tokens?
- The authorization code only authenticates the user. As the client ID is not a secret identifier, a third application can use my application’s ID to generate an authorization code. This is why we need an additional layer, where the authorizing server can authenticate the client application as well (by checking its secret credentials).
- Why do we need refresh tokens, anyway?
- The way the OAuth framework is designed, ensures that the resource server is not required to authenticate the client app or the resource owner. It’s job is only to verify the legitimacy of the access tokens produced before it. Now, if the user has a change of heart and wishes to revoke their permission, the resource server will have no way to know this, as the original access tokens will still work. For this reason, access tokens have limited lifetimes. Everytime an access token expires, the client app is forced to re-authenticate itself with the authorizing server. The authorizing sevrer–as it interacts with the resource owner–can prevent generation of further access tokens, if the resource owner revokes their consent.
octopus is hosted on this GitHub repository:https://github.com/oitee/octopus. Pull requests are always welcome!