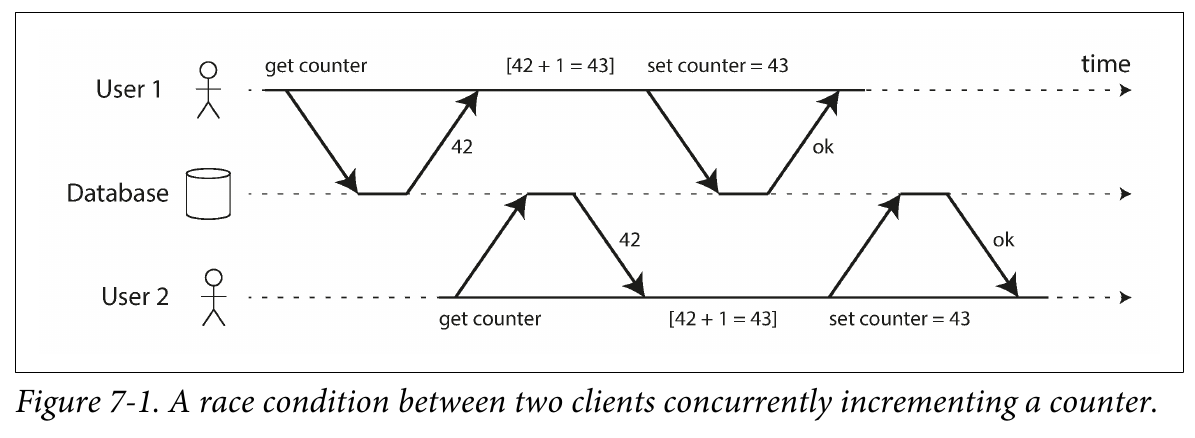
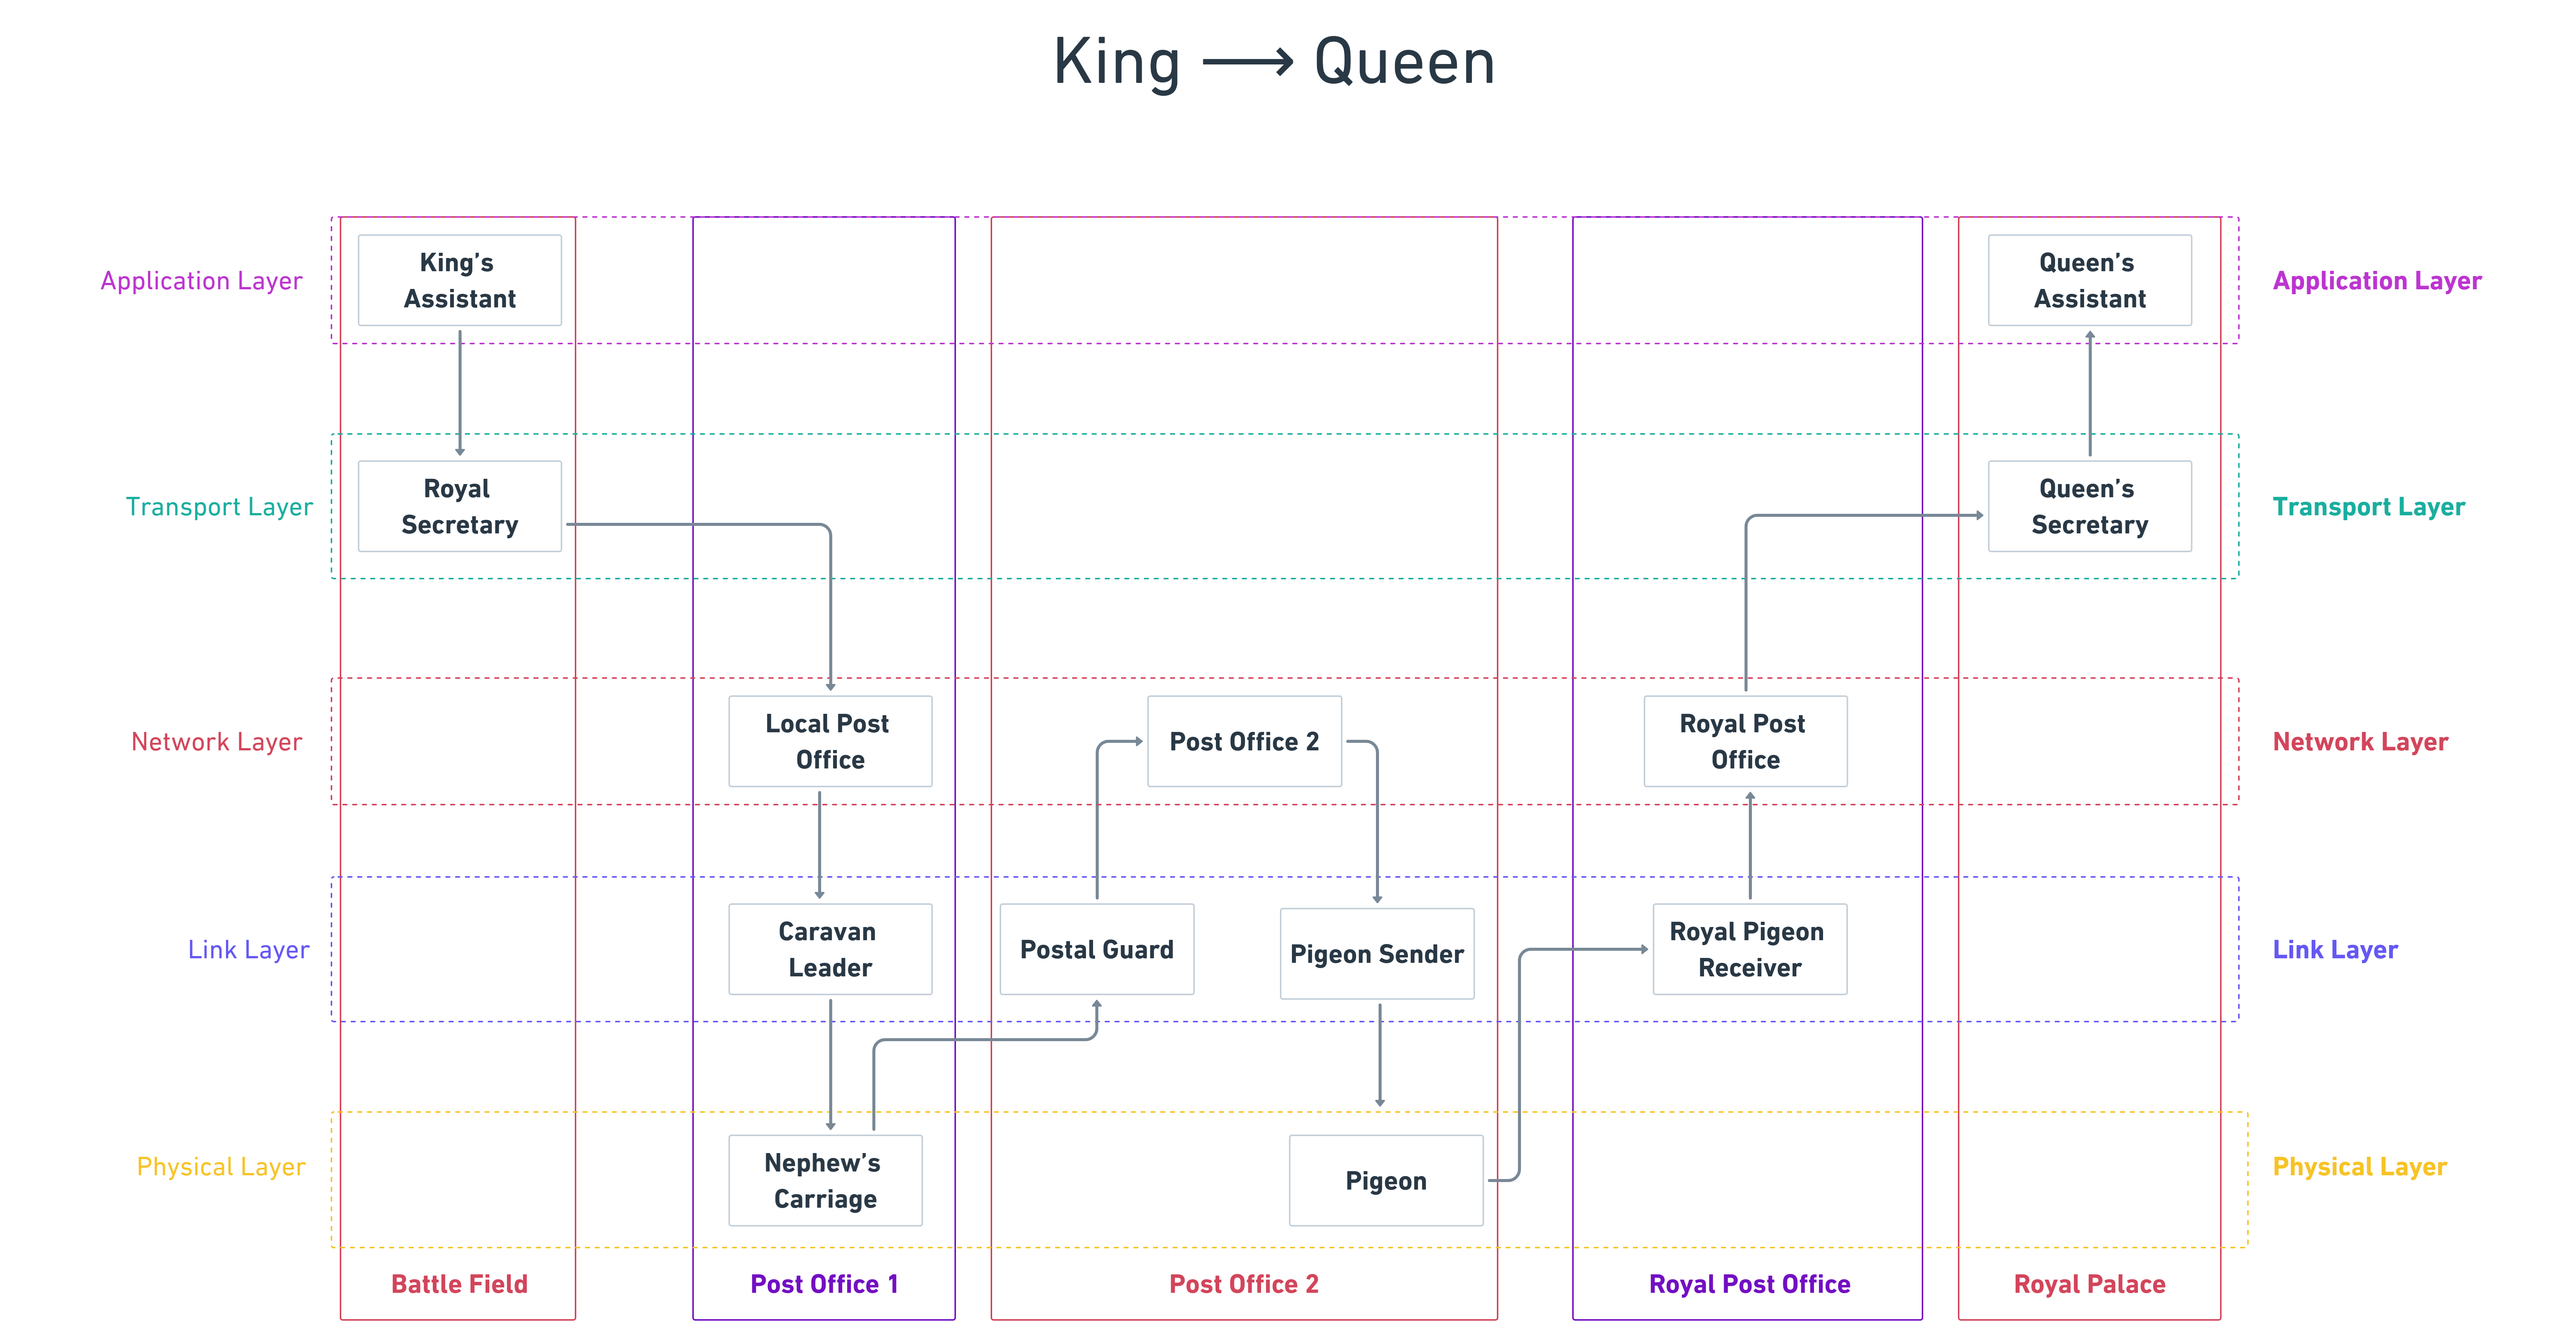
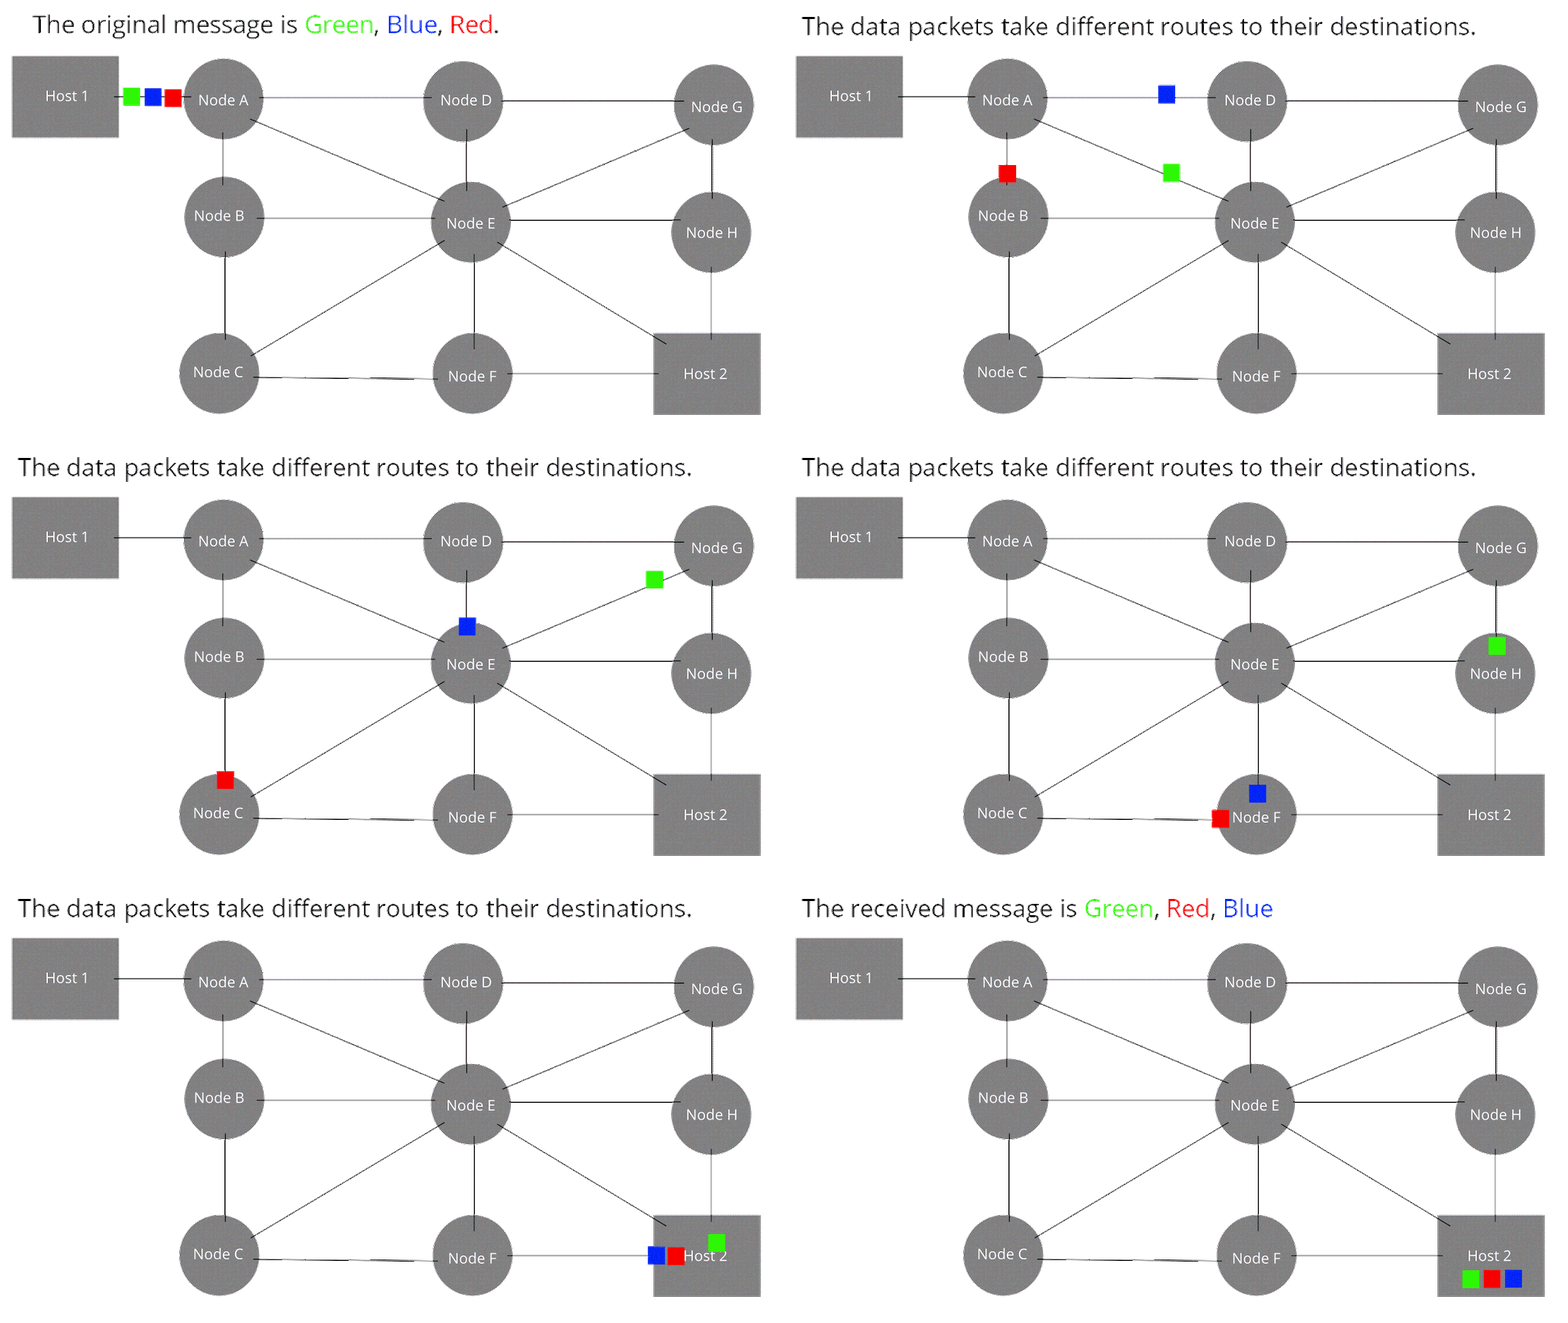
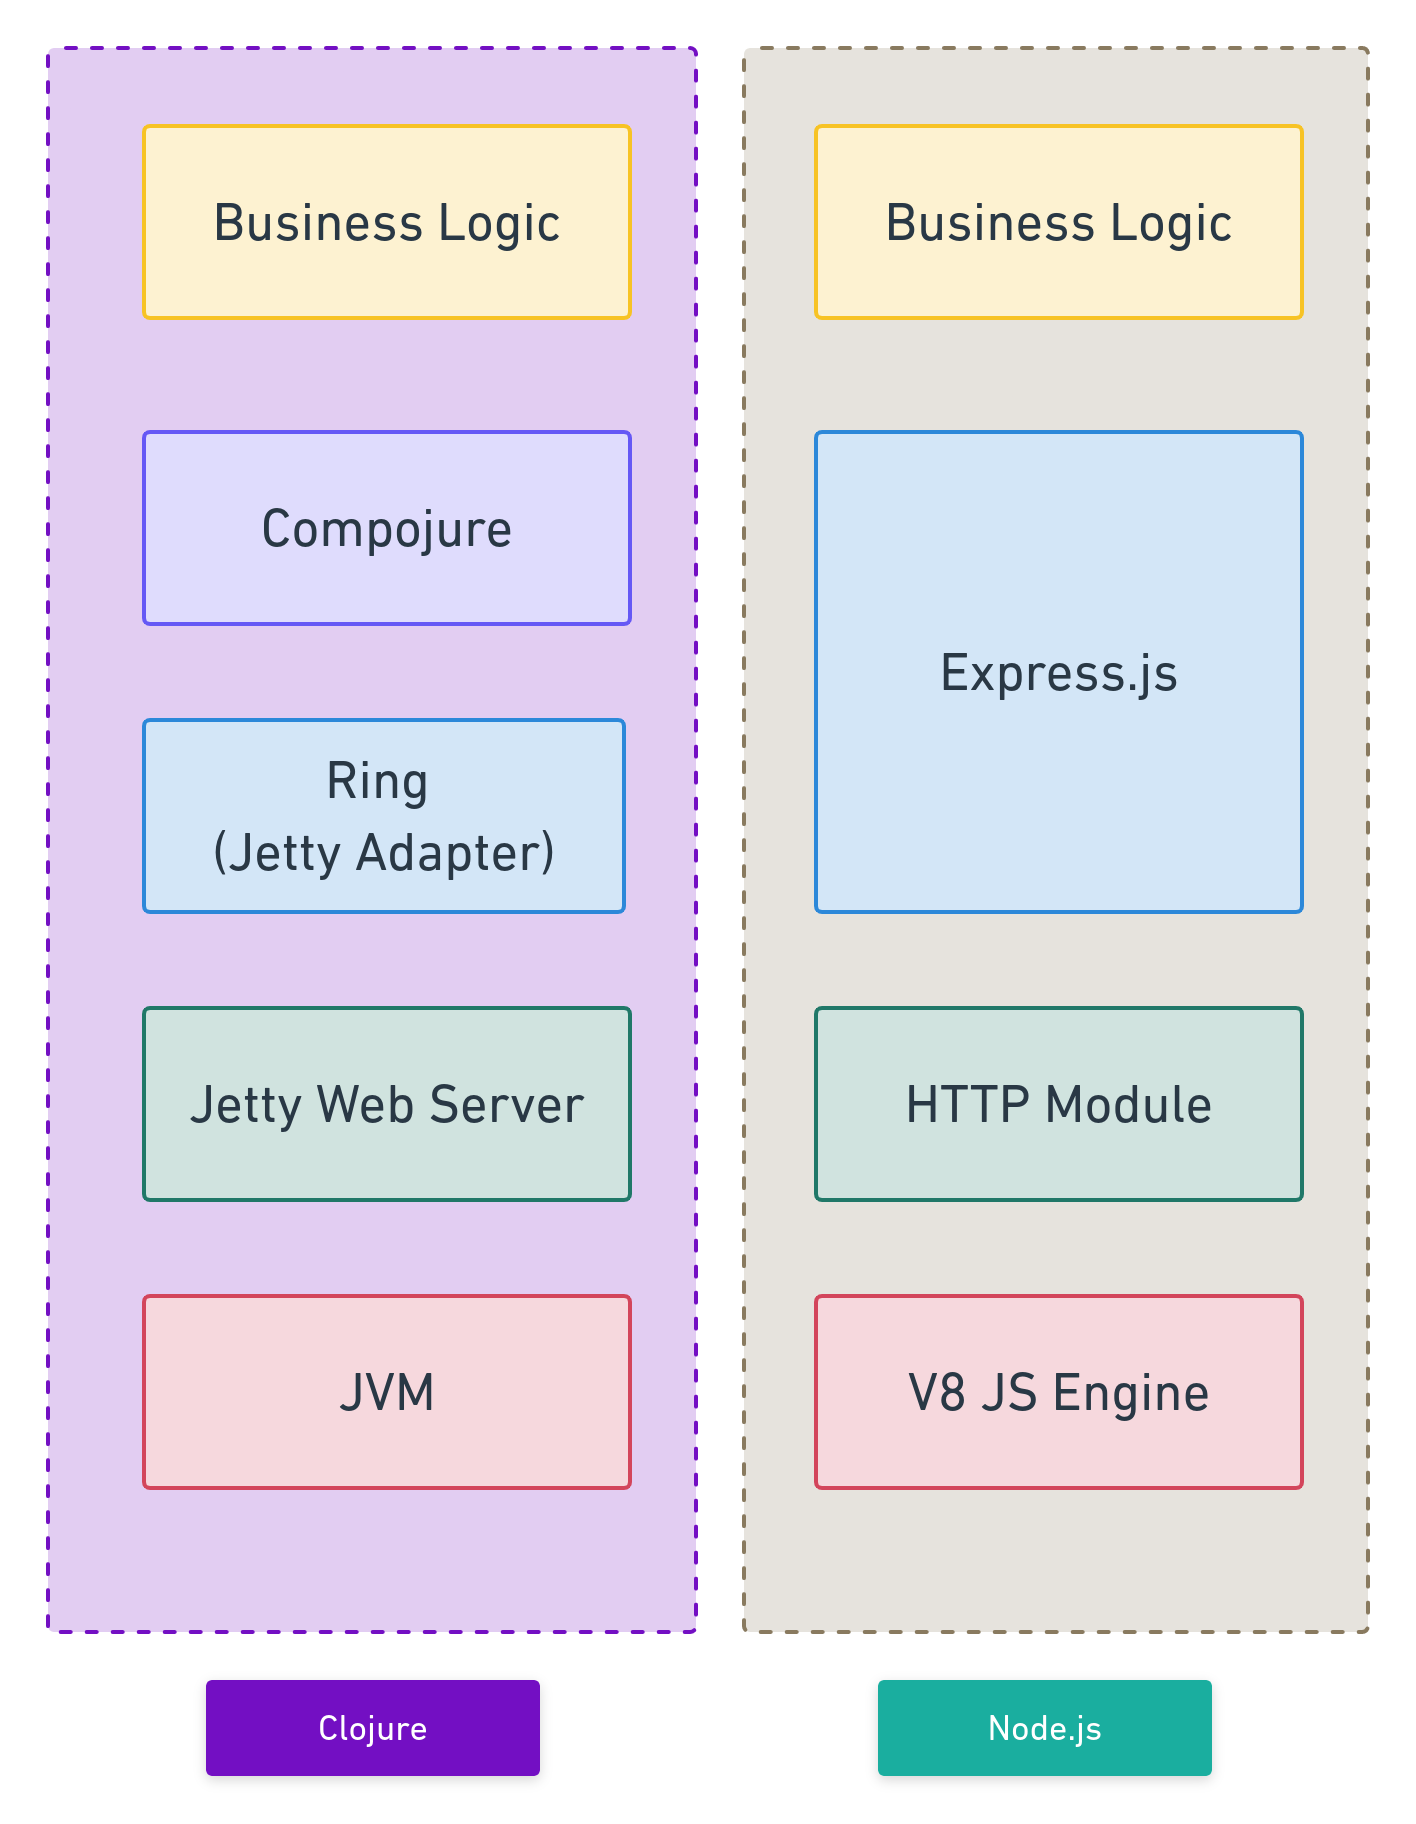
<?xml version="1.0" encoding="utf-8"?><feed xmlns="http://www.w3.org/2005/Atom" ><generator uri="https://jekyllrb.com/" version="3.10.0">Jekyll</generator><link href="https://otee.dev/feed.xml" rel="self" type="application/atom+xml" /><link href="https://otee.dev/" rel="alternate" type="text/html" /><updated>2026-07-07T14:49:50+00:00</updated><id>https://otee.dev/feed.xml</id><title type="html">Oitihjya Sen</title><subtitle>Backend engineer and former lawyer writing about distributed systems, legaltech, and Indian policy.</subtitle><entry><title type="html">Don’t move back to the Writers’</title><link href="https://otee.dev/2026/05/06/why-not-writers.html" rel="alternate" type="text/html" title="Don’t move back to the Writers’" /><published>2026-05-06T00:00:00+00:00</published><updated>2026-05-06T00:00:00+00:00</updated><id>https://otee.dev/2026/05/06/why-not-writers</id><content type="html" xml:base="https://otee.dev/2026/05/06/why-not-writers.html"><![CDATA[<p>The reported plan of the new BJP government in West Bengal to shift the state secretariat <a href="https://www.telegraphindia.com/west-bengal/kolkata/bjp-eyes-return-to-writers-buildings-new-chief-minister-to-take-final-call-prnt/cid/2159221">back to the Writers’ Building</a> in BBD Bagh, from Nabanna, may be presented as a pragmatic step and a return to heritage. But it is actually a failure of imagination.</p>

<h4 id="what-the-building-was-meant-for">What the building was meant for</h4>

<p>The Writers’ Building was built in 1777 by Thomas Lyon, on behalf of the British East India Company. It was Calcutta’s first three-storeyed building — a 150-metre Greco-Roman structure designed to project authority.</p>

<p>It stood as a grand symbol of who held power, who dispensed it, and who was expected to receive it in silence. The building sits at the heart of what was then called the White Town, deliberately separated from the Black Town where the native population lived. It was not built for Indians. It was built to administer them.</p>

<p><a href="/assets/images/writers_building.webp">
    <img src="/assets/images/writers_building.webp" width="50%" />
</a></p>

<h4 id="more-than-just-a-secretariat">More than just a secretariat</h4>

<p>On December 8, 1930, three young revolutionaries — Benoy Basu, Badal Gupta, and Dinesh Gupta — walked into this building and shot dead Colonel N.S. Simpson, the Inspector General of Prisons, notorious for his brutality toward political prisoners. Badal took cyanide on the spot. Benoy died in hospital five days later. Dinesh was hanged in 1931.</p>

<p><a href="/assets/images/bbd.jpeg">
    <img src="/assets/images/bbd.jpeg" width="30%" />
</a></p>

<p>The statues of Benoy, Badal and Dinesh proudly stand in front of the building to this day. The square is named after them. This place has real, consequential history. In fact, the Writers’ Building is the most important building in BBD Bagh. It is the kind of place that should be a museum, or a public cultural space. A place where Calcuttans can actually walk in and experience their own history. Turning it back into a working secretariat, with thousands of employees, filing cabinets, and departmental paperwork, is the least imaginative thing you can do with it.</p>

<h4 id="weight-of-history">Weight of history</h4>

<p>This history did not end with independence: the Writers’ Building has been the seat of every government that presided over West Bengal’s long, steady decline. The Left Front governed from it for 34 years. The Congress before them. The Trinamool Congress after (albeit briefly). Whatever their individual failures or achievements, the aggregate result is stark: capital flight, industrial decay, and a metropolis in decline. All of this happened under administrations that governed from this very building.
If the new government genuinely wants to signal a break from the past, the symbolism matters. Coming in and immediately moving into the same building that every previous government occupied is not a signal of change. It is a signal of continuity with the very past you are trying to distinguish yourself from.</p>

<h4 id="colonial-mindset">Colonial Mindset</h4>

<p>The BJP has made much of moving away from the <a href="https://www.pib.gov.in/PressReleasePage.aspx?PRID=2227768&amp;reg=3&amp;lang=2">colonial hangover in Indian governance</a>. The Central Vista project was explicitly framed as a break from Lutyens’ Delhi, from the North and South Blocks that the British built to administer their empire. The logic, as articulated by the government, was that independent India should govern itself from spaces it built for itself, not from spaces built to serve colonial masters.</p>

<p>The Writers’ Building was built to serve colonial masters. If the BJP truly believes in <em>Viksit Bharat</em> — a developed India free of colonial baggage — it should start its new innings in Kolkata by not returning to a building commissioned by the British East India Company.</p>

<h4 id="a-new-secretariat-for-new-bengal">A new Secretariat for New Bengal</h4>

<p><a href="/assets/images/new.jpeg">
    <img src="/assets/images/new.jpeg" width="60%" /></a></p>

<p>The new government should operate from a new secretariat that represents the wishes and aspirations of the 21st Century Bengali — a space that reflects what Bengal should become, not what it has been.</p>

<p>And free the Writers’ Building. Convert it into what it should be: a public space for Calcuttans to walk into and experience. Return the building to BBD Bagh, not the bureaucracy.</p>]]></content><author><name></name></author><category term="personal" /><summary type="html"><![CDATA[The reported plan of the new BJP government in West Bengal to shift the state secretariat back to the Writers’ Building in BBD Bagh, from Nabanna, may be presented as a pragmatic step and a return to heritage. But it is actually a failure of imagination.]]></summary><media:thumbnail xmlns:media="http://search.yahoo.com/mrss/" url="https://otee.dev/assets/images/writers_building.webp" /><media:content medium="image" url="https://otee.dev/assets/images/writers_building.webp" xmlns:media="http://search.yahoo.com/mrss/" /></entry><entry><title type="html">Personal Project, Public Outage: A Lesson in Incident Management</title><link href="https://otee.dev/2025/07/08/personal-project-public-outage.html" rel="alternate" type="text/html" title="Personal Project, Public Outage: A Lesson in Incident Management" /><published>2025-07-08T00:00:00+00:00</published><updated>2025-07-08T00:00:00+00:00</updated><id>https://otee.dev/2025/07/08/personal-project-public-outage</id><content type="html" xml:base="https://otee.dev/2025/07/08/personal-project-public-outage.html"><![CDATA[<p>Recently, I experienced a minor outage on a personal VM instance hosted on Google Cloud Compute. While the stakes were low, the process of diagnosing and resolving the issue, and then ensuring it doesn’t happen again, was a learning experience that I’d like to share.</p>

<ul id="markdown-toc">
  <li><a href="#silent-outage" id="markdown-toc-silent-outage">Silent outage</a>    <ul>
      <li><a href="#the-mitigation-a-step-by-step-recovery" id="markdown-toc-the-mitigation-a-step-by-step-recovery">The Mitigation: A Step-by-Step Recovery</a></li>
      <li><a href="#finding-the-root-cause" id="markdown-toc-finding-the-root-cause">Finding the root cause</a></li>
      <li><a href="#prevention-of-future-outages" id="markdown-toc-prevention-of-future-outages">Prevention of future outages</a></li>
    </ul>
  </li>
  <li><a href="#takeaway-a-lesson-in-devops" id="markdown-toc-takeaway-a-lesson-in-devops">Takeaway: A lesson in devops</a></li>
</ul>

<h2 id="silent-outage">Silent outage</h2>

<p>The incident began, as many do, with a simple observation: a new, work-in-progress application I had deployed was not responding. This application was built using Spring Boot and was deployed as a containerised service (using docker). The fact that my new application was not working was not alarming; new deployments often have teething problems - and I had consciously deployed a rough-around-the-edges application to test it on different devices.</p>

<p>However, my routine check on other, stable services running on the same VM (<a href="https://twirl.otee.dev/">twirl.otee.dev</a> and <a href="https://remind.otee.dev/">remind.otee.dev</a>) revealed a more serious issue – they were down as well.</p>

<p>My first instinct was to SSH into the virtual machine to inspect the logs. However, to my shock, my attempts to connect, both from my local machine and through the GCP browser-based utility, timed out. This was a significant red flag; an unreachable SSH daemon indicated a fundamental problem with the VM itself.</p>

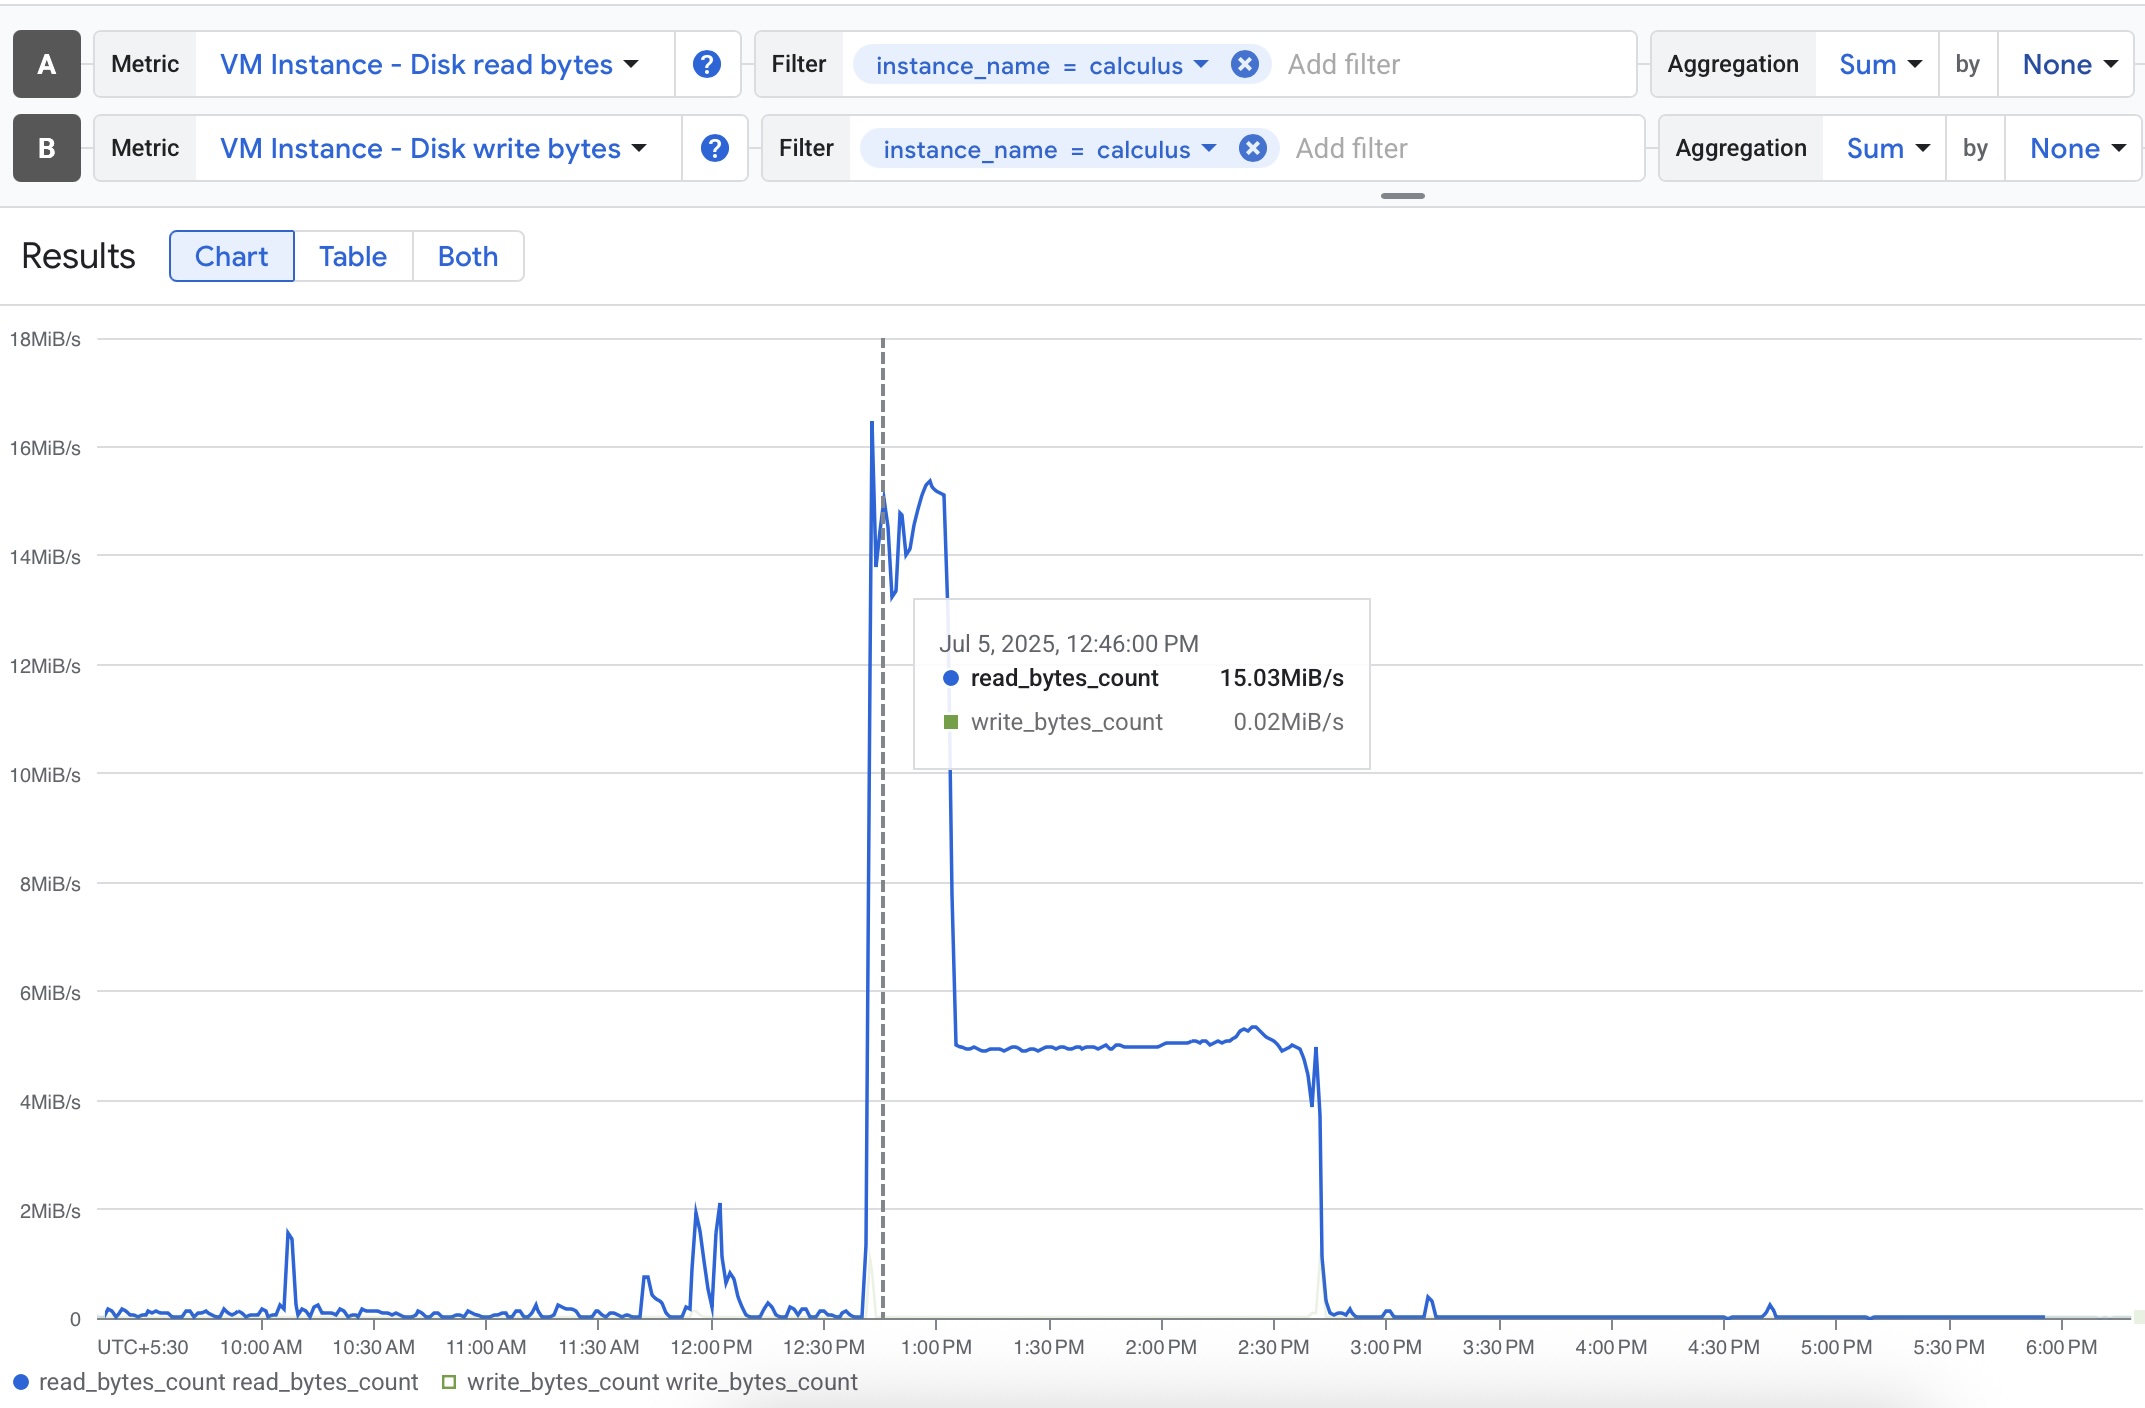
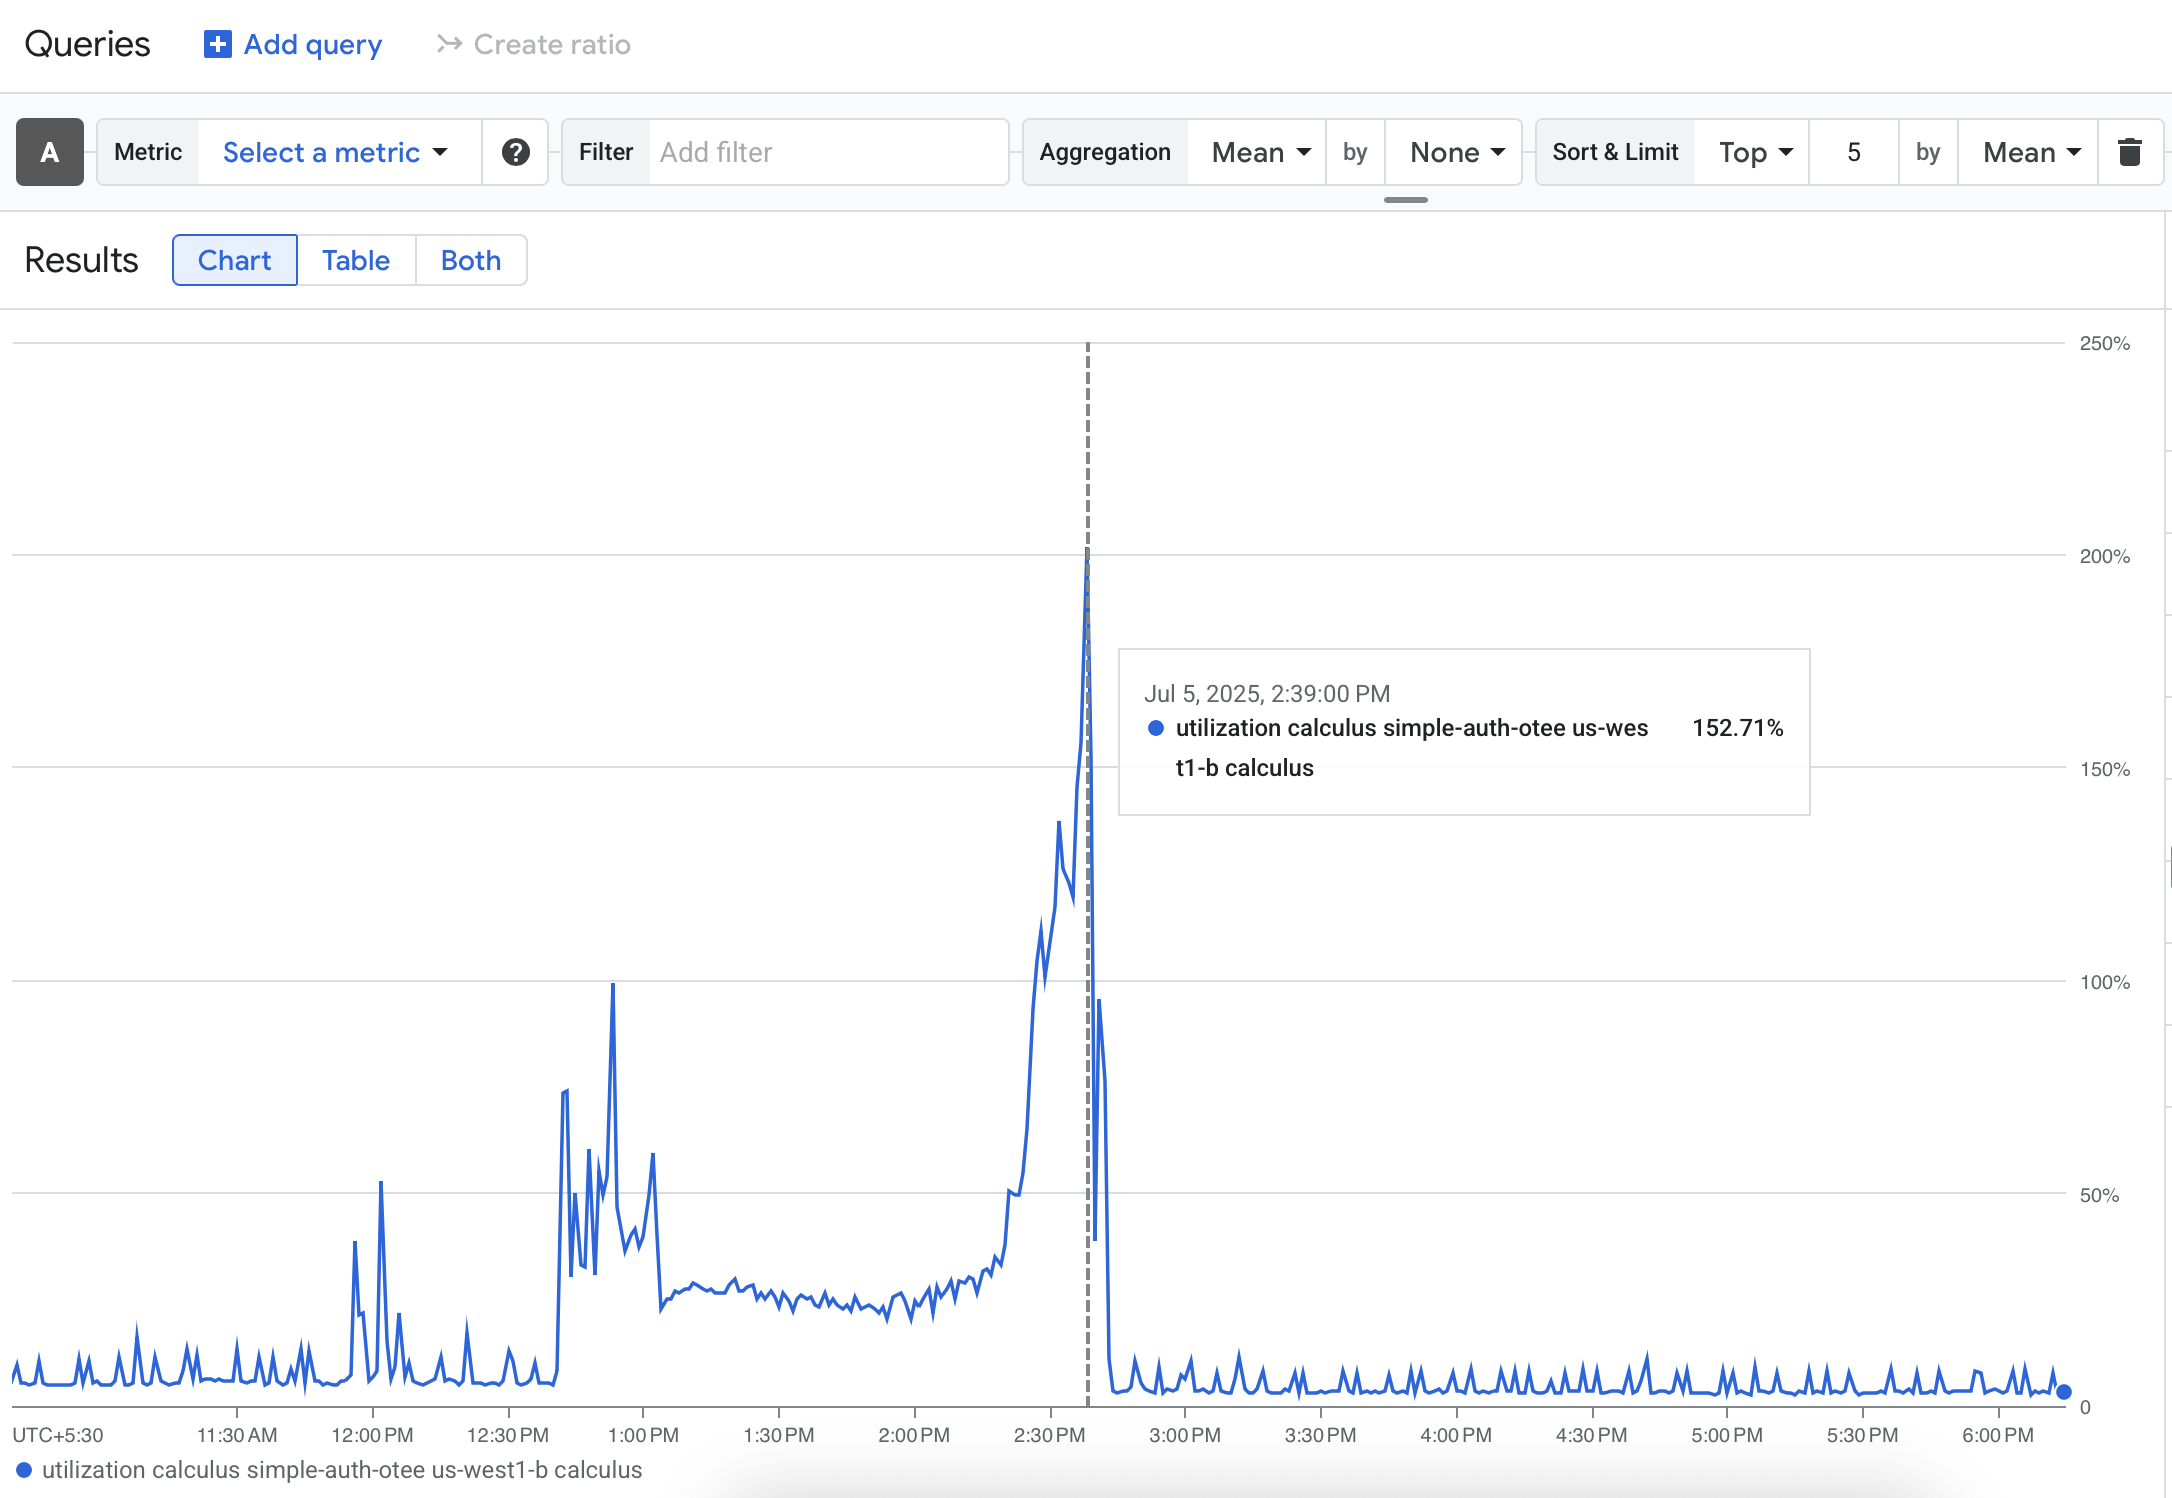
<p>A glance at the GCP dashboard for my instance revealed stressed CPU and disk I/O graphs from sometime earlier, confirming that the system had been under duress.</p>

<p><a href="/assets/images/disk_ops.jpg">
    <img src="/assets/images/disk_ops.jpg" width="100%" />
</a></p>
<p style="font-size:16px; font-style: italic"> Disk operations during the outage </p>

<p><a href="/assets/images/cpu_utilisation.png">
    <img src="/assets/images/cpu_utilisation.png" width="100%" />
</a></p>
<p style="font-size:16px; font-style: italic"> CPU utilisation during the outage </p>

<p>This was a classic case of a “silent failure” – an issue that could have persisted for days had I not chanced upon it. In any software engineering company, this would have been an incident, in the rest of the post, I will treat it as such in three steps: mitigation, root cause analysis, and prevention.</p>

<h3 id="the-mitigation-a-step-by-step-recovery">The Mitigation: A Step-by-Step Recovery</h3>

<p>The primary goal was to bring the stable services back up and running. With direct access to the instance unavailable, I was constrained to take a more forceful step: a “hard” reboot. I initiated a stop and start of the VM instance directly from the GCP dashboard.</p>

<p>This brought one of the services, <a href="https://remind.otee.dev/">remind.otee.dev</a>, back online. However, <a href="https://twirl.otee.dev/">twirl.otee.dev</a> was now serving a <code class="language-plaintext highlighter-rouge">502 Bad Gateway</code> error, (meaning, nginx was working but the application server was not).</p>

<p>Thankfully, the reboot had restored SSH access. Once inside the VM, a quick check of the running services confirmed my suspicion. The <code class="language-plaintext highlighter-rouge">twirl.service</code> was not running. I inspected the list of enabled <code class="language-plaintext highlighter-rouge">systemd</code> services using:</p>

<div class="language-bash highlighter-rouge"><div class="highlight"><pre class="highlight"><code>systemctl list-unit-files <span class="nt">--type</span><span class="o">=</span>service <span class="nt">--state</span><span class="o">=</span>enabled
</code></pre></div></div>

<p>As it turned out, <code class="language-plaintext highlighter-rouge">twirl.service</code> was not on this list, meaning it wouldn’t automatically start on a system reboot. I enabled it with:</p>

<div class="language-bash highlighter-rouge"><div class="highlight"><pre class="highlight"><code><span class="nb">sudo </span>systemctl <span class="nb">enable </span>twirl.service
</code></pre></div></div>

<p>And then started it manually:</p>

<div class="language-bash highlighter-rouge"><div class="highlight"><pre class="highlight"><code><span class="nb">sudo </span>systemctl start twirl.service
</code></pre></div></div>

<p>A final check of the service’s logs showed no errors, and <a href="https://twirl.otee.dev/">twirl.otee.dev</a> was back online.</p>

<div class="language-bash highlighter-rouge"><div class="highlight"><pre class="highlight"><code><span class="nb">sudo </span>journalctl <span class="nt">-u</span> twirl.service <span class="nt">-f</span>
</code></pre></div></div>

<h3 id="finding-the-root-cause">Finding the root cause</h3>

<p>With the immediate fires extinguished, my focus shifted to understanding the root cause of the initial outage. The <a href="https://swipe.otee.dev">swipe</a> service, my new work-in-progress application, was the prime suspect.</p>

<p>An analysis of the serial port logs from the GCP dashboard provided the smoking gun:</p>

<div class="language-bash highlighter-rouge"><div class="highlight"><pre class="highlight"><code>Jul 5 09:08:13 calculus kernel: <span class="o">[</span>94239163.698111] Out of memory: Killed process 4494 <span class="o">(</span>java<span class="o">)</span> total-vm:1870112kB, anon-rss:170216kB, file-rss:0kB, shmem-rss:0kB, UID:0 pgtables:604kB oom_score_adj:0
</code></pre></div></div>

<p>This meant that a Java process had become so memory-intensive that the Linux kernel’s “OOM Killer” had to step in and kill it.</p>

<p>Subsequent logs pointed to issues with Docker:</p>

<div class="language-bash highlighter-rouge"><div class="highlight"><pre class="highlight"><code>Jul 5 09:09:22 calculus containerd[4191566]: <span class="nb">time</span><span class="o">=</span><span class="s2">"2025-07-05T09:09:12.618001383Z"</span> <span class="nv">level</span><span class="o">=</span>error <span class="nv">msg</span><span class="o">=</span><span class="s2">"failed to delete"</span> <span class="nv">cmd</span><span class="o">=</span><span class="s2">"/usr/bin/containerd-shim-runc-v2 -namespace -address /run/containerd/containerd.sock -publish-binary /usr/bin/containerd -id b382fb9a6e7a6fd4e5f6c1a44faaa35ae6a627cc85af49f928c209398bfd17ba -bundle /run/containerd/io.containerd.runtime.v2.task/*/b382fb9a6e7a6fd4e5f6c1a44faaa35ae6a627cc85af49f928c209398bfd17ba delete"</span> <span class="nv">error</span><span class="o">=</span><span class="s2">"signal: killed"</span> 
</code></pre></div></div>

<p>The <code class="language-plaintext highlighter-rouge">swipe</code> service was the only Java process and the only containerized service running on the instance. It was clear that my new application was using more memory than what the VM could provide, causing the OOM Killer to step in.</p>

<p>Upon checking the <code class="language-plaintext highlighter-rouge">Dockerfile</code> it emerged that there were no resource limits specified (like the <code class="language-plaintext highlighter-rouge">-Xmx</code> flag for heap size). The JVM, by default, can be greedy with memory, consuming more memory than the instance could afford.</p>

<div class="language-bash highlighter-rouge"><div class="highlight"><pre class="highlight"><code>FROM eclipse-temurin:24-jdk-alpine
COPY target/swipe-0.0.1-SNAPSHOT.jar swipe.jar
EXPOSE 3001
ENTRYPOINT <span class="o">[</span><span class="s2">"java"</span>,<span class="s2">"-jar"</span>,<span class="s2">"swipe.jar"</span>,<span class="s2">"--server.port=3001"</span><span class="o">]</span>
</code></pre></div></div>

<h3 id="prevention-of-future-outages">Prevention of future outages</h3>

<p>To prevent a similar <em>silent</em> outage from happening again, I implemented the following:</p>

<ul>
  <li><strong>Proactive Alerting</strong>: The first and most obvious fix. I have now configured alerts in Google Cloud Monitoring to send me an email if CPU utilization or memory usage exceeds 80% for more than five minutes. A silent failure should never be silent again.</li>
  <li><strong>JVM memory limits:</strong> Limiting the max heap size available to <code class="language-plaintext highlighter-rouge">swipe</code> to 128MB, while starting the application via <code class="language-plaintext highlighter-rouge">Dockerfile</code>:</li>
</ul>

<div class="language-bash highlighter-rouge"><div class="highlight"><pre class="highlight"><code><span class="c"># Set max heap size to 128MB</span>
ENTRYPOINT <span class="o">[</span><span class="s2">"java"</span>,<span class="s2">"-Xmx128m"</span>,<span class="s2">"-jar"</span>,<span class="s2">"swipe.jar"</span>,<span class="s2">"--server.port=3001"</span><span class="o">]</span>
</code></pre></div></div>

<ul>
  <li><strong>Enforce Container Resource Limits</strong>: In addition to limiting memory usage at the application-level, updating the <code class="language-plaintext highlighter-rouge">docker-compose.yml</code> file to limit the total memory available to the containers:</li>
</ul>

<div class="language-yaml highlighter-rouge"><div class="highlight"><pre class="highlight"><code><span class="na">services</span><span class="pi">:</span>
  <span class="na">app</span><span class="pi">:</span>
    <span class="c1"># ... other configs</span>
    <span class="na">mem_limit</span><span class="pi">:</span> <span class="s">256m</span>
    <span class="na">mem_reservation</span><span class="pi">:</span> <span class="s">128m</span>
  <span class="na">postgres</span><span class="pi">:</span>
    <span class="c1"># ... other configs</span>
    <span class="na">mem_limit</span><span class="pi">:</span> <span class="s">256m</span>
</code></pre></div></div>

<ul>
  <li><strong>Add memory limits on docker process:</strong> Additionally, limiting the total memory that the docker process can access, by adding <code class="language-plaintext highlighter-rouge">MemoryLimit</code> and <code class="language-plaintext highlighter-rouge">MemoryAccounting</code> in <code class="language-plaintext highlighter-rouge">swipe.service</code> in systemd:</li>
</ul>

<div class="language-ini highlighter-rouge"><div class="highlight"><pre class="highlight"><code><span class="nn">[Service]</span>
<span class="err">...</span>
<span class="py">MemoryAccounting</span><span class="p">=</span><span class="s">true</span>
<span class="py">MemoryLimit</span><span class="p">=</span><span class="s">512M</span>
</code></pre></div></div>

<h2 id="takeaway-a-lesson-in-devops">Takeaway: A lesson in devops</h2>

<p>This incident was a stark reminder that our work doesn’t end with writing code. The infrastructure that supports our applications is equally critical.</p>

<p>It brought to light the importance of solid software engineering fundamentals, like resource management and proactive monitoring.</p>

<p>But perhaps the most important lesson was in the incident response itself. In the heat of the moment, the priority should always be to restore service first - diagnosing the root case can be done after services are restored.</p>]]></content><author><name></name></author><category term="project" /><summary type="html"><![CDATA[Recently, I experienced a minor outage on a personal VM instance hosted on Google Cloud Compute. While the stakes were low, the process of diagnosing and resolving the issue, and then ensuring it doesn’t happen again, was a learning experience that I’d like to share.]]></summary><media:thumbnail xmlns:media="http://search.yahoo.com/mrss/" url="https://otee.dev/assets/images/disk_ops.jpg" /><media:content medium="image" url="https://otee.dev/assets/images/disk_ops.jpg" xmlns:media="http://search.yahoo.com/mrss/" /></entry><entry><title type="html">Ping-pong: Using multiple Kafka consumers to process events</title><link href="https://otee.dev/2023/06/19/ping-pong.html" rel="alternate" type="text/html" title="Ping-pong: Using multiple Kafka consumers to process events" /><published>2023-06-19T00:00:00+00:00</published><updated>2023-06-19T00:00:00+00:00</updated><id>https://otee.dev/2023/06/19/ping-pong</id><content type="html" xml:base="https://otee.dev/2023/06/19/ping-pong.html"><![CDATA[<p>In this post, I write about ping-pong - a project that aims at simulating how messages in a live chatroom (with multiple concurrent users) may get processed, using a Kafka messaging system.</p>

<p>This project makes use of a Kafka producer to push user messages to a topic and uses two independent Kafka consumers to process them. Here’s the github repository for this project: <a href="https://github.com/oitee/ping-pong">https://github.com/oitee/ping-pong</a></p>

<ul id="markdown-toc">
  <li><a href="#system-components" id="markdown-toc-system-components">System Components</a></li>
  <li><a href="#demo" id="markdown-toc-demo">Demo</a></li>
  <li><a href="#generating-user-messages" id="markdown-toc-generating-user-messages">Generating user-messages</a></li>
  <li><a href="#processing-user-messages" id="markdown-toc-processing-user-messages">Processing User Messages</a>    <ul>
      <li><a href="#messages-consumer" id="markdown-toc-messages-consumer">Messages Consumer</a></li>
      <li><a href="#active-users-consumer" id="markdown-toc-active-users-consumer">Active Users Consumer</a></li>
      <li><a href="#tracking-active-users" id="markdown-toc-tracking-active-users">Tracking Active users</a></li>
    </ul>
  </li>
  <li><a href="#importance-of-passing-event-timestamp" id="markdown-toc-importance-of-passing-event-timestamp">Importance of passing event timestamp</a></li>
</ul>

<h2 id="system-components">System Components</h2>

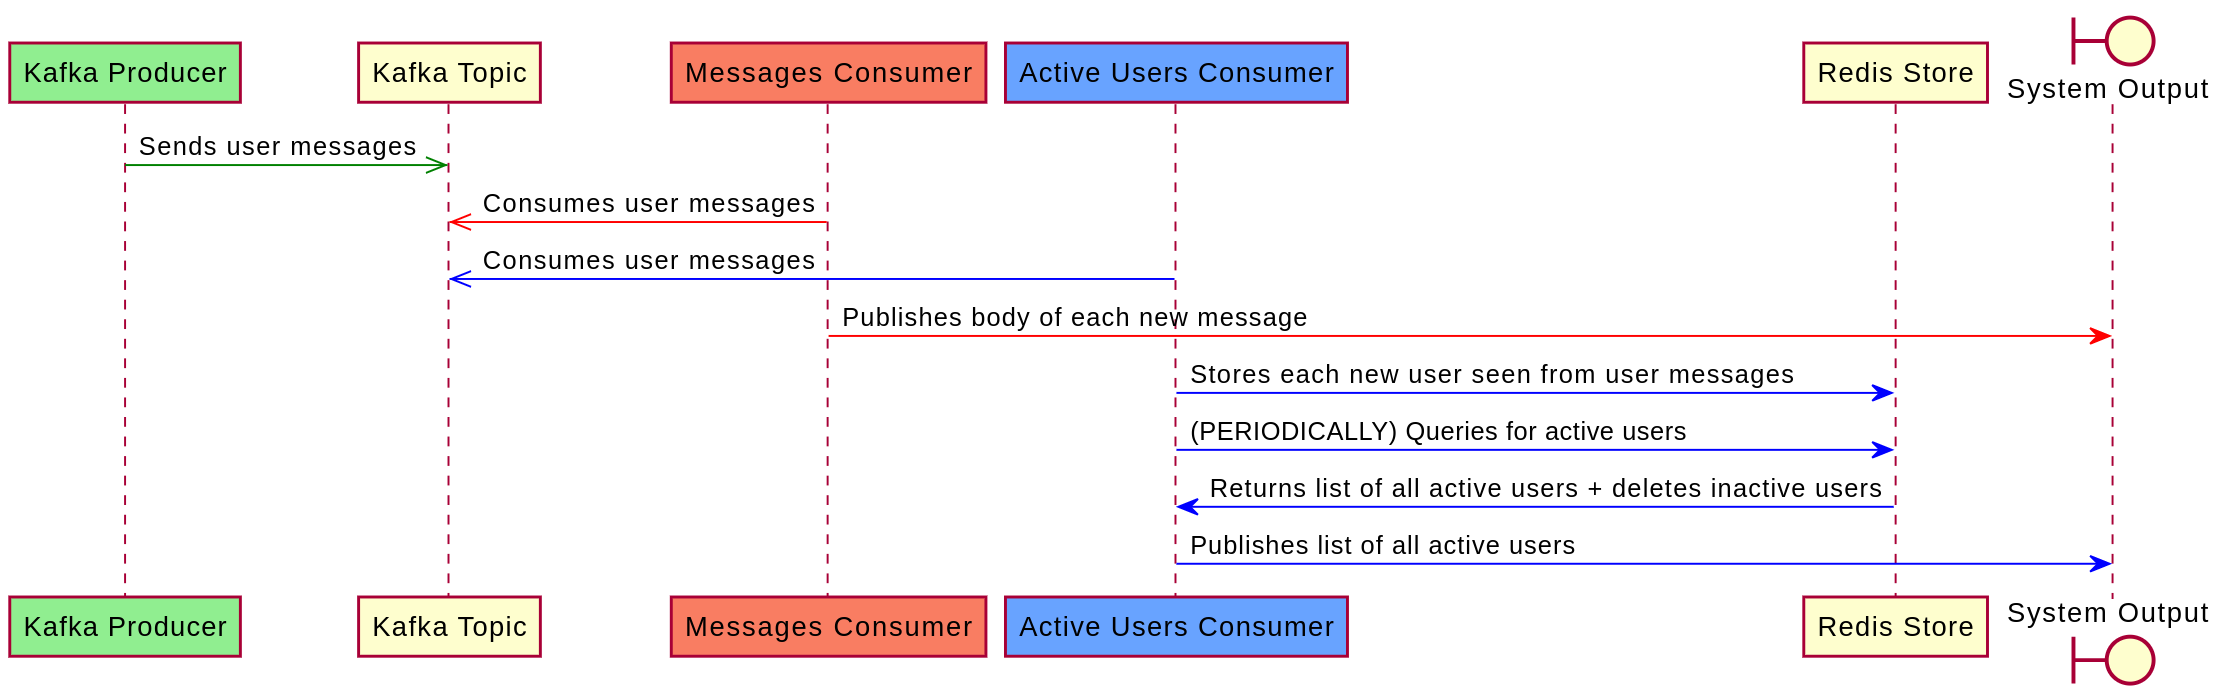
<p>Largely, the system relies on a Kafka producer to push each new user message and on two independent Kafka consumers to process each new message:</p>

<ul>
  <li><strong>Kafka producer:</strong> It pushes new user-generated messages to a common Kafka topic. These messages are meant to be consumed by different consumers.</li>
  <li><strong>Messages consumer:</strong> This consumer reads each event (<em>containing user-generated messages</em>) from the Kafka topic and prints out the contents of each user message</li>
  <li><strong>Active users consumer:</strong> This consumer consumes each Kafka event and periodically publishes a list of all active users.</li>
  <li><strong>Redis:</strong> The active users consumer stores each active user, in a Redis store, and periodically fetches the list of all active users from this store.</li>
</ul>

<p>The interaction of the above components are demonstrated in the following sequence diagram:</p>

<p><a href="/assets/images/ping_pong_sequence.png">
    <img src="/assets/images/ping_pong_sequence.png" width="100%" />
</a></p>

<h2 id="demo">Demo</h2>

<p>Before going ahead with further details, here is a demo of the system:</p>
<iframe width="560" height="315" src="https://www.youtube.com/embed/2VD-P0W7UXU" title="YouTube video player" frameborder="0" allow="accelerometer; autoplay; clipboard-write; encrypted-media; gyroscope; picture-in-picture; web-share" allowfullscreen=""></iframe>

<h2 id="generating-user-messages">Generating user-messages</h2>

<p>User-messages have to be generated before pushing them to the Kafka producer. To simulate a chat-room:</p>

<ul>
  <li>A list of users is hard-coded in the project (present in <code class="language-plaintext highlighter-rouge">ping-pong.utils</code> name-space). As an avid fan of The Office (US), the users are all the characters of <a href="https://en.wikipedia.org/wiki/List_of_The_Office_(American_TV_series)_characters">The Office(US)</a>
    <ul>
      <li><img src="https://media.tenor.com/mKfeCtD5EukAAAAC/the-office-the.gif" border="1px" width="20%" /></li>
    </ul>
  </li>
  <li>
    <p>Using the list of user-names, a one-time list of emails for each user is generated by randomly using a list of common email domains and the user-names of each user. Each user entity, thus, is represented as follows:</p>

    <div class="language-clojure highlighter-rouge"><div class="highlight"><pre class="highlight"><code><span class="w">  </span><span class="p">{</span><span class="no">:user</span><span class="w"> </span><span class="s">"Micheal Scott"</span><span class="w">
   </span><span class="no">:email</span><span class="w"> </span><span class="s">"micheal.scott@gmail.com"</span><span class="p">}</span><span class="w">
</span></code></pre></div>    </div>
  </li>
  <li>The list of user-entities is stored in an atom called <code class="language-plaintext highlighter-rouge">users</code> in the <code class="language-plaintext highlighter-rouge">ping-pong.users</code> namespace. This namespace exposes a function called <code class="language-plaintext highlighter-rouge">get-user</code> that randomly returns a user-object from this atom.</li>
  <li>The <code class="language-plaintext highlighter-rouge">ping-pong.producer</code> periodically fetches a user-entity from this function and sends two types of Kafka events:
    <ul>
      <li>
        <p><strong>Messages</strong>: Every second, after fetching a user entity, it makes a HTTP get request to an <a href="https://favqs.com/api/qotd">open API</a> which returns random quotes. This forms the message body of the respective user. Finally, it sends the Kafka event. Here’s a snapshot of how this is done (the entire namespace can be found <a href="https://github.com/oitee/ping-pong/blob/master/src/ping_pong/producer.clj">here</a>):</p>

        <div class="language-clojure highlighter-rouge"><div class="highlight"><pre class="highlight"><code><span class="w">  </span><span class="p">(</span><span class="k">def</span><span class="w"> </span><span class="n">quotes-url</span><span class="w"> </span><span class="s">"https://favqs.com/api/qotd"</span><span class="p">)</span><span class="w">
        
  </span><span class="p">(</span><span class="k">defn</span><span class="w"> </span><span class="n">get-user-message</span><span class="w">
    </span><span class="p">[]</span><span class="w">
    </span><span class="p">(</span><span class="k">let</span><span class="w"> </span><span class="p">[</span><span class="n">response</span><span class="w"> </span><span class="p">(</span><span class="nf">clj-http.client/get</span><span class="w"> </span><span class="n">quotes-url</span><span class="p">)]</span><span class="w">
      </span><span class="p">(</span><span class="k">if</span><span class="w"> </span><span class="p">(</span><span class="nb">=</span><span class="w"> </span><span class="p">(</span><span class="no">:status</span><span class="w"> </span><span class="n">response</span><span class="p">)</span><span class="w"> </span><span class="mi">200</span><span class="p">)</span><span class="w">
        </span><span class="p">(</span><span class="nb">-&gt;</span><span class="w"> </span><span class="n">response</span><span class="w">
            </span><span class="no">:body</span><span class="w">
            </span><span class="n">cheshire.core/parse-string</span><span class="w">
            </span><span class="n">clojure.walk/keywordize-keys</span><span class="w">
            </span><span class="p">(</span><span class="nf">get-in</span><span class="w"> </span><span class="p">[</span><span class="no">:quote</span><span class="w"> </span><span class="no">:body</span><span class="p">]))</span><span class="w">
        </span><span class="s">""</span><span class="p">)))</span><span class="w">
        
  </span><span class="p">(</span><span class="k">defn</span><span class="w"> </span><span class="n">create-and-send-messages</span><span class="w">
    </span><span class="p">[</span><span class="n">interval</span><span class="p">]</span><span class="w">
    </span><span class="p">(</span><span class="nf">while</span><span class="w"> </span><span class="o">@</span><span class="n">continue?</span><span class="w">
      </span><span class="p">(</span><span class="k">let</span><span class="w"> </span><span class="p">[</span><span class="n">current-ts</span><span class="w"> </span><span class="p">(</span><span class="nf">System/currentTimeMillis</span><span class="p">)</span><span class="w">
            </span><span class="p">{</span><span class="no">:keys</span><span class="w"> </span><span class="p">[</span><span class="nb">name</span><span class="w"> </span><span class="n">email</span><span class="p">]}</span><span class="w"> </span><span class="p">(</span><span class="nf">ping-pong.users/get-user</span><span class="p">)</span><span class="w">
            </span><span class="n">user-message</span><span class="w"> </span><span class="p">(</span><span class="nf">get-user-message</span><span class="p">)</span><span class="w">
            </span><span class="n">activity</span><span class="w"> </span><span class="p">(</span><span class="no">:send-message</span><span class="w"> </span><span class="n">ping-pong.utils/allowed-activities</span><span class="p">)]</span><span class="w">
        </span><span class="p">(</span><span class="nf">send-message</span><span class="w"> </span><span class="p">(</span><span class="nf">cheshire.core/generate-string</span><span class="w"> </span><span class="p">{</span><span class="no">:user</span><span class="w"> </span><span class="nb">name</span><span class="w">
                                                      </span><span class="no">:email</span><span class="w"> </span><span class="n">email</span><span class="w">
                                                      </span><span class="no">:activity</span><span class="w"> </span><span class="n">activity</span><span class="w">
                                                      </span><span class="no">:message</span><span class="w"> </span><span class="n">user-message</span><span class="w">
                                                      </span><span class="no">:ts</span><span class="w"> </span><span class="n">current-ts</span><span class="p">})))</span><span class="w">
      </span><span class="p">(</span><span class="nf">Thread/sleep</span><span class="w"> </span><span class="n">interval</span><span class="p">)))</span><span class="w">
</span></code></pre></div>        </div>
      </li>
      <li>
        <p><strong>Hearbeats</strong>: These events are sent at random intervals (between 1 and 7 seconds) and are meant to represent a user is active, even though they are not typing a new message. Unlike a message event, a heartbeat event does not contain any <code class="language-plaintext highlighter-rouge">message</code> key in the payload(the entire namespace can be found <a href="https://github.com/oitee/ping-pong/blob/master/src/ping_pong/producer.clj">here</a>):</p>
      </li>
    </ul>

    <div class="language-clojure highlighter-rouge"><div class="highlight"><pre class="highlight"><code><span class="w">  </span><span class="p">(</span><span class="k">defn</span><span class="w"> </span><span class="n">send-heartbeats</span><span class="w">
    </span><span class="p">[]</span><span class="w">
    </span><span class="p">(</span><span class="nf">while</span><span class="w"> </span><span class="o">@</span><span class="n">continue?</span><span class="w">
      </span><span class="p">(</span><span class="k">let</span><span class="w"> </span><span class="p">[</span><span class="n">current-ts</span><span class="w"> </span><span class="p">(</span><span class="nf">System/currentTimeMillis</span><span class="p">)</span><span class="w">
            </span><span class="p">{</span><span class="no">:keys</span><span class="w"> </span><span class="p">[</span><span class="nb">name</span><span class="w"> </span><span class="n">email</span><span class="p">]}</span><span class="w"> </span><span class="p">(</span><span class="nf">ping-pong.users/get-user</span><span class="p">)</span><span class="w">
            </span><span class="n">min-interval</span><span class="w"> </span><span class="mi">1000</span><span class="w">
            </span><span class="n">rand-interval</span><span class="w"> </span><span class="p">(</span><span class="nb">+</span><span class="w"> </span><span class="n">min-interval</span><span class="w"> </span><span class="p">(</span><span class="nb">rand-int</span><span class="w"> </span><span class="mi">7000</span><span class="p">))</span><span class="w">
            </span><span class="n">activity</span><span class="w"> </span><span class="p">(</span><span class="no">:heart-beat</span><span class="w"> </span><span class="n">ping-pong.utils/allowed-activities</span><span class="p">)]</span><span class="w">
        </span><span class="p">(</span><span class="nf">send-message</span><span class="w"> </span><span class="p">(</span><span class="nf">cheshire.core/generate-string</span><span class="w"> </span><span class="p">{</span><span class="no">:user</span><span class="w"> </span><span class="nb">name</span><span class="w">
                                                      </span><span class="no">:email</span><span class="w"> </span><span class="n">email</span><span class="w">
                                                      </span><span class="no">:activity</span><span class="w"> </span><span class="n">activity</span><span class="w">
                                                      </span><span class="no">:ts</span><span class="w"> </span><span class="n">current-ts</span><span class="p">}))</span><span class="w">
        </span><span class="p">(</span><span class="nf">Thread/sleep</span><span class="w"> </span><span class="n">rand-interval</span><span class="p">))))</span><span class="w">
</span></code></pre></div>    </div>

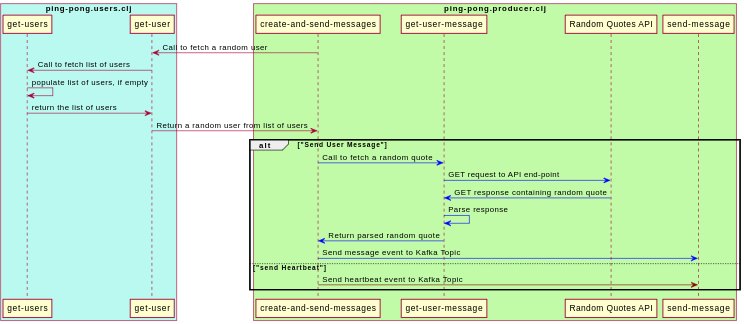
    <p>Here’s a sequence diagram representing how the producer generates kafka events:</p>

    <p><a href="/assets/images/kafka_producer.png">
      <img src="/assets/images/kafka_producer.png" width="100%" />
  </a></p>
  </li>
</ul>

<h2 id="processing-user-messages">Processing User Messages</h2>

<p>This project uses two different Kafka consumers to process each Kafka event:</p>

<ul>
  <li><strong>Messages Consumer:</strong> This consumer consumes each Kafka event and prints out the message payload</li>
  <li><strong>Active Users Consumer:</strong> This consumer consumes each Kafka event and stores each user in a Redis store. Every three seconds, it prints out the current list of active users by querying the Redis store.</li>
</ul>

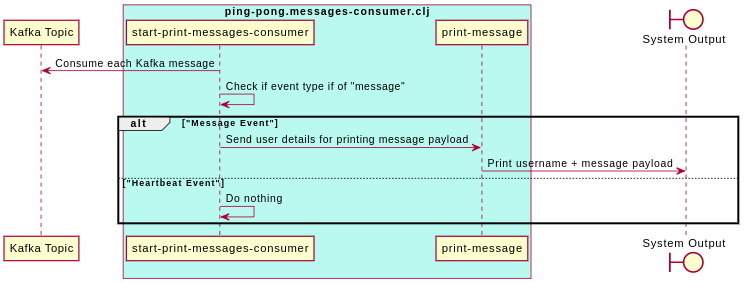
<h3 id="messages-consumer">Messages Consumer</h3>

<p>This consumer does three things:</p>

<ul>
  <li>Consumes each event</li>
  <li>Checks if the <code class="language-plaintext highlighter-rouge">activity</code> key to determine if it is a <code class="language-plaintext highlighter-rouge">send-message</code> event.</li>
  <li>If yes, it prints out the message along with the user name.</li>
</ul>

<p>Here’s a code-snapshot of this (the entire code can be found <a href="https://github.com/oitee/ping-pong/blob/master/src/ping_pong/messages_consumer.clj">here</a>):</p>

<div class="language-clojure highlighter-rouge"><div class="highlight"><pre class="highlight"><code><span class="p">(</span><span class="k">defn</span><span class="w"> </span><span class="n">print-message</span><span class="w">
  </span><span class="p">[</span><span class="n">user</span><span class="w"> </span><span class="n">m</span><span class="p">]</span><span class="w">
  </span><span class="p">(</span><span class="nb">println</span><span class="w"> </span><span class="p">(</span><span class="nf">format</span><span class="w"> </span><span class="s">"%s: %s"</span><span class="w">
                   </span><span class="n">user</span><span class="w">
                   </span><span class="n">m</span><span class="p">)))</span><span class="w">

</span><span class="p">(</span><span class="k">defn</span><span class="w"> </span><span class="n">start-print-messages-consumer</span><span class="w">
  </span><span class="p">[]</span><span class="w">
  </span><span class="p">(</span><span class="k">let</span><span class="w"> </span><span class="p">[</span><span class="n">continue-fn</span><span class="w"> </span><span class="p">(</span><span class="k">fn</span><span class="w"> </span><span class="p">[</span><span class="n">_</span><span class="p">]</span><span class="w"> </span><span class="o">@</span><span class="n">continue?</span><span class="p">)</span><span class="w">
        </span><span class="n">consuming-fn</span><span class="w"> </span><span class="p">(</span><span class="k">fn</span><span class="w">
                       </span><span class="p">[</span><span class="n">value</span><span class="p">]</span><span class="w">
                       </span><span class="p">(</span><span class="k">let</span><span class="w"> </span><span class="p">[{</span><span class="no">:keys</span><span class="w"> </span><span class="p">[</span><span class="n">user</span><span class="w"> </span><span class="n">message</span><span class="w"> </span><span class="n">activity</span><span class="p">]}</span><span class="w"> </span><span class="p">(</span><span class="nf">ping-pong.utils/keywordise-payload</span><span class="w"> </span><span class="n">value</span><span class="p">)]</span><span class="w">
                         </span><span class="p">(</span><span class="nb">when</span><span class="w"> </span><span class="p">(</span><span class="nb">=</span><span class="w"> </span><span class="n">activity</span><span class="w"> </span><span class="p">(</span><span class="no">:send-message</span><span class="w"> </span><span class="n">ping-pong.utils/allowed-activities</span><span class="p">))</span><span class="w">
                           </span><span class="p">(</span><span class="nf">print-message</span><span class="w"> </span><span class="n">user</span><span class="w"> </span><span class="n">message</span><span class="p">))))]</span><span class="w">
    </span><span class="p">(</span><span class="nf">utils/start-consuming</span><span class="w"> </span><span class="n">consumer-config</span><span class="w">
                           </span><span class="n">utils/topic</span><span class="w">
                           </span><span class="n">continue-fn</span><span class="w">
                           </span><span class="n">consuming-fn</span><span class="p">)))</span><span class="w"> 
</span></code></pre></div></div>

<p>Here’s a sequence diagram of the above:</p>

<p><a href="/assets/images/kafka_messages_consumer.png">
    <img src="/assets/images/kafka_messages_consumer.png" width="100%" />
</a></p>

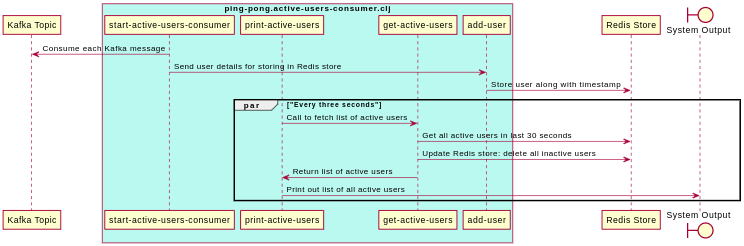
<h3 id="active-users-consumer">Active Users Consumer</h3>

<p>Broadly, this consumer consumes each Kafka event, and stores the user in the Redis store along with the timestamp mentioned in the event payload. The Redis store keeps a timestamp-to-user mapping inside a sorted set.</p>

<p>Every three seconds, the Redis store is queried for fetching the current set of active users. An active user is defined as a user who is seen at least once in the past 30 seconds.</p>

<p>Here’s a snapshot of how this is done (the entire code can be found <a href="https://github.com/oitee/ping-pong/blob/master/src/ping_pong/active_users_consumer.clj">here</a>)</p>

<div class="language-clojure highlighter-rouge"><div class="highlight"><pre class="highlight"><code><span class="p">(</span><span class="k">defn</span><span class="w"> </span><span class="n">start-active-users-consumer</span><span class="w">
  </span><span class="p">[</span><span class="n">sys</span><span class="p">]</span><span class="w">
  </span><span class="p">(</span><span class="k">let</span><span class="w"> </span><span class="p">[</span><span class="n">continue-fn</span><span class="w"> </span><span class="p">(</span><span class="k">fn</span><span class="w"> </span><span class="p">[</span><span class="n">_</span><span class="p">]</span><span class="w"> </span><span class="o">@</span><span class="n">continue?</span><span class="p">)</span><span class="w">
        </span><span class="n">consuming-fn</span><span class="w"> </span><span class="p">(</span><span class="k">fn</span><span class="w">
                       </span><span class="p">[</span><span class="n">value</span><span class="p">]</span><span class="w">
                       </span><span class="p">(</span><span class="k">let</span><span class="w"> </span><span class="p">[{</span><span class="no">:keys</span><span class="w"> </span><span class="p">[</span><span class="n">ts</span><span class="w"> </span><span class="n">user</span><span class="w"> </span><span class="n">email</span><span class="p">]}</span><span class="w"> </span><span class="p">(</span><span class="nf">utils/keywordise-payload</span><span class="w"> </span><span class="n">value</span><span class="p">)]</span><span class="w">
                         </span><span class="p">(</span><span class="nf">add-user</span><span class="w"> </span><span class="n">sys</span><span class="w"> </span><span class="n">user</span><span class="w"> </span><span class="n">email</span><span class="w"> </span><span class="n">ts</span><span class="p">)))]</span><span class="w">
    </span><span class="p">(</span><span class="nf">ping-pong.utils/start-consuming</span><span class="w"> </span><span class="n">consumer-config</span><span class="w">
                                     </span><span class="n">utils/topic</span><span class="w">
                                     </span><span class="n">continue-fn</span><span class="w">
                                     </span><span class="n">consuming-fn</span><span class="p">)))</span><span class="w">

</span><span class="p">(</span><span class="k">defn</span><span class="w"> </span><span class="n">print-active-users</span><span class="w">
  </span><span class="p">[]</span><span class="w">
  </span><span class="p">(</span><span class="nf">while</span><span class="w"> </span><span class="o">@</span><span class="n">continue?</span><span class="w">
    </span><span class="p">(</span><span class="k">let</span><span class="w"> </span><span class="p">[</span><span class="n">active-users</span><span class="w"> </span><span class="p">(</span><span class="nf">get-active-users</span><span class="p">)]</span><span class="w">
      </span><span class="p">(</span><span class="k">if</span><span class="w"> </span><span class="p">(</span><span class="nf">empty?</span><span class="w"> </span><span class="n">active-users</span><span class="p">)</span><span class="w">
        </span><span class="p">(</span><span class="nb">println</span><span class="w"> </span><span class="s">"No Active Users..."</span><span class="p">)</span><span class="w">
        </span><span class="p">(</span><span class="nf">do</span><span class="w"> </span><span class="p">(</span><span class="nb">println</span><span class="w"> </span><span class="s">"Active Users:"</span><span class="p">)</span><span class="w">
            </span><span class="p">(</span><span class="nf">run!</span><span class="w"> </span><span class="o">#</span><span class="p">(</span><span class="nb">print</span><span class="w"> </span><span class="p">(</span><span class="nb">str</span><span class="w"> </span><span class="n">%</span><span class="w"> </span><span class="s">", "</span><span class="p">))</span><span class="w"> </span><span class="n">active-users</span><span class="p">)</span><span class="w">
            </span><span class="p">(</span><span class="nb">println</span><span class="w"> </span><span class="s">"\n---"</span><span class="p">))))</span><span class="w">
    </span><span class="p">(</span><span class="nf">Thread/sleep</span><span class="w"> </span><span class="mi">3000</span><span class="p">))</span><span class="w">
  </span><span class="p">(</span><span class="nb">println</span><span class="w"> </span><span class="s">"----xx---"</span><span class="p">))</span><span class="w">
</span></code></pre></div></div>

<p>Here’s a sequence diagram of the above:</p>

<p><a href="/assets/images/kafka_active_users_consumer.png">
    <img src="/assets/images/kafka_active_users_consumer.png" width="100%" />
</a></p>

<h3 id="tracking-active-users">Tracking Active users</h3>

<p>The system relies on Redis to store active users. Specifically, a sorted set is used for storing users. In a sorted set, entities are sorted on the basis of their respective scores. In the present case case, the event time-stamp is the score.</p>

<div class="language-clojure highlighter-rouge"><div class="highlight"><pre class="highlight"><code><span class="p">(</span><span class="k">def</span><span class="w"> </span><span class="n">store</span><span class="w"> </span><span class="s">"sorted:users"</span><span class="p">)</span><span class="w">
</span><span class="p">(</span><span class="k">def</span><span class="w"> </span><span class="n">jedis</span><span class="w"> </span><span class="p">(</span><span class="nf">JedisPooled.</span><span class="w"> </span><span class="s">"localhost"</span><span class="w"> </span><span class="mi">6379</span><span class="p">))</span><span class="w">

</span><span class="p">(</span><span class="k">defn</span><span class="w"> </span><span class="n">add-user</span><span class="w">
  </span><span class="p">[</span><span class="n">username</span><span class="w"> </span><span class="n">email</span><span class="w"> </span><span class="n">score</span><span class="p">]</span><span class="w">
  </span><span class="p">(</span><span class="k">let</span><span class="w"> </span><span class="p">[</span><span class="n">user</span><span class="w"> </span><span class="p">(</span><span class="nf">format</span><span class="w"> </span><span class="s">"%s::%s"</span><span class="w"> </span><span class="n">username</span><span class="w"> </span><span class="n">email</span><span class="p">)]</span><span class="w">
    </span><span class="p">(</span><span class="nf">.zadd</span><span class="w"> </span><span class="n">jedis</span><span class="w"> </span><span class="n">store</span><span class="w"> </span><span class="p">(</span><span class="nb">double</span><span class="w"> </span><span class="n">score</span><span class="p">)</span><span class="w"> </span><span class="n">user</span><span class="p">)))</span><span class="w">
</span></code></pre></div></div>

<p>Thus, every time we need to fetch active users, we can query the sorted set in Redis, by using <code class="language-plaintext highlighter-rouge">zrangeByScore</code> where the <code class="language-plaintext highlighter-rouge">min</code> score is the cutoff timestamp (i.e., 30 seconds prior to the current time-stamp) and the <code class="language-plaintext highlighter-rouge">max</code> score is the current timestamp.</p>

<p>Importantly, while fetching the list of active users, it is important to clean up redundant data, i.e., all users with a score less than the cutoff timestamp.</p>

<div class="language-clojure highlighter-rouge"><div class="highlight"><pre class="highlight"><code><span class="p">(</span><span class="k">defn</span><span class="w"> </span><span class="n">get-active-users</span><span class="w">
  </span><span class="p">[]</span><span class="w">
  </span><span class="p">(</span><span class="k">let</span><span class="w"> </span><span class="p">[</span><span class="n">curr-ts</span><span class="w"> </span><span class="p">(</span><span class="nb">double</span><span class="w"> </span><span class="p">(</span><span class="nf">System/currentTimeMillis</span><span class="p">))</span><span class="w">
        </span><span class="n">cutoff-ts</span><span class="w"> </span><span class="p">(</span><span class="nb">double</span><span class="w"> </span><span class="p">(</span><span class="nb">-</span><span class="w"> </span><span class="n">curr-ts</span><span class="w"> </span><span class="mi">30000</span><span class="p">))</span><span class="w">
        </span><span class="n">active-users</span><span class="w"> </span><span class="p">(</span><span class="nf">.zrangeByScore</span><span class="w"> </span><span class="n">jedis</span><span class="w"> </span><span class="n">store</span><span class="w"> </span><span class="n">cutoff-ts</span><span class="w"> </span><span class="n">curr-ts</span><span class="p">)]</span><span class="w">
    </span><span class="c1">;; Remove users who were active before the cutoff time-stamp</span><span class="w">
    </span><span class="p">(</span><span class="nf">.zremrangeByScore</span><span class="w"> </span><span class="n">jedis</span><span class="w"> </span><span class="n">store</span><span class="w"> </span><span class="n">Double/NEGATIVE_INFINITY</span><span class="w"> </span><span class="p">(</span><span class="nb">dec</span><span class="w"> </span><span class="n">cutoff-ts</span><span class="p">))</span><span class="w">
    </span><span class="p">(</span><span class="nb">map</span><span class="w"> </span><span class="o">#</span><span class="p">(</span><span class="nb">first</span><span class="w"> </span><span class="p">(</span><span class="nf">cs/split</span><span class="w"> </span><span class="n">%</span><span class="w"> </span><span class="o">#</span><span class="s">"::"</span><span class="p">))</span><span class="w"> </span><span class="n">active-users</span><span class="p">)))</span><span class="w">
</span></code></pre></div></div>

<h2 id="importance-of-passing-event-timestamp">Importance of passing event timestamp</h2>

<p>Notably, we are using the time-stamp value recorded in the Kafka event (i.e. <strong>event timestamp</strong>), while pushing a user in the redis store. This may seem redundant: we can use the current time-stamp at the time of consuming the events to do this (i.e. <strong>processing timestamp</strong>). This will reduce the payload of the kafka event.</p>

<p>However, relying on processing timestamp may lead to inconsistencies if the consumer dies in the middle of consuming events. In such an event, there will be a gap before consumption can resume. When the consumer resumes comsumption, it will start with consuming the pending events. Many of these events would be stale events. Without the event timestamp recorded in the event payload, all these events will be considered as “new” events. However, by relying on the event time-stamp, the consumer can easily detect stale events and reject them as inactive.</p>]]></content><author><name></name></author><category term="project" /><summary type="html"><![CDATA[In this post, I write about ping-pong - a project that aims at simulating how messages in a live chatroom (with multiple concurrent users) may get processed, using a Kafka messaging system.]]></summary><media:thumbnail xmlns:media="http://search.yahoo.com/mrss/" url="https://otee.dev/assets/images/ping_pong_sequence.png" /><media:content medium="image" url="https://otee.dev/assets/images/ping_pong_sequence.png" xmlns:media="http://search.yahoo.com/mrss/" /></entry><entry><title type="html">Understanding: Log-Structured Merge Trees</title><link href="https://otee.dev/2023/04/17/log-structured-merge-tree.html" rel="alternate" type="text/html" title="Understanding: Log-Structured Merge Trees" /><published>2023-04-17T00:00:00+00:00</published><updated>2023-04-17T00:00:00+00:00</updated><id>https://otee.dev/2023/04/17/log-structured-merge-tree</id><content type="html" xml:base="https://otee.dev/2023/04/17/log-structured-merge-tree.html"><![CDATA[<p>In this post, I am listing down my understanding of Log-Structured Merge Trees (LSM Trees, in short), based on my reading of the first part of Chapter 3 of ‘Designing Data-Intensive Applications’ by Martin Kleppmann.</p>

<ul id="markdown-toc">
  <li><a href="#tldr" id="markdown-toc-tldr">TLDR</a></li>
  <li><a href="#detailed-notes" id="markdown-toc-detailed-notes">Detailed Notes</a>    <ul>
      <li><a href="#simple-k-v-store-the-log" id="markdown-toc-simple-k-v-store-the-log">Simple k-v store: The Log</a></li>
      <li><a href="#using-an-in-memory-hash-map-to-improve-performance" id="markdown-toc-using-an-in-memory-hash-map-to-improve-performance">Using an in-memory hash-map to improve performance</a></li>
      <li><a href="#merger-and-compaction-of-logs" id="markdown-toc-merger-and-compaction-of-logs">Merger and compaction of logs</a></li>
      <li><a href="#sstables-and-lsm-tree" id="markdown-toc-sstables-and-lsm-tree">SSTables and LSM-Tree</a></li>
    </ul>
  </li>
  <li><a href="#references" id="markdown-toc-references">References</a></li>
</ul>

<h2 id="tldr">TLDR</h2>

<ul>
  <li>
    <p>An LSM tree-backed storage engine comprises of an in-memory data-structure, called a <strong>mem-table</strong>. Every write operation is done on this mem-table. This data-structure ensures that keys are stored in a sorted manner, irrespective of the write pattern.</p>
  </li>
  <li>
    <p>Once the size of this data-structure reaches a given threshold, its contents are written to a file on disk (called a log). As the mem-table stores data in a sorted manner, the log file also contains keys in a sorted manner. Note that log files are <strong>immutable</strong> - each time you write to a file you either append or write to a new log file.</p>
  </li>
  <li>
    <p>In the background, multiple log files are <strong>merged and compacted</strong> (i.e. removal of duplicate keys) from time to time.</p>
  </li>
  <li>
    <p><strong>Read path</strong>: Reads are done in the following manner: search for a key in the mem-table, then on the latest log file, all the way up to the oldest log-file.</p>
  </li>
  <li>
    <p><strong>Write path</strong>: Directly update the mem-table. This is one of the reasons LSM trees are <strong>so fast</strong>.</p>
  </li>
  <li>
    <p>In addition to the memtable, we also keep an in-memory hash-index of keys, for each log, where each key maps to the on-disk location of the key. Because keys are always sorted, we keep a sparse index.</p>
  </li>
</ul>

<hr />

<h2 id="detailed-notes">Detailed Notes</h2>

<h3 id="simple-k-v-store-the-log">Simple k-v store: The Log</h3>
<ul>
  <li>
    <p>The simplest form of a key-value datastore would involve a text file (often called a ‘log’), where each line consists of a key-value pair (separated by a comma)</p>
  </li>
  <li>
    <p>For writing to this data store, i.e., creating a new pair or updating an existing pair, we simply append the key-value pair at the end of that log</p>
  </li>
  <li>
    <p>For reading, we need to scan the entire log, by looking for the given key. If two keys are found, the latest key-value pair will be considered. This is because we never overwrite an existing entry in the log: we simply append at the end of the log.</p>
  </li>
  <li>
    <p>This kind of data-store has <strong>very fast writes - O(1)</strong> as appending to a file is a very cheap operation. Conversely, <strong>look-ups are very painful - O(n)</strong>, where n is the number of records in the log.</p>
  </li>
  <li>
    <p>Important: we never write existing data present in the log file.</p>
  </li>
</ul>

<h3 id="using-an-in-memory-hash-map-to-improve-performance">Using an in-memory hash-map to improve performance</h3>

<ul>
  <li>
    <p>To improve the look-up operations, we can make use of <strong>indexes</strong>, which store additional meta-data about the records and act as a “signpost”.</p>
  </li>
  <li>
    <p>Essentially, while doing writes, we store this additional metadata in addition to the appending operation. Thus, adding any kind of index will slow down write operations, but will also speed up read operations. Because the effectiveness of an index is dependent on the patterns of read queries, an application developer needs to manually add indices - they don’t come set by default.</p>
  </li>
  <li>
    <p>One common index is to use an in-memory hash-map, which contains all the keys of the actual data-store, and these keys map to the on-disk location of that key in the data store. This makes look-ups far more efficient: given a key, we can use the in-memory data-structure to find the location of the key on the disk (as opposed to scanning the whole log file).</p>
  </li>
  <li>
    <p>One limitation of this in-memory hashmap approach  is that the total number of keys is limited by the finite size of RAM - since all keys of the data-store needs to be stored in the in-memory data-structure. Given this limitation, this kind of data-store is very useful in cases where the number of keys are finite but the values are updated frequently.</p>
  </li>
  <li>
    <p>We also need to consider the situation where the log file becomes so large that its size becomes comparable to that of the disk. To overcome this, we can break the log file into <strong>segments</strong>, such that, the moment the log reaches a given size, we make subsequent writes on a new segment file.</p>
  </li>
</ul>

<h3 id="merger-and-compaction-of-logs">Merger and compaction of logs</h3>

<ul>
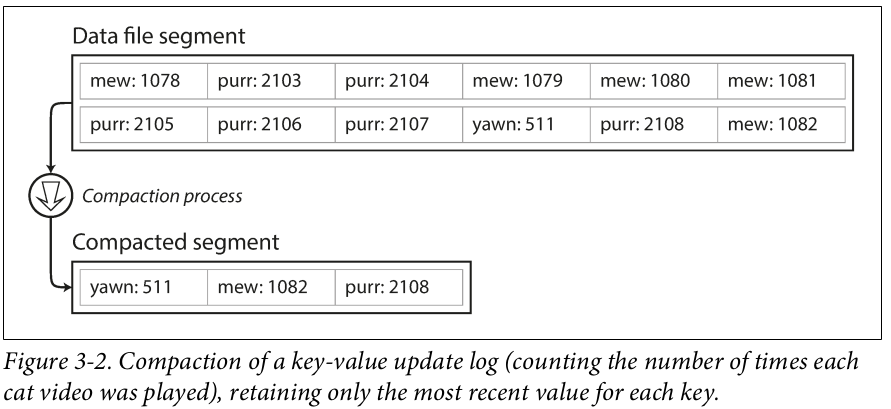
  <li>We can use <strong>compaction</strong> on existing segment files, ie, removing duplicates between two or more existing segments. This can reduce the overall size of the data-store as we get rid of duplicate keys (which are really just redundant data).</li>
</ul>

<p><a href="/assets/images/ddia_figure_3_2.png">
    <img src="/assets/images/ddia_figure_3_2.png" width="80%" />
</a></p>

<p style="font-size:16px; font-style: italic"> Source: Designing Data-Intensive Applications: The Big Ideas Behind Reliable, Scalable, and Maintainable Systems</p>

<ul>
  <li>
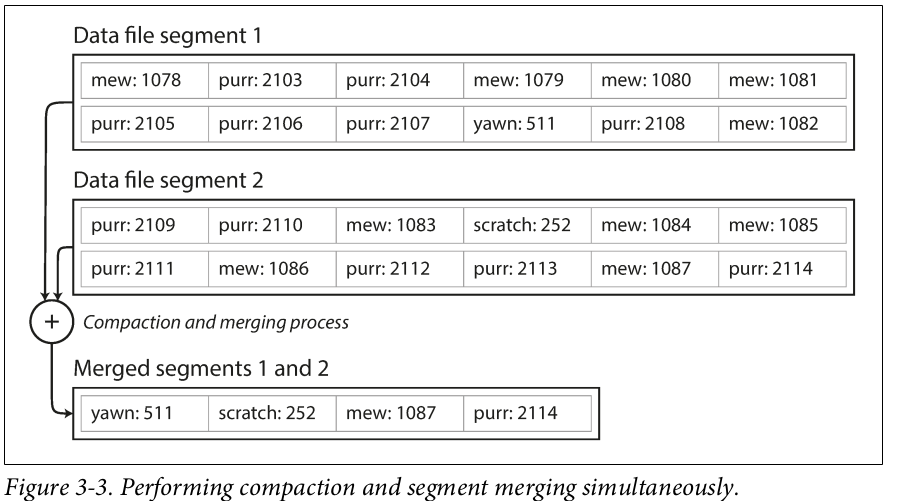
    <p>Since <strong>compaction can make segments smaller</strong>, we can merge two or more segments into one new segment.</p>
  </li>
  <li>
    <p>This compaction and merging of frozen segments can happen asynchronously (in the background), while new writes take place on a new segment and reads use existing segments.</p>
  </li>
</ul>

<p><a href="/assets/images/ddia_figure_3_3.png">
    <img src="/assets/images/ddia_figure_3_3.png" width="80%" />
</a></p>

<p style="font-size:16px; font-style: italic"> Source: Designing Data-Intensive Applications: The Big Ideas Behind Reliable, Scalable, and Maintainable Systems </p>

<ul>
  <li>
    <p>We keep separate in-memory hash-map indices for each segment. When we need to look up a given key, we start with the hash-map of the latest segment and go all the way back to the oldest segment, stopping the moment we find the key we are looking for. <strong>Deleting operations need to be dealt with separately</strong> for this kind of data-store: when a key is deleted, a special value should be stored against it on the log file.</p>
  </li>
  <li>
    <p>If the database crashes, we will need to re-construct the in-memory hash-maps of each segment from scratch. This limitation can be overcome, if we keep a copy of the in-memory data-stores on a separate log of operations  on the disk.</p>
  </li>
  <li>
    <p>Another limitation of this append-only data-store is that it is not efficient for making range queries.</p>
  </li>
</ul>

<h3 id="sstables-and-lsm-tree">SSTables and LSM-Tree</h3>

<ul>
  <li>
    <p>In an append-only data-store, writes are not made in any particular order: they are made sequentially.</p>
  </li>
  <li>
    <p>But we can also store the key-value pairs in a sorted manner (i.e. sorted by keys), while storing in the segment logs. This format is called <strong>Sorted String Tables</strong>.</p>
  </li>
  <li>
    <p>For a given segment log, a single key appears only once (this can be easily achieved by compaction, as seen above).</p>
  </li>
  <li>
    <p>SSTables have several advantages over simple append-only databases.</p>
  </li>
  <li>
    <p>First, merging segments is possible, even when the size of the segment files exceed the available memory. While merging multiple segments, we start with the first key of each segment file, and write the key with the lowest value, and so on (similar to mergesort algorithm). If two or more segments contain the same file, we pick from the segment which is more recent (as that’s how segments are created).</p>
  </li>
  <li>
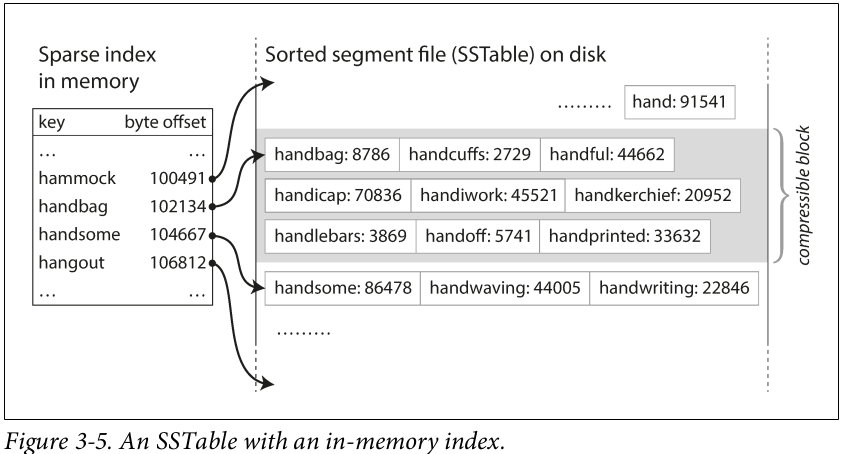
    <p>Second, we no longer need to maintain the file location of each key of the data-store. If we know the location of “handbag” and “hardwork”, we will know that the location of “handsome” will be in between these two locations. So we can jump to the offset of “handbag” and scan till we come across “handsome”. Thus, we no longer need to keep an in-memory map of <strong><em>all the keys of the data-store</em></strong>.</p>
  </li>
</ul>

<p><a href="/assets/images/ddia_figure_3_5.png">
    <img src="/assets/images/ddia_figure_3_5.png" width="80%" />
</a></p>
<p style="font-size:16px; font-style: italic"> Source: Designing Data-Intensive Applications: The Big Ideas Behind Reliable, Scalable, and Maintainable Systems </p>

<ul>
  <li>
    <p>How to store keys in a sorted manner, in the first place? We can use an appropriate in-memory tree data-structure (such as a <strong>red-black tree</strong>) which allows us to write data in any order, but which stores them in a sorted manner. Thus, when a write operation is made, the key-value pair is stored in an in-memory data-structure which ensures this sorting property.</p>
  </li>
  <li>
    <p><strong>Once this data-structure passes a given threshold, we write the key-value pairs to a segment file in a sorted manner, thereby creating SSTables.</strong></p>
  </li>
  <li>
    <p>For a read operation, we first search for the key in the memtable, then to the most recent SSTable segment file, and so on.</p>
  </li>
  <li>
    <p>One downside: <strong>in case of a crash, the most recent keys in the memtable will be lost.</strong> To fix this, we take a backup of the memtable in a separate file - which can simply be <strong>an append-only log file</strong>. In effect, each write operation makes two operations, it writes to the memtable and to the back-up append-only log file. The latter is used only for re-constructing the mem-table in case of a server crash.
Storage engines which are based on this principle of merging and compacting sorted files are often called LSM storage engines, or, Log-structured Merge-Tree storage engines.</p>
  </li>
  <li>
    <p>In LSM storage engines, look-up operations for non-existent keys are slow: to confirm a key is absent, we need to traverse from the memtable all the way to the oldest segment file. We can use <strong><em>bloom filters</em></strong>, to optimise this, as it can help us in knowing if a key is absent or not.</p>
  </li>
  <li>
    <p>Like the append-only storage engine, we keep in-memory hash maps for each segment file, which stores keys sparsely (ie not every key, but every n keys).</p>
  </li>
</ul>

<h2 id="references">References</h2>

<ul>
  <li>Martin Kleppmann, Designing Data-Intensive Applications: The Big Ideas Behind Reliable, Scalable, and Maintainable Systems (O’Reilly Media. 1st Edn.), Chapter 3</li>
  <li>‘How do LSM Trees work?’,<a href="https://yetanotherdevblog.com/lsm/">https://yetanotherdevblog.com/lsm/</a></li>
</ul>]]></content><author><name></name></author><category term="conceptual" /><summary type="html"><![CDATA[In this post, I am listing down my understanding of Log-Structured Merge Trees (LSM Trees, in short), based on my reading of the first part of Chapter 3 of ‘Designing Data-Intensive Applications’ by Martin Kleppmann.]]></summary><media:thumbnail xmlns:media="http://search.yahoo.com/mrss/" url="https://otee.dev/assets/images/ddia_figure_3_3.png" /><media:content medium="image" url="https://otee.dev/assets/images/ddia_figure_3_3.png" xmlns:media="http://search.yahoo.com/mrss/" /></entry><entry><title type="html">Transitioning from Heroku Free Tier to GCP + YugabyteDB</title><link href="https://otee.dev/2023/01/08/migrating-heroku-to-gcp-and-yugabyte.html" rel="alternate" type="text/html" title="Transitioning from Heroku Free Tier to GCP + YugabyteDB" /><published>2023-01-08T00:00:00+00:00</published><updated>2023-01-08T00:00:00+00:00</updated><id>https://otee.dev/2023/01/08/migrating-heroku-to-gcp-and-yugabyte</id><content type="html" xml:base="https://otee.dev/2023/01/08/migrating-heroku-to-gcp-and-yugabyte.html"><![CDATA[<p>This post captures the list of steps I followed to migrate a HTTP service from a Heroku dyno to a Google Cloud Platform instance powered by YugabyteDB cluster as the database.</p>

<ul id="markdown-toc">
  <li><a href="#introduction" id="markdown-toc-introduction">Introduction</a></li>
  <li><a href="#current-architecture" id="markdown-toc-current-architecture">Current Architecture</a></li>
  <li><a href="#new-architecture" id="markdown-toc-new-architecture">New Architecture</a></li>
  <li><a href="#phase-1-setting-up-a-parallel-service-on-gcp" id="markdown-toc-phase-1-setting-up-a-parallel-service-on-gcp">Phase 1: Setting up a parallel service on GCP</a>    <ul>
      <li><a href="#step-11-create-yugabytedb-cluster" id="markdown-toc-step-11-create-yugabytedb-cluster">Step 1.1: Create YugabyteDB cluster</a></li>
      <li><a href="#step-12-set-up-the-database" id="markdown-toc-step-12-set-up-the-database">Step 1.2: Set up the Database</a></li>
      <li><a href="#step-13-local-sanity-testing" id="markdown-toc-step-13-local-sanity-testing">Step 1.3: Local sanity testing</a></li>
      <li><a href="#step-14-deploy-http-server-on-gcp" id="markdown-toc-step-14-deploy-http-server-on-gcp">Step 1.4: Deploy HTTP server on GCP</a></li>
      <li><a href="#step-15-setting-up-nginx-config" id="markdown-toc-step-15-setting-up-nginx-config">Step 1.5: Setting up nginx config</a></li>
      <li><a href="#step-16-add-gcp-instance-ip-address-to-yugabyte-allow-list" id="markdown-toc-step-16-add-gcp-instance-ip-address-to-yugabyte-allow-list">Step 1.6: Add GCP instance IP address to Yugabyte allow-list</a></li>
    </ul>
  </li>
  <li><a href="#phase-2-bring-the-gcp-service-upto-speed" id="markdown-toc-phase-2-bring-the-gcp-service-upto-speed">Phase 2: Bring the GCP service upto speed</a>    <ul>
      <li><a href="#step-21-migrate-existing-data-from-heroku-posgresql-to-yugabytedb-managed" id="markdown-toc-step-21-migrate-existing-data-from-heroku-posgresql-to-yugabytedb-managed">Step 2.1: Migrate existing data from Heroku PosgreSQL to YugabyteDB Managed</a></li>
      <li><a href="#step-22-install-twirl-as-a-service-on-gcp" id="markdown-toc-step-22-install-twirl-as-a-service-on-gcp">Step 2.2: Install Twirl as a service on GCP</a></li>
      <li><a href="#step-23-divert-traffic-from-heroku-service-to-the-gcp-service" id="markdown-toc-step-23-divert-traffic-from-heroku-service-to-the-gcp-service">Step 2.3: Divert traffic from Heroku service to the GCP service</a></li>
    </ul>
  </li>
  <li><a href="#phase-3-shut-down-heroku-server" id="markdown-toc-phase-3-shut-down-heroku-server">Phase 3: Shut down Heroku server</a></li>
  <li><a href="#future-improvements" id="markdown-toc-future-improvements">Future Improvements</a>    <ul>
      <li><a href="#permanent-redirections" id="markdown-toc-permanent-redirections">Permanent Redirections</a></li>
      <li><a href="#backups" id="markdown-toc-backups">Backups</a></li>
    </ul>
  </li>
</ul>

<h2 id="introduction">Introduction</h2>

<p>To deploy <a href="https://twirl.otee.dev/">Twirl</a>, my URL shortening service, I was using Heroku’s free tier plans (<em>more on how I built this app <a href="https://otee.dev/2021/11/14/twirl-user-management.html">here</a>, <a href="https://otee.dev/2021/11/14/twirl-user-management.html">here</a>, and <a href="https://otee.dev/2021/11/14/twirl-user-management.html">here</a>)</em>. But now that it is <a href="https://techcrunch.com/2022/08/25/heroku-announces-plans-to-eliminate-free-plans-blaming-fraud-and-abuse/">no longer free</a> and (<em>more importantly</em>) there is no plausible way to pay for their premium plans from India (whether via Indian cards or any other payment methods), I was forced to shift my app to a more traditional cloud provider.</p>

<p>Since I have an <a href="https://otee.dev/2021/12/31/deploying-to-google-cloud-compute.html">existing setup</a> on Google Cloud Platform (GCP), I decided to migrate my setup to my GCP instance. Additionally, I chose to use YugabyteDB instead of PostgreSQL as my database.</p>

<p><a href="/assets/images/heroku_to_gcp_and_yugabyte.png">
    <img src="/assets/images/heroku_to_gcp_and_yugabyte.png" border="1px" width="100%" text-align="center" />
</a></p>

<p>Here are the steps I followed to migrate out of Heroku, for my URL shortening service: <a href="https://twirl.otee.dev/">twirl.otee.dev</a></p>

<h2 id="current-architecture">Current Architecture</h2>

<p>The following diagram largely displays the current architecture. For more details, read: <a href="https://otee.dev/2022/01/13/making-short-links-shorter.html">https://otee.dev/2022/01/13/making-short-links-shorter.html</a></p>

<p>Major components:</p>

<ul>
  <li><strong>nginx</strong>: this is running on GCP and is used for custom domain mapping to a free Heroku tier dyno, without having the default <code class="language-plaintext highlighter-rouge">herokuapp</code> domain in the URL.</li>
  <li><strong>HTTP server</strong>: this is NodeJs app that uses PostgreSQL for storing state. Here’s the repo: <a href="https://github.com/oitee/twirl">https://github.com/oitee/twirl</a></li>
  <li><strong>PostgreSQL</strong>: the database that stores the users, short links and other associated data.</li>
</ul>

<p><a href="/assets/images/existing_twirl_architecture.png">
    <img src="/assets/images/existing_twirl_architecture.png" border="1px" width="70%" />
</a></p>

<h2 id="new-architecture">New Architecture</h2>

<p>In the <strong>first phase</strong>, we want to independently run the system on GCP. In this lift-and-shift phase, each of the components of the system will be running outside of Heroku:</p>

<table>
  <thead>
    <tr>
      <th>Existing component</th>
      <th>Change</th>
    </tr>
  </thead>
  <tbody>
    <tr>
      <td>nginx</td>
      <td>Redirect to local port instead of Heroku dyno</td>
    </tr>
    <tr>
      <td>Heroku HTTP server</td>
      <td>GCP Compute Instance</td>
    </tr>
    <tr>
      <td>PostgreSQL</td>
      <td>Managed YugabyteDB</td>
    </tr>
  </tbody>
</table>

<p>In the <strong>second phase</strong>, we want to move the data that is already present in the PostgreSQL database on Heroku, to the new YugabyteDB Managed instance. The reason for choosing <a href="https://www.yugabyte.com/">YugabyteDB</a> was not lightly made. Most importantly, it supports PostgreSQL operations so it fits our use-case. There are many other advantages as well which I will illustrate in another post.</p>

<p>In the <strong>last phase</strong>, we will decommission Heroku dyno.</p>

<h2 id="phase-1-setting-up-a-parallel-service-on-gcp">Phase 1: Setting up a parallel service on GCP</h2>

<h3 id="step-11-create-yugabytedb-cluster">Step 1.1: Create YugabyteDB cluster</h3>

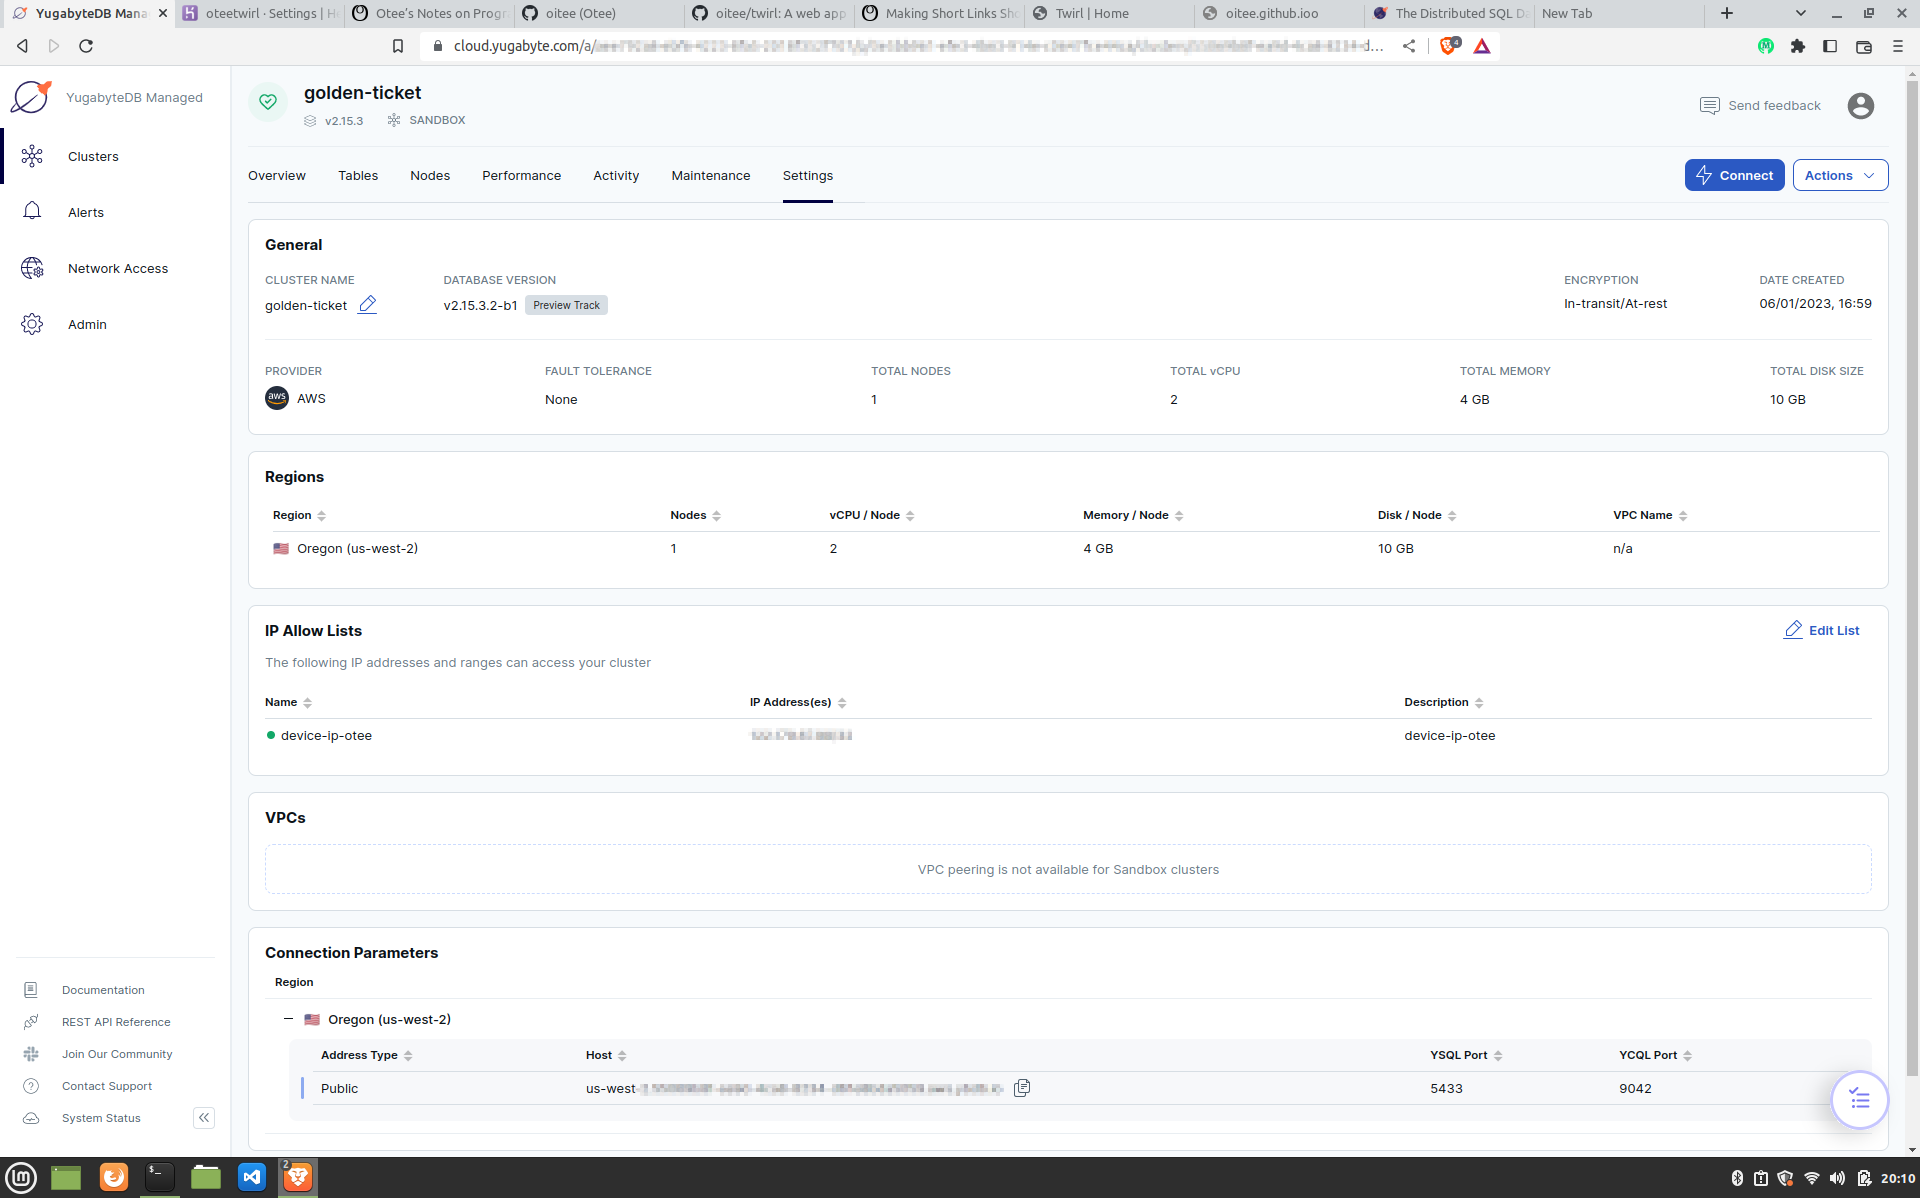
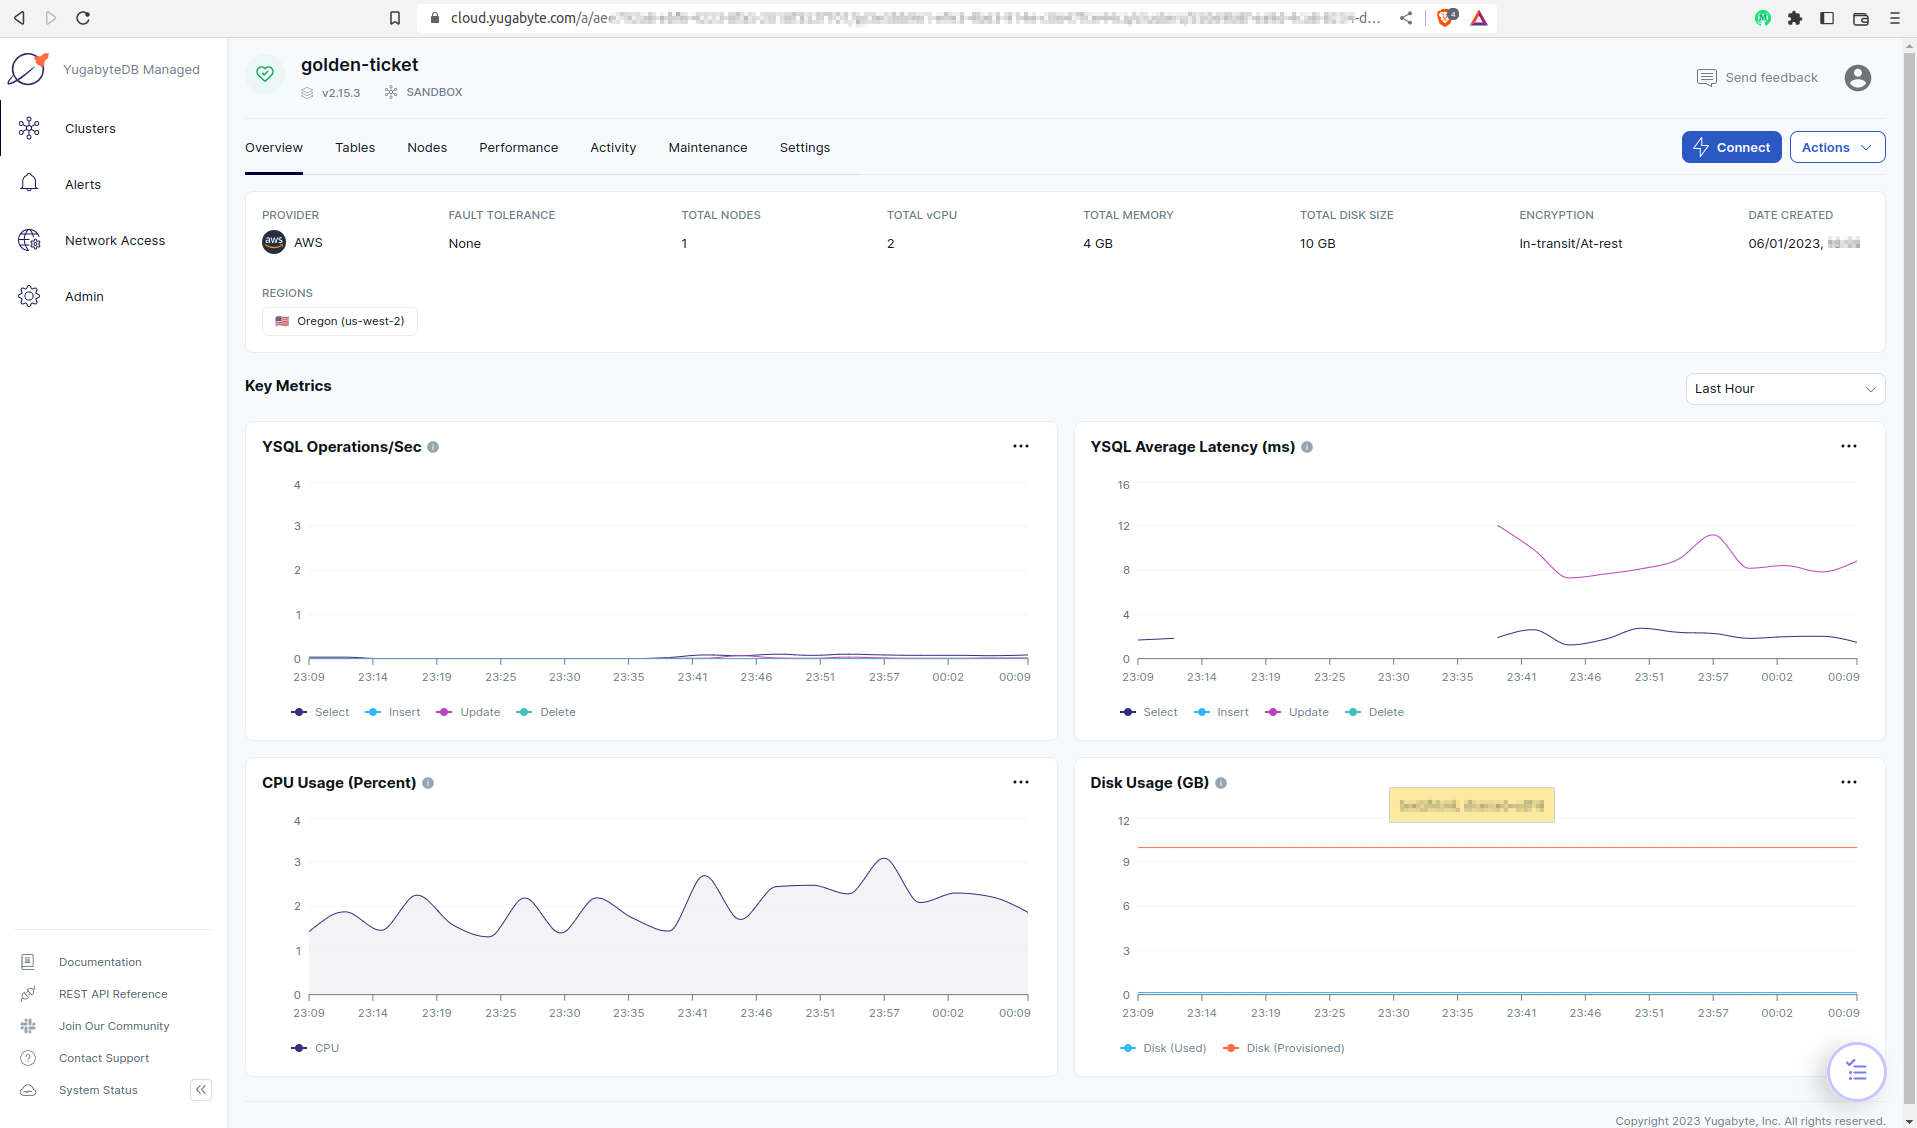
<p>Setting up a YugabyteDB Managed instance is quite straight-forward. After completing the sign-up process on <a href="https://cloud.yugabyte.com/signup">https://cloud.yugabyte.com/signup</a>, the cluster looks like this:</p>

<p><a href="/assets/images/yugabyte_dashboard_snapshot.png">
    <img src="/assets/images/yugabyte_dashboard_snapshot.png" border="1px" width="100%" />
</a></p>

<p>Once set up, we need to connect to this database to set up our schema for the URL shortening app, as per the <a href="https://github.com/oitee/twirl#readme">ReadMe</a> of the project. To do this, we have to use the connection string as per the <a href="https://docs.yugabyte.com/preview/yugabyte-cloud/cloud-connect/connect-applications/#connection-parameters">documentation</a> on YugabyteDB:</p>

<div class="language-bash highlighter-rouge"><div class="highlight"><pre class="highlight"><code>postgresql://&lt;DB USER&gt;:&lt;DB PASSWORD&gt;@us-west-2.....aws.ybdb.io:5433/yugabyte?ssl<span class="o">=</span><span class="nb">true</span>&amp;sslmode<span class="o">=</span>verify-full&amp;sslrootcert<span class="o">=</span>&lt;ROOT_CERT_PATH&gt;
</code></pre></div></div>

<p>Note that to connect to the YugabyteDB cluster, we need to download a digital certificate - this can be done from the dashboard itself, by clicking on the <code class="language-plaintext highlighter-rouge">connect</code> button on the top left corner, and choosing the <code class="language-plaintext highlighter-rouge">Connect to your Application</code> option. We need to add the path to this certificate to the connection string. This certificate is used for verify the identity of clusters, as YugabyteDB uses TLS protocol for communicating with its clusters.</p>

<p><a href="/assets/images/root_cert_download.png">
    <img src="/assets/images/root_cert_download.png" border="1px" width="60%" />
</a></p>

<p>Also, to connect to the YugabyteDB cluster, we need to white-list the client IP address. This also can be done from the dashboard itself (<em>which provides a convenient option to add your current IP address to the IP Allow list</em>). At this point, we must add the IP address of our local machine. Ultimately, the IP Allow list should contain the public IP address of our GCP instance only.</p>

<h3 id="step-12-set-up-the-database">Step 1.2: Set up the Database</h3>

<p>To connect to the YugabyteDB, we can use the command line utility <code class="language-plaintext highlighter-rouge">psql</code> which is compatible with PostgreSQL and like databases.</p>

<p>We will use the connection string mentioned above to connect:</p>

<div class="language-bash highlighter-rouge"><div class="highlight"><pre class="highlight"><code>psql <span class="s2">"postgresql://&lt;DB USER&gt;:&lt;DB PWD&gt;@us-west-2....aws.ybdb.io:5433/yugabyte?ssl=true&amp;sslmode=verify-full&amp;sslrootcert=/home/otee/Downloads/root.crt"</span>
</code></pre></div></div>

<p>At this point, <code class="language-plaintext highlighter-rouge">psql</code> should connect to the default <code class="language-plaintext highlighter-rouge">yugabyte</code> database. We can now create a new database for our app, <code class="language-plaintext highlighter-rouge">twirl</code></p>

<div class="language-bash highlighter-rouge"><div class="highlight"><pre class="highlight"><code><span class="nv">yugabyte</span><span class="o">=&gt;</span> DROP DATABASE IF EXISTS twirl<span class="p">;</span>
NOTICE: database <span class="s2">"twirl"</span> does not exist, skipping
DROP DATABASE
<span class="nv">yugabyte</span><span class="o">=&gt;</span> CREATE DATABASE twirl<span class="p">;</span>

CREATE DATABASE
<span class="nv">yugabyte</span><span class="o">=&gt;</span>
<span class="nv">yugabyte</span><span class="o">=&gt;</span> <span class="se">\c</span>onnect twirl<span class="p">;</span>

psql <span class="o">(</span>12.12 <span class="o">(</span>Ubuntu 12.12-0ubuntu0.20.04.1<span class="o">)</span>, server 11.2-YB-2.15.3.2-b0<span class="o">)</span>
SSL connection <span class="o">(</span>protocol: TLSv1.3, cipher: TLS_AES_256_GCM_SHA384, bits: 256, compression: off<span class="o">)</span>
You are now connected to database <span class="s2">"twirl"</span> as user <span class="s2">"admin"</span><span class="nb">.</span>
<span class="nv">twirl</span><span class="o">=&gt;</span>
</code></pre></div></div>

<p>After this, the requisite schema for this app can be set up, following the queries mentioned ont the <a href="https://github.com/oitee/twirl#running-the-system">ReadMe</a>.</p>

<h3 id="step-13-local-sanity-testing">Step 1.3: Local sanity testing</h3>

<p>Now that the schema has been set up correctly, we need to make sure our app can use this. For this, we can run our app locally and use this connection string as the db endpoint. This is for local sanity testing that the app functions normally before we try anything infrastructure specific.</p>

<p>To run the app locally, the following command needs to be run. This command is specific to the app at hand, which expects a few environment variables, like the db connection string:</p>

<div class="language-bash highlighter-rouge"><div class="highlight"><pre class="highlight"><code><span class="c"># Note that we need to use the new database `twirl`</span>
<span class="c"># and not the default `yugabyte` in the connection string</span>
<span class="nv">PG_SSL_CONNECTION</span><span class="o">=</span><span class="nb">true </span><span class="nv">CUSTOM_DOMAIN_NAME</span><span class="o">=</span>localhost:4001 <span class="nv">RECAPTCHA_SECRET</span><span class="o">=</span>EXEMPTED <span class="nv">PORT</span><span class="o">=</span>4001 <span class="nv">COOKIE_SECRET</span><span class="o">=</span>&lt;eiffeltower...&gt; <span class="nv">PG_CONNECTION_STRING</span><span class="o">=</span><span class="s2">"postgresql://&lt;DB USER&gt;:&lt;DB PWD&gt;@us-west-2....aws.ybdb.io:5433/twirl?ssl=true&amp;sslmode=verify-full&amp;sslrootcert=/home/otee/Downloads/root.crt"</span> node app.js
Twirl listenning on 4001...
</code></pre></div></div>

<p>At this point, the app works locally! 🎇</p>

<h3 id="step-14-deploy-http-server-on-gcp">Step 1.4: Deploy HTTP server on GCP</h3>

<p>Now, we need to setup the app on our GCP instance. For this, the following steps need to be followed:</p>

<ol>
  <li>
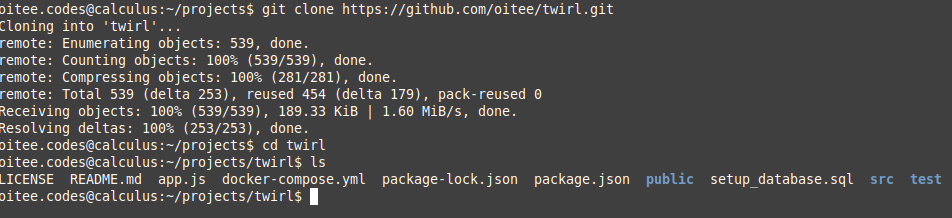
    <p>After ssh-ing to GCP instance, clone the repo:</p>

    <p><a href="/assets/images/git_clone_twirl.png">
     <img src="/assets/images/git_clone_twirl.png" border="1px" width="100%" />
 </a></p>
  </li>
  <li>
    <p>Copy the root certificate file (downloaded from YugabyteDB dashboard) to the GCP instance (ssh alias already set up as <code class="language-plaintext highlighter-rouge">calculus</code> locally).</p>

    <div class="language-bash highlighter-rouge"><div class="highlight"><pre class="highlight"><code> scp /home/otee/Downloads/root.crt calculus:/home/oitee.codes
</code></pre></div>    </div>
  </li>
  <li>
    <p>Run the command we ran locally earlier:</p>

    <div class="language-bash highlighter-rouge"><div class="highlight"><pre class="highlight"><code> <span class="nv">PG_SSL_CONNECTION</span><span class="o">=</span><span class="nb">true </span><span class="nv">CUSTOM_DOMAIN_NAME</span><span class="o">=</span>localhost:4001 <span class="nv">RECAPTCHA_SECRET</span><span class="o">=</span>EXEMPTED <span class="nv">PORT</span><span class="o">=</span>4001 <span class="nv">COOKIE_SECRET</span><span class="o">=</span>&lt;eiffeltower...&gt; <span class="nv">PG_CONNECTION_STRING</span><span class="o">=</span><span class="s2">"postgresql://&lt;DB USER&gt;:&lt;DB PWD&gt;@us-west-2....aws.ybdb.io:5433/twirl?ssl=true&amp;sslmode=verify-full&amp;sslrootcert=/home/oitee.codes/root.crt"</span> node app.js
 Twirl listenning on 4122...
</code></pre></div>    </div>
  </li>
</ol>

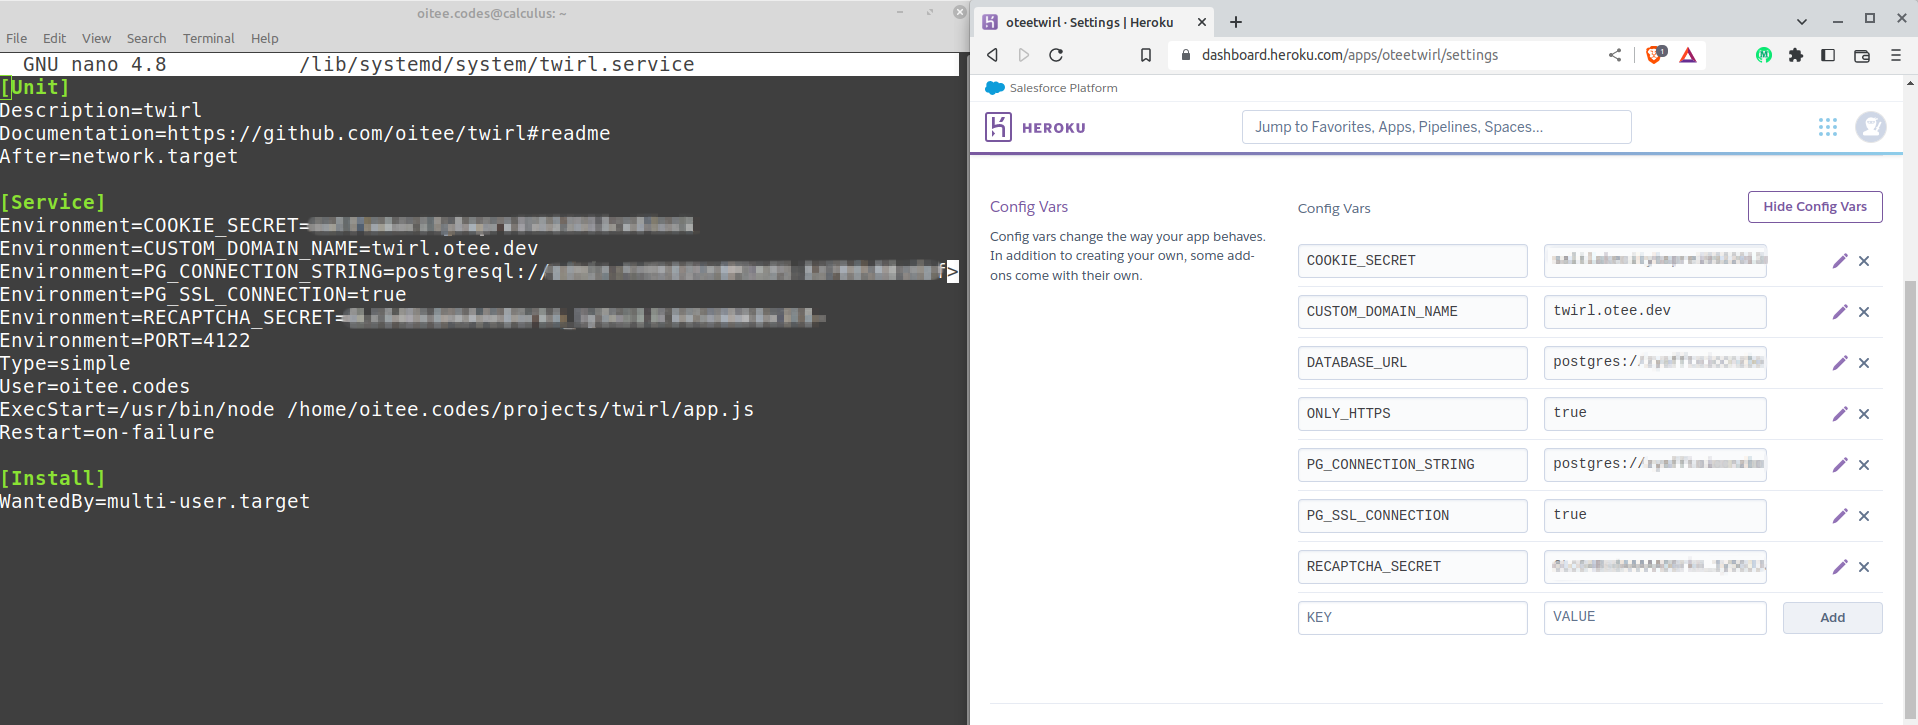
<p>Once we see the system startup, we have no way of connecting to this port from the browser because this port is not exposed. We will do this in the next step.</p>

<p>Note: When we run a service on an instance like this, one of the housekeeping items to ensure is that if the instance reboots (which it will eventually), we have to make sure that our HTTP server is automatically started. This was already being taken care of by Heroku, but here we need to do this ourselves (<em>this will be done later</em>). But even when we do this, it is not guaranteed that the instance would not be irrevocably lost; in which case we will need to set it up manually again.</p>

<h3 id="step-15-setting-up-nginx-config">Step 1.5: Setting up nginx config</h3>

<p>For our parallel (trial) service, we need to create a simple nginx config that maps requests to a test sub-domain <a href="http://twirl-test.otee.dev"><code class="language-plaintext highlighter-rouge">twirl-test.otee.dev</code></a> to this new HTTP service.</p>

<div class="language-bash highlighter-rouge"><div class="highlight"><pre class="highlight"><code>server <span class="o">{</span>
        listen 80<span class="p">;</span>
        listen <span class="o">[</span>::]:80<span class="p">;</span>
        server_name twirl-test.otee.dev<span class="p">;</span>
        location / <span class="o">{</span>
         proxy_pass http://127.0.0.1:4122<span class="p">;</span>
        <span class="o">}</span>
<span class="o">}</span>
</code></pre></div></div>

<p>Next, we need to add a new DNS entry pointing the trial sub-domain <code class="language-plaintext highlighter-rouge">twirl-test.otee.dev</code> to the GCP instance.</p>

<p>Unfortunately, <code class="language-plaintext highlighter-rouge">.dev</code> domains only support https connections. So, we have to install a certificate for this sub-domain. We can do this with <code class="language-plaintext highlighter-rouge">certbot</code>, (following the <a href="https://certbot.eff.org/instructions?ws=nginx&amp;os=ubuntufocal">official documentation</a>)</p>

<div class="language-bash highlighter-rouge"><div class="highlight"><pre class="highlight"><code><span class="nb">sudo </span>certbot <span class="nt">--nginx</span>
</code></pre></div></div>

<p><a href="/assets/images/certbot_certification.png">
    <img src="/assets/images/certbot_certification.png" border="1px" width="100%" />
</a></p>

<p>After cerbot finishes adding the certificate, the earlier nginx configuration will be updated with the new certificate enforcing HTTPS:</p>

<div class="language-bash highlighter-rouge"><div class="highlight"><pre class="highlight"><code>server <span class="o">{</span>
        server_name twirl-test.otee.dev<span class="p">;</span>
        location / <span class="o">{</span>
         proxy_pass http://127.0.0.1:4122<span class="p">;</span>
        <span class="o">}</span>

    listen <span class="o">[</span>::]:443 ssl<span class="p">;</span> <span class="c"># managed by Certbot</span>
    listen 443 ssl<span class="p">;</span> <span class="c"># managed by Certbot</span>
    ssl_certificate /etc/letsencrypt/live/twirl-test.otee.dev/fullchain.pem<span class="p">;</span> <span class="c"># managed by Certbot</span>
    ssl_certificate_key /etc/letsencrypt/live/twirl-test.otee.dev/privkey.pem<span class="p">;</span> <span class="c"># managed by Certbot</span>
    include /etc/letsencrypt/options-ssl-nginx.conf<span class="p">;</span> <span class="c"># managed by Certbot</span>
    ssl_dhparam /etc/letsencrypt/ssl-dhparams.pem<span class="p">;</span> <span class="c"># managed by Certbot</span>

<span class="o">}</span>
server <span class="o">{</span>
    <span class="k">if</span> <span class="o">(</span><span class="nv">$host</span> <span class="o">=</span> twirl-test.otee.dev<span class="o">)</span> <span class="o">{</span>
        <span class="k">return </span>301 https://<span class="nv">$host$request_uri</span><span class="p">;</span>
    <span class="o">}</span> <span class="c"># managed by Certbot</span>

        listen 80<span class="p">;</span>
        listen <span class="o">[</span>::]:80<span class="p">;</span>
        server_name twirl-test.otee.dev<span class="p">;</span>
    <span class="k">return </span>404<span class="p">;</span> <span class="c"># managed by Certbot</span>

<span class="o">}</span>
</code></pre></div></div>

<h3 id="step-16-add-gcp-instance-ip-address-to-yugabyte-allow-list">Step 1.6: Add GCP instance IP address to Yugabyte allow-list</h3>

<p>The GCP IP address needs to be white-listed on the YugabyteDB dashboard, because random connections to the database are not allowed. Note that we need to add the <strong>permanent public IP address</strong> (and not the internal ephemeral IP address) of the GCP instance.</p>

<p>Now, the system should work with the YugabyteDB as the database!</p>

<p>Note: we have thus far set-up a parallel service using a temporary sub-domain; we will still need to point <a href="http://twirl.otee.dev"><code class="language-plaintext highlighter-rouge">twirl.otee.dev</code></a> (the original sub-domain) to this GCP instance. This will be done at a later step.</p>

<h2 id="phase-2-bring-the-gcp-service-upto-speed">Phase 2: Bring the GCP service upto speed</h2>

<h3 id="step-21-migrate-existing-data-from-heroku-posgresql-to-yugabytedb-managed">Step 2.1: Migrate existing data from Heroku PosgreSQL to YugabyteDB Managed</h3>

<p>Now that the HTTP server is working, we need to migrate the existing data from the postgreSQL database on Heroku to the newly set-up YugabyteDB database.</p>

<p>For this, we can use <code class="language-plaintext highlighter-rouge">pg_dump</code> which comes installed with <code class="language-plaintext highlighter-rouge">psql</code>. <code class="language-plaintext highlighter-rouge">pg_dump</code> is a back-up utility for a PostgreSQL database. It spits out SQL commands which can be used to reconstruct the database with all its the data present at the time of the backup.</p>

<p>For this, we need to use the same PostgreSQL connection string that the Heroku app uses.</p>

<p>Note: We could not use <code class="language-plaintext highlighter-rouge">pg_dump</code> from the terminal of our local machine directly, because the Heroku instance was using postgres version 13 and the corresponding <code class="language-plaintext highlighter-rouge">postgres-client</code> version was not readily available. So, we used this <a href="https://github.com/oitee/twirl/blob/main/docker-compose.yml">docker file</a> and used <code class="language-plaintext highlighter-rouge">pg_dump</code> inside that docker container:</p>

<div class="language-bash highlighter-rouge"><div class="highlight"><pre class="highlight"><code><span class="c"># Going into the container</span>
<span class="nb">sudo </span>docker <span class="nb">exec</span> <span class="nt">-it</span> twirl_postgres_1 bash

root@3012d2b15617:/# pg_dump <span class="nt">-d</span> <span class="s2">"&lt;psql connection string&gt;"</span> <span class="nt">-f</span> sql_queries.txt

<span class="c">##Leave the Docker container and copy the file</span>
<span class="nb">sudo </span>docker <span class="nb">cp </span>twirl_postgres_1:/sql_queries.txt /tmp/sql_queries.txt
</code></pre></div></div>

<p>Now that the backup is ready, we need to recreate the <code class="language-plaintext highlighter-rouge">twirl</code> database on YugabyteDB. For this, we need to connect to the default database on YugabyteDB called <code class="language-plaintext highlighter-rouge">yugabyte</code> and create the <code class="language-plaintext highlighter-rouge">twirl</code> database afresh.</p>

<div class="language-bash highlighter-rouge"><div class="highlight"><pre class="highlight"><code><span class="nv">yugabyte</span><span class="o">=&gt;</span> DROP DATABASE IF EXISTS twirl<span class="p">;</span>
DROP DATABASE
<span class="nv">yugabyte</span><span class="o">=&gt;</span> CREATE DATABASE twirl<span class="p">;</span>

CREATE DATABASE
<span class="nv">yugabyte</span><span class="o">=&gt;</span>
</code></pre></div></div>

<p>Next, we need to restore the data from the file created by <code class="language-plaintext highlighter-rouge">pg_dump</code>. Since this file contains just SQL commands, we can just run <code class="language-plaintext highlighter-rouge">psql</code> on the new database taking the SQL commands from the file instead of the prompt:</p>

<div class="language-bash highlighter-rouge"><div class="highlight"><pre class="highlight"><code><span class="c"># Connection string to yugabyte</span>
psql <span class="s2">"postgresql://....ybdb.io:5433/twirl?ssl=true&amp;sslmode=verify-full&amp;sslrootcert=/home/otee/Downloads/root.crt"</span> <span class="nt">-f</span> /tmp/sql_queries.txt
</code></pre></div></div>

<p>Note that some of the statements may fail - this can be due to commands related to ownership access and other settings but the data should not be missing. Once the back-up is complete, we can do a simple sanity test by checking the number of rows in each table in both the databases.</p>

<p>At this point, our parallel service is upto speed with the existing service. In other words, <a href="http://twirl-test.otee.dev"><code class="language-plaintext highlighter-rouge">twirl-test.otee.dev</code></a> and <a href="http://twirl.otee.dev"><code class="language-plaintext highlighter-rouge">twirl.otee.dev</code></a> should have the same data, i.e., user credentials, short-links, access counts etc. So, we have successfully migrated the data from Heroku to YugabyteDB and therefore most of the work is now done. 🥂</p>

<h3 id="step-22-install-twirl-as-a-service-on-gcp">Step 2.2: Install Twirl as a service on GCP</h3>

<p>The node process running in the background can crash due to unforeseen exceptions, out-of-memory errors or some other reason like restarting of the VM itself. When this happens (as it inevitably will), our node process will terminate and our app will be unavailable. To solve this, we can use <code class="language-plaintext highlighter-rouge">systemd</code>. It is a “system and service manager” for Linux Operating Systems.</p>

<p>On the GCP instance, we need to create a new <code class="language-plaintext highlighter-rouge">systemd</code> service:</p>

<div class="language-bash highlighter-rouge"><div class="highlight"><pre class="highlight"><code><span class="nb">sudo </span>nano /lib/systemd/system/twirl.service
</code></pre></div></div>

<p>This file should contain the following:</p>

<div class="language-bash highlighter-rouge"><div class="highlight"><pre class="highlight"><code><span class="o">[</span>Unit]
<span class="nv">Description</span><span class="o">=</span>twirl
<span class="nv">Documentation</span><span class="o">=</span>https://github.com/oitee/twirl#readme
<span class="nv">After</span><span class="o">=</span>network.target

<span class="o">[</span>Service]
<span class="nv">Environment</span><span class="o">=</span><span class="nv">COOKIE_SECRET</span><span class="o">=</span>XXX
<span class="nv">Environment</span><span class="o">=</span><span class="nv">CUSTOM_DOMAIN_NAME</span><span class="o">=</span>twirl.otee.dev
<span class="nv">Environment</span><span class="o">=</span><span class="nv">PG_CONNECTION_STRING</span><span class="o">=</span>postgresql://XXX.aws.ybdb.io:5433/twirl?ssl<span class="o">=</span><span class="nb">true</span>&amp;sslmode<span class="o">=</span>verify-full&amp;sslrootcert<span class="o">=</span>/home/oitee.codes/root.crt
<span class="nv">Environment</span><span class="o">=</span><span class="nv">PG_SSL_CONNECTION</span><span class="o">=</span><span class="nb">true
</span><span class="nv">Environment</span><span class="o">=</span><span class="nv">RECAPTCHA_SECRET</span><span class="o">=</span>XXX
<span class="nv">Environment</span><span class="o">=</span><span class="nv">PORT</span><span class="o">=</span>4122
<span class="nv">Type</span><span class="o">=</span>simple
<span class="nv">User</span><span class="o">=</span>oitee.codes
<span class="nv">ExecStart</span><span class="o">=</span>/usr/bin/node /home/oitee.codes/projects/twirl/app.js
<span class="nv">Restart</span><span class="o">=</span>on-failure

<span class="o">[</span>Install]
<span class="nv">WantedBy</span><span class="o">=</span>multi-user.target
</code></pre></div></div>

<p>Note that we added the <code class="language-plaintext highlighter-rouge">PORT</code> environment variable which was not required on Heroku because it was setup by the setup of Heroku.</p>

<p><a href="/assets/images/twirl_env_vars.png">
    <img src="/assets/images/twirl_env_vars.png" border="1px" width="100%" />
</a></p>

<h3 id="step-23-divert-traffic-from-heroku-service-to-the-gcp-service">Step 2.3: Divert traffic from Heroku service to the GCP service</h3>

<p>So far we have been making changes on a new sub-domain <a href="http://twirl-test.otee.dev"><code class="language-plaintext highlighter-rouge">twirl-test.otee.dev</code></a>. Now that we are confident that the GCP service is working as expected, we can stop the traffic to the Heroku server via <a href="http://twirl.otee.dev"><code class="language-plaintext highlighter-rouge">twirl.otee.dev</code></a> and instead serve it from the GCP instance through <code class="language-plaintext highlighter-rouge">twirl.otee.dev</code>. Once we achieve this, <code class="language-plaintext highlighter-rouge">twirl-test.otee.dev</code> will no longer be required.</p>

<p>We have to change the nginx configuration for <code class="language-plaintext highlighter-rouge">twirl.otee.dev</code> to point to the local port instead of Heroku. Current configuration looks like:</p>

<div class="language-bash highlighter-rouge"><div class="highlight"><pre class="highlight"><code>server <span class="o">{</span>
    listen 443 ssl<span class="p">;</span>
    server_name twirl.otee.dev<span class="p">;</span>
    <span class="k">return </span>301 <span class="nv">$scheme</span>://oteetwirl.herokuapp.com<span class="nv">$request_uri</span><span class="p">;</span>

    ssl_certificate /etc/letsencrypt/live/twirl.otee.dev/fullchain.pem<span class="p">;</span> <span class="c"># managed by Certbot</span>
    ssl_certificate_key /etc/letsencrypt/live/twirl.otee.dev/privkey.pem<span class="p">;</span> <span class="c"># managed by Certbot</span>
<span class="o">}</span>
server <span class="o">{</span>
    <span class="k">if</span> <span class="o">(</span><span class="nv">$host</span> <span class="o">=</span> twirl.otee.dev<span class="o">)</span> <span class="o">{</span>
        <span class="k">return </span>301 https://<span class="nv">$host$request_uri</span><span class="p">;</span>
    <span class="o">}</span> <span class="c"># managed by Certbot</span>

    listen 80<span class="p">;</span>
    server_name twirl.otee.dev<span class="p">;</span>
    <span class="k">return </span>404<span class="p">;</span> <span class="c"># managed by Certbot</span>

<span class="o">}</span>
</code></pre></div></div>

<p>Note the <code class="language-plaintext highlighter-rouge">301</code> redirect to <code class="language-plaintext highlighter-rouge">oteetwirl.herokuapp.com</code>. We need to replace this line mainly, by moving away from the <code class="language-plaintext highlighter-rouge">return</code> directive to the <code class="language-plaintext highlighter-rouge">location</code> directive using a <code class="language-plaintext highlighter-rouge">proxy_pass</code>:</p>

<div class="language-bash highlighter-rouge"><div class="highlight"><pre class="highlight"><code>server <span class="o">{</span>
    listen 443 ssl<span class="p">;</span>
    server_name twirl.otee.dev<span class="p">;</span>
		location / <span class="o">{</span>
         proxy_pass http://127.0.0.1:4122<span class="p">;</span>
    <span class="o">}</span>

    ssl_certificate /etc/letsencrypt/live/twirl.otee.dev/fullchain.pem<span class="p">;</span> <span class="c"># managed by Certbot</span>
    ssl_certificate_key /etc/letsencrypt/live/twirl.otee.dev/privkey.pem<span class="p">;</span> <span class="c"># managed by Certbot</span>
<span class="o">}</span>
server <span class="o">{</span>
    <span class="k">if</span> <span class="o">(</span><span class="nv">$host</span> <span class="o">=</span> twirl.otee.dev<span class="o">)</span> <span class="o">{</span>
        <span class="k">return </span>301 https://<span class="nv">$host$request_uri</span><span class="p">;</span>
    <span class="o">}</span> <span class="c"># managed by Certbot</span>

    listen 80<span class="p">;</span>
    server_name twirl.otee.dev<span class="p">;</span>
    <span class="k">return </span>404<span class="p">;</span> <span class="c"># managed by Certbot</span>

<span class="o">}</span>
</code></pre></div></div>

<h2 id="phase-3-shut-down-heroku-server">Phase 3: Shut down Heroku server</h2>

<p>We can now stop the Heroku dyno.</p>

<p><a href="/assets/images/shutdown_heroku.png">
    <img src="/assets/images/shutdown_heroku.png" border="1px" width="100%" />
</a></p>

<p>Now <a href="http://twirl.otee.dev"><code class="language-plaintext highlighter-rouge">twirl.otee.dev</code></a> should still work and be served from GCP instance powered by the YugabyteDB Managed cluster.</p>

<p><a href="/assets/images/yugabyte_dashboard_snapshot_2.png">
    <img src="/assets/images/yugabyte_dashboard_snapshot_2.png" border="1px" width="100%" />
</a></p>

<h2 id="future-improvements">Future Improvements</h2>

<h3 id="permanent-redirections">Permanent Redirections</h3>

<p>Note that because we used permanent redirection via HTTP status <code class="language-plaintext highlighter-rouge">301</code> browsers which previously got redirected to Heroku domain might see the following error:</p>

<p><a href="/assets/images/redirect_to_heroku.png">
    <img src="/assets/images/redirect_to_heroku.png" border="1px" width="100%" />
</a></p>

<p>A simple solution to this is to disable cache on the browser and reload:</p>

<p><a href="/assets/images/load_twirl_with_disable_caching.png">
    <img src="/assets/images/load_twirl_with_disable_caching.png" border="1px" width="100%" />
</a></p>

<p>Alternatively, we can write a simple Heroku app that just redirects back to GCP in order to undo the permanent caching without having our users’ browsers. We are going to leave this aside for now.</p>

<h3 id="backups">Backups</h3>

<p>Our free Yugabyte instance does not have data-backups. This means that we are at a risk of losing all our data if the Yugabyte cluster goes down. A simple solution to this would be to run the <code class="language-plaintext highlighter-rouge">pg_dump</code> command above periodically (crontab) and uploading it to a cloud storage (like s3).</p>

<p>For now, we will run this command manually and store it.</p>]]></content><author><name></name></author><category term="project" /><summary type="html"><![CDATA[This post captures the list of steps I followed to migrate a HTTP service from a Heroku dyno to a Google Cloud Platform instance powered by YugabyteDB cluster as the database.]]></summary><media:thumbnail xmlns:media="http://search.yahoo.com/mrss/" url="https://otee.dev/assets/images/heroku_to_gcp_and_yugabyte_1.png" /><media:content medium="image" url="https://otee.dev/assets/images/heroku_to_gcp_and_yugabyte_1.png" xmlns:media="http://search.yahoo.com/mrss/" /></entry><entry><title type="html">Understanding Tail Recursion</title><link href="https://otee.dev/2022/04/03/understanding-tail-recursion.html" rel="alternate" type="text/html" title="Understanding Tail Recursion" /><published>2022-04-03T00:00:00+00:00</published><updated>2022-04-03T00:00:00+00:00</updated><id>https://otee.dev/2022/04/03/understanding-tail-recursion</id><content type="html" xml:base="https://otee.dev/2022/04/03/understanding-tail-recursion.html"><![CDATA[<p>In this post, I try to explain how tail call optimization can be used to make recursive functions (of certain kind) more efficient.</p>

<h3 id="understanding-recursion">Understanding Recursion</h3>

<p>A recursive process can be divided in two parts:</p>

<ol>
  <li>A base case(s), which defines a simple case (such as the first item in a sequence)</li>
  <li>A recursive step, where new cases are defined in terms of previous cases.</li>
</ol>

<p>When a recursive process is called with the base case, it simply returns the result. If the process is called with a more complex case, it would break down the problem into two parts: a part it knows how to evaluate and a part which it does not. The latter part will resemble the original case, except that it will be a slightly smaller or simpler version of it. It would then call a fresh instance of itself on this latter part to work on the simpler case.</p>

<blockquote>
  <p><em>What is essential for a proper use of recursion is that the objects can be expressed in
terms of simpler objects, where “simpler” means closer to the basis of the recursion.</em> [<a href="https://faculty.uml.edu//klevasseur/ads2/c8/c8a.pdf">Source</a>]</p>

</blockquote>

<p>To put it in another way, a recursive algorithm can be defined as solving a problem by solving a smaller version of the same problem (a sub-problem) and then using that solution to solve the original problem. To solve a sub-problem, we need to solve a still smaller version of that sub-problem and so on. To prevent an infinite series of sub-problems, we need the series of sub-problems to eventually terminate at a base case.</p>

<h2 id="examples-of-recursive-functions">Examples of recursive functions</h2>

<p>We can use recursion to find the factorial of a positive natural number:</p>

<div class="language-js highlighter-rouge"><div class="highlight"><pre class="highlight"><code><span class="kd">function</span> <span class="nx">factorial</span><span class="p">(</span><span class="nx">n</span><span class="p">){</span>
    <span class="k">if</span><span class="p">(</span><span class="nx">n</span> <span class="o">&lt;=</span> <span class="mi">1</span><span class="p">)</span><span class="c1">//.... (1)</span>
        <span class="k">return</span> <span class="mi">1</span>
    <span class="k">return</span> <span class="nx">n</span> <span class="o">*</span> <span class="nx">factorial</span><span class="p">(</span><span class="nx">n</span> <span class="o">-</span> <span class="mi">1</span><span class="p">)</span><span class="c1">// ... (2)</span>
<span class="p">}</span>
</code></pre></div></div>

<p>In the above example, line (1) represents the base case and line (2) represents the recursive call.</p>

<h2 id="keeping-track-of-recursive-calls">Keeping Track of Recursive Calls</h2>

<p>Other than the base case, a recursive function cannot compute the final result (of a given input) without first knowing the result of the same function with a smaller input. For example, in the case of the factorial function, for any value of <code class="language-plaintext highlighter-rouge">n</code> (where <code class="language-plaintext highlighter-rouge">n != 1</code>), we need to first know the value of <code class="language-plaintext highlighter-rouge">factorial(n - 1)</code>, and to calculate the value of <code class="language-plaintext highlighter-rouge">factorial(n - 1)</code> we need to compute <code class="language-plaintext highlighter-rouge">factorial(n - 2)</code> and so on, till <code class="language-plaintext highlighter-rouge">n == 1</code> is true.</p>

<p>This means that for <strong>every step of this recursive ladder, we must wait for return value of the recursive call</strong>. Till this is done, we must pause our execution. Once we have this result, we can complete our evaluation by carrying out our operation(s) on it and return the result so computed.</p>

<p>So, to find the factorial of 4, we need to suspend our execution till we know the result of the factorial of 3 (and so on).</p>

<p>Also, note that at each step of the recursive process, <strong>we do not carry out the same operation with the result we get from the recursive call</strong>. Operations at each recursive step involves variables (not constants) relevant to that recursive step. In the case of <code class="language-plaintext highlighter-rouge">factorial</code>, for each step, we need to multiply the current value of <code class="language-plaintext highlighter-rouge">n</code> with the value we get from <code class="language-plaintext highlighter-rouge">factorial(n  - 1)</code>.</p>

<blockquote>
  <p><em>The answer to the new factorial subproblem is not the answer to the original problem. The value obtained for (n - 1)! must be multiplied by n</em> to get the final answer. [<a href="https://mitpress.mit.edu/sites/default/files/sicp/full-text/book/book-Z-H-31.html#%_sec_5.1.4">Source</a>]</p>

</blockquote>

<p>From the above discussion we know that for a recursive operation-</p>

<ul>
  <li>we need a series of invocations of the same function with different values starting from a given value to the base-case value;</li>
  <li>to compute the value at a given recursive step, we need to wait till all the function calls from the base case leading up to it are completed;</li>
  <li>while waiting, we need to store the state of the values at that recursive step.</li>
</ul>

<p>To illustrate this, let’s take the example of <code class="language-plaintext highlighter-rouge">factorial(n)</code>, where <code class="language-plaintext highlighter-rouge">n = 4</code>:</p>

<div class="language-jsx highlighter-rouge"><div class="highlight"><pre class="highlight"><code><span class="nx">factorial</span><span class="p">(</span><span class="mi">4</span><span class="p">)</span> <span class="o">=</span> <span class="mi">4</span> <span class="o">*</span> <span class="nx">factorial</span><span class="p">(</span><span class="mi">3</span><span class="p">)</span>
<span class="nx">factorial</span><span class="p">(</span><span class="mi">3</span><span class="p">)</span> <span class="o">=</span> <span class="mi">3</span> <span class="o">*</span> <span class="nx">factorial</span><span class="p">(</span><span class="mi">2</span><span class="p">)</span><span class="c1">// ... factorial(4) waiting </span>
<span class="nx">factorial</span><span class="p">(</span><span class="mi">2</span><span class="p">)</span> <span class="o">=</span> <span class="mi">2</span> <span class="o">*</span> <span class="nx">factorial</span><span class="p">(</span><span class="mi">1</span><span class="p">)</span><span class="c1">// ... factorial(4), factorial(3) waiting</span>
<span class="nx">factorial</span><span class="p">(</span><span class="mi">1</span><span class="p">)</span> <span class="o">=</span> <span class="mi">1</span><span class="c1">//                ... factorial(4), factorial(3), factorial(2) waiting </span>

<span class="nx">factorial</span><span class="p">(</span><span class="mi">2</span><span class="p">)</span> <span class="o">=</span> <span class="mi">2</span> <span class="o">*</span> <span class="mi">1</span><span class="c1">//            ... factorial(3), factorial(4) waiting</span>
<span class="nx">factorial</span><span class="p">(</span><span class="mi">3</span><span class="p">)</span> <span class="o">=</span> <span class="mi">3</span> <span class="o">*</span> <span class="mi">2</span><span class="c1">//            ... factorial(4) waiting</span>
<span class="nx">factorial</span><span class="p">(</span><span class="mi">4</span><span class="p">)</span> <span class="o">=</span> <span class="mi">4</span> <span class="o">*</span> <span class="mi">6</span>
</code></pre></div></div>

<p>Since there is no <em>ex ante</em> way of knowing the number of recursive calls required to reach the base case for a given value, <strong>we need to be able to store the states of a dynamic number of  recursive steps</strong>. Also, as we can see above, the order in which the states of each recursive step is accessed is one of <em>Last-In-First-Out,</em> i.e., the <strong>values of each recursive step are accessed in the reverse order of their insertion</strong>. Because of this property of recursive function calls, we can use stacks to store the state of each recursive step.</p>

<h2 id="understanding-call-stack">Understanding Call Stack</h2>

<p>Whenever a function is called, a memory block (known as ‘stack frame’ or ‘activation record’) representing its state (mainly, its parameters, local variables, its return address) is pushed to a call stack that is maintained during the run-time of the program. When the execution of the function is complete, it’s corresponding memory block is popped from the call stack. At any point in time, the call stack only contains memory blocks representing functions that have been called, but not yet been executed. (As an aside, most programming languages have the functionality to display the call stack at any particular point of time during run-time. This is called stack trace and it is a useful tool for debugging run-time errors)</p>

<p>In the case of recursive functions, a function that is already part of the call stack, makes another call of the same function (with a smaller sub-problem). The original function cannot be executed till this newly called function returns its value. So, a new memory block representing the newly called function gets pushed on to the call stack. The process repeats itself till we reach the base case. Once we have reached the base case, we will have reached the top of the recursive call-stack. As soon as the base-case function call returns its value, it’s associated memory block gets popped from the stack. The function that made the base-case function call, gets popped next which returns its value to the next function that had called it. This goes on till we reach the bottom of the stack. The bottom-most block on the stack represents the original function call. By the time we reach there, we will have all the values needed to complete this evaluation.</p>

<p>Here’s a visualization of a recursive call stack for the factorial of 5:</p>

<p><img src="https://s3.us-west-2.amazonaws.com/secure.notion-static.com/1354bb4c-7405-491d-92c7-afa73cfe4916/Untitled.png?X-Amz-Algorithm=AWS4-HMAC-SHA256&amp;X-Amz-Content-Sha256=UNSIGNED-PAYLOAD&amp;X-Amz-Credential=AKIAT73L2G45EIPT3X45%2F20220403%2Fus-west-2%2Fs3%2Faws4_request&amp;X-Amz-Date=20220403T144114Z&amp;X-Amz-Expires=86400&amp;X-Amz-Signature=f6c3862b71c183c3eb44fc88489dda5d54473d068681a9e77baa32230c74097f&amp;X-Amz-SignedHeaders=host&amp;response-content-disposition=filename%20%3D%22Untitled.png%22&amp;x-id=GetObject" width="100%" /></p>

<h2 id="computing-space-complexity-for-recursive-calls">Computing Space Complexity for Recursive Calls</h2>

<p>The space complexity for a recursive function depends on the maximum size of the call stack at any point of time during its execution. For a linear recursive function, i.e., a function that makes a single call to itself during each recursive step, the maximum size of the call stack will be the sum of the number of recursive calls made by each recursive step. Thus, for the <code class="language-plaintext highlighter-rouge">factorial</code> function, the maximum size of the call stack will be  <code class="language-plaintext highlighter-rouge">n</code> (as shown above).</p>

<p>For non-linear recursive functions, if we visualise the pattern of recursive calls as a <em>recursive tree</em>, where each node represents a recursive call, the maximum size of the call stack will be the height of the tree. Thus, for the following function generating <code class="language-plaintext highlighter-rouge">n</code>th Fibonacci number, the maximum size of the call stack will be <code class="language-plaintext highlighter-rouge">n</code></p>

<div class="language-bash highlighter-rouge"><div class="highlight"><pre class="highlight"><code><span class="k">function </span>fibo<span class="o">(</span>n<span class="o">){</span>
<span class="k">if</span> <span class="o">(</span>n <span class="o">==</span> 0<span class="o">)</span>
	<span class="k">return </span>0
<span class="k">if</span><span class="o">(</span><span class="nv">n</span><span class="o">==</span>1<span class="o">)</span>
	<span class="k">return </span>1
<span class="k">return </span>fibo<span class="o">(</span>n - 1<span class="o">)</span> + fibo<span class="o">(</span>n - 2<span class="o">)</span>
<span class="o">}</span>

</code></pre></div></div>

<p>In the above example, even though we are making two recursive calls at each step, we will still only require a call stack of size <code class="language-plaintext highlighter-rouge">n</code>. This is because at each node of the recursive tree, we need to wait for it’s children nodes to return their values, and the same goes for their children nodes as well. We essentially do a depth-first traversal from each node in the recursive tree, thereby requiring only a max stack size of the height (or depth) of the recursive tree.</p>

<h2 id="stack-overflow">Stack Overflow</h2>

<p>The size of call stacks are finite and limited (their exact size depend on multiple factors, including the programming language and the run time environment). This means that there are only so many recursive calls we can make for a given call stack.  When we exceed this size, we get a ‘stack overflow’ error. Let’s take the following function that recursively finds the sum of the first <code class="language-plaintext highlighter-rouge">n</code> natural numbers:</p>

<div class="language-bash highlighter-rouge"><div class="highlight"><pre class="highlight"><code><span class="k">function </span>sumOfNaturalNumbers<span class="o">(</span>n<span class="o">){</span>
    <span class="k">if</span><span class="o">(</span>n <span class="o">==</span> 1<span class="o">)</span>
        <span class="k">return </span>1
    <span class="k">return </span>n + sumOfNaturalNumbers<span class="o">(</span>n - 1<span class="o">)</span>
<span class="o">}</span>
</code></pre></div></div>

<p>If we pass a relatively large number to the above function, say <code class="language-plaintext highlighter-rouge">100000</code>, we get the following error</p>

<div class="language-bash highlighter-rouge"><div class="highlight"><pre class="highlight"><code>RangeError: Maximum call stack size exceeded
    at sumOfNaturalNumbers <span class="o">(</span>/home/otee/projects/recursive_factorial.js:13:5<span class="o">)</span>
    at sumOfNaturalNumbers <span class="o">(</span>/home/otee/projects/recursive_factorial.js:15:16<span class="o">)</span>
    at sumOfNaturalNumbers <span class="o">(</span>/home/otee/projects/recursive_factorial.js:15:16<span class="o">)</span>
    at sumOfNaturalNumbers <span class="o">(</span>/home/otee/projects/recursive_factorial.js:15:16<span class="o">)</span>
    at sumOfNaturalNumbers <span class="o">(</span>/home/otee/projects/recursive_factorial.js:15:16<span class="o">)</span>
    at sumOfNaturalNumbers <span class="o">(</span>/home/otee/projects/recursive_factorial.js:15:16<span class="o">)</span>
    at sumOfNaturalNumbers <span class="o">(</span>/home/otee/projects/recursive_factorial.js:15:16<span class="o">)</span>
    at sumOfNaturalNumbers <span class="o">(</span>/home/otee/projects/recursive_factorial.js:15:16<span class="o">)</span>
    at sumOfNaturalNumbers <span class="o">(</span>/home/otee/projects/recursive_factorial.js:15:16<span class="o">)</span>
    at sumOfNaturalNumbers <span class="o">(</span>/home/otee/projects/recursive_factorial.js:15:16<span class="o">)</span>
</code></pre></div></div>

<p>However, if we write the same function using a <code class="language-plaintext highlighter-rouge">for</code> loop and pass the same parameter (<code class="language-plaintext highlighter-rouge">100000</code>), we do not get any errors.</p>

<div class="language-bash highlighter-rouge"><div class="highlight"><pre class="highlight"><code><span class="k">function </span>sumOfNaturalNumbersIteration<span class="o">(</span>n<span class="o">){</span>
    <span class="nb">sum</span> <span class="o">=</span> 0<span class="p">;</span>
    <span class="k">for</span><span class="o">(</span><span class="nb">let </span>i <span class="o">=</span> 0<span class="p">;</span> i &lt;<span class="o">=</span> n<span class="p">;</span> i++<span class="o">){</span>
        <span class="nb">sum</span> +<span class="o">=</span> i<span class="p">;</span>
    <span class="o">}</span>
    <span class="k">return </span><span class="nb">sum</span><span class="p">;</span>
<span class="o">}</span>
</code></pre></div></div>

<p>The reason why we the above prograat ism does not break is because it takes constant space to run a <code class="language-plaintext highlighter-rouge">for</code> loop, irrespective of the number of iterations being executed. To run the above loop, all we need to keep track of are the current values of <code class="language-plaintext highlighter-rouge">n</code>, <code class="language-plaintext highlighter-rouge">i</code> and <code class="language-plaintext highlighter-rouge">sum</code>.</p>

<h2 id="tail-recursion">Tail recursion</h2>

<p>Tail recursion is a special kind of recursion where the recursive call is the last operation carried out in the recursive case and the result of the recursive call is not manipulated by the caller.</p>

<blockquote>
  <p><em>A call from procedure f ( ) to procedure g( ) is a tail call if the only thing f ( ) does, after g( ) returns to it, is itself return. The call is tail-recursive if f ( ) and g( ) are the same procedure</em> (Steven S. Muchnick, <strong><em>Advanced Compiler Design and Implementation</em>,</strong> p 461)</p>

</blockquote>

<p>The most important aspect of a tail call, is that a new frame does not need to be added to the call stack for every function call. For tail calls, there is no need to store the state of the function making the tail call (as all the operations inside that function are executed by the time the tail call is made and all that is left to do is to pass on the value so returned, to its original caller). Instead, the tail-called function returns the value directly to the <em>original</em> caller. As a result, tail recursion takes constant space to be executed. In fact, a tail-call is essentially a goto statement:</p>

<blockquote>
  <p><em>In this way, if the last thing a procedure does is call another (external) procedure, that call can be compiled as a GOTO.</em> <em>Such a call is called tail-recursive, because the call appears to be recursive, but is not, since it appears at the tail end of the caller.</em> [<a href="https://dl.acm.org/doi/10.1145/800179.810196">Source</a>]</p>

</blockquote>

<p>The above implementation of the sum of natural numbers,<code class="language-plaintext highlighter-rouge">sumOfNaturalNumbers</code>, is not written in a tail-recursive style, as we do one operation after receiving the return value from the recursive call (namely, adding the current value of <code class="language-plaintext highlighter-rouge">n</code> to the returned value). Here’s a tail-recursive  implementation of that function:</p>

<div class="language-bash highlighter-rouge"><div class="highlight"><pre class="highlight"><code><span class="k">function </span>sumOfNaturalNumbersTailRecursive<span class="o">(</span>n, acc <span class="o">=</span> 0<span class="o">){</span>
    <span class="k">if</span><span class="o">(</span>n &lt;<span class="o">=</span> 0<span class="o">)</span>
        <span class="k">return </span>acc
    <span class="k">return </span>sumOfNaturalNumbersTailRecursive<span class="o">(</span>n - 1, acc + n<span class="o">)</span>
 <span class="o">}</span>
</code></pre></div></div>

<p>However, this implementation, too, fails when we pass <code class="language-plaintext highlighter-rouge">100000</code> to it:</p>

<div class="language-bash highlighter-rouge"><div class="highlight"><pre class="highlight"><code>RangeError: Maximum call stack size exceeded
    at sumOfNaturalNumbersTailRecursive <span class="o">(</span>/home/otee/projects/recursive_factorial.js:34:42<span class="o">)</span>
    at sumOfNaturalNumbersTailRecursive <span class="o">(</span>/home/otee/projects/recursive_factorial.js:37:12<span class="o">)</span>
    at sumOfNaturalNumbersTailRecursive <span class="o">(</span>/home/otee/projects/recursive_factorial.js:37:12<span class="o">)</span>
    at sumOfNaturalNumbersTailRecursive <span class="o">(</span>/home/otee/projects/recursive_factorial.js:37:12<span class="o">)</span>
    at sumOfNaturalNumbersTailRecursive <span class="o">(</span>/home/otee/projects/recursive_factorial.js:37:12<span class="o">)</span>
    at sumOfNaturalNumbersTailRecursive <span class="o">(</span>/home/otee/projects/recursive_factorial.js:37:12<span class="o">)</span>
    at sumOfNaturalNumbersTailRecursive <span class="o">(</span>/home/otee/projects/recursive_factorial.js:37:12<span class="o">)</span>
    at sumOfNaturalNumbersTailRecursive <span class="o">(</span>/home/otee/projects/recursive_factorial.js:37:12<span class="o">)</span>
    at sumOfNaturalNumbersTailRecursive <span class="o">(</span>/home/otee/projects/recursive_factorial.js:37:12<span class="o">)</span>
    at sumOfNaturalNumbersTailRecursive <span class="o">(</span>/home/otee/projects/recursive_factorial.js:37:12<span class="o">)</span>
</code></pre></div></div>

<p>The reason why this implementation also results in stack overflow is because JavaScript (in the NodeJs runtime environment) <a href="https://stackoverflow.com/questions/42788139/es6-tail-recursion-optimisation-stack-overflow/42788286#42788286">does not support tail call optimization</a>. In fact, many other programming languages, including Java, do not support tail call optimization:</p>

<blockquote>
  <p><em>Not all programming languages require tail-call elimination. However, in functional programming languages, tail-call elimination is often guaranteed by the language standard, allowing tail recursion to use a similar amount of memory as an equivalent loop.</em> [<a href="https://en.wikipedia.org/wiki/Tail_call">Wikipedia</a>]</p>

</blockquote>

<p>Clojure, being a functional programming language, supports tail call optimization.</p>

<h3 id="tail-recursion-in-clojure">Tail Recursion In Clojure</h3>

<p>Unlike compilers of some other functional languages, Clojure’s compiler will not automatically detect a recursive tail-call and optimise it accordingly. We need to make the tail call using a special form, <code class="language-plaintext highlighter-rouge">recur</code>, to explicitly utilise tail recursion optimisation.</p>

<blockquote>
  <p><em>Many such languages guarantee that function calls made in tail position do not consume stack space, and thus recursive loops utilize constant space. Since Clojure uses the Java calling conventions, it cannot, and does not, make the same tail call optimization guarantees. Instead, it provides the recur special operator, which does constant-space recursive looping by rebinding and jumping to the nearest enclosing loop or function frame. While not as general as tail-call-optimization, it allows most of the same elegant constructs, and offers the advantage of checking that calls to recur can only happen in a tail position.</em>[<a href="https://clojure.org/about/functional_programming">Source</a>]</p>

</blockquote>

<p>Here’s a non-tail recursive implementation of the sum of first <code class="language-plaintext highlighter-rouge">n</code> natural numbers:</p>

<div class="language-clojure highlighter-rouge"><div class="highlight"><pre class="highlight"><code><span class="p">(</span><span class="k">defn</span><span class="w"> </span><span class="n">sum-of-natural-numbers</span><span class="w"> 
  </span><span class="p">[</span><span class="n">n</span><span class="p">]</span><span class="w">
  </span><span class="p">(</span><span class="k">if</span><span class="w"> </span><span class="p">(</span><span class="nb">&lt;=</span><span class="w"> </span><span class="n">n</span><span class="w"> </span><span class="mi">0</span><span class="p">)</span><span class="w">
    </span><span class="mi">0</span><span class="w">
    </span><span class="p">(</span><span class="nb">+</span><span class="w"> </span><span class="n">n</span><span class="w"> </span><span class="p">(</span><span class="nf">sum-of-natural-numbers</span><span class="w"> </span><span class="p">(</span><span class="nb">dec</span><span class="w"> </span><span class="n">n</span><span class="p">)))))</span><span class="w">
</span></code></pre></div></div>

<p>If we pass <code class="language-plaintext highlighter-rouge">100000</code> to this function, we get the following output on the REPL:</p>

<div class="language-clojure highlighter-rouge"><div class="highlight"><pre class="highlight"><code><span class="p">(</span><span class="nf">sum-of-natural-numbers</span><span class="w"> </span><span class="mi">100000</span><span class="p">)</span><span class="w">
</span><span class="c1">; Execution error (StackOverflowError) at flash.tail-recursive/sum-of-natural-numbers (form-init869174823328265034.clj:6).</span><span class="w">
</span><span class="c1">; null</span><span class="w">
</span></code></pre></div></div>

<p>Here’s a tail recursive implementation of the above function:</p>

<div class="language-clojure highlighter-rouge"><div class="highlight"><pre class="highlight"><code><span class="p">(</span><span class="k">defn</span><span class="w"> </span><span class="n">sum-of-natural-numbers-tail-recursive</span><span class="w">
  </span><span class="p">([</span><span class="n">n</span><span class="p">]</span><span class="w">
   </span><span class="p">(</span><span class="k">if</span><span class="w"> </span><span class="p">(</span><span class="nb">&lt;=</span><span class="w"> </span><span class="n">n</span><span class="w"> </span><span class="mi">0</span><span class="p">)</span><span class="w">
     </span><span class="mi">0</span><span class="w">
     </span><span class="p">(</span><span class="nf">sum-of-natural-numbers-tail-recursive</span><span class="w"> </span><span class="n">n</span><span class="w"> </span><span class="mi">0</span><span class="p">)))</span><span class="w">
  </span><span class="p">([</span><span class="n">n</span><span class="w"> </span><span class="n">acc</span><span class="p">]</span><span class="w">
   </span><span class="p">(</span><span class="k">if</span><span class="w"> </span><span class="p">(</span><span class="nb">&lt;=</span><span class="w"> </span><span class="n">n</span><span class="w"> </span><span class="mi">0</span><span class="p">)</span><span class="w">
     </span><span class="n">acc</span><span class="w">
     </span><span class="p">(</span><span class="nf">recur</span><span class="w"> </span><span class="p">(</span><span class="nb">dec</span><span class="w"> </span><span class="n">n</span><span class="p">)</span><span class="w"> </span><span class="p">(</span><span class="nb">+</span><span class="w"> </span><span class="n">acc</span><span class="w"> </span><span class="n">n</span><span class="p">)))))</span><span class="w">
</span></code></pre></div></div>

<p>This function successfully completes evaluation when we pass <code class="language-plaintext highlighter-rouge">100000</code></p>

<div class="language-clojure highlighter-rouge"><div class="highlight"><pre class="highlight"><code><span class="p">(</span><span class="nf">sum-of-natural-numbers-tail-recursive</span><span class="w"> </span><span class="mi">100000</span><span class="p">)</span><span class="w">
</span><span class="c1">;; =&gt; 5000050000</span><span class="w">
</span></code></pre></div></div>

<p>Here’s a tail-recursive implementation of finding the <code class="language-plaintext highlighter-rouge">n</code>th fibonacci number:</p>

<div class="language-clojure highlighter-rouge"><div class="highlight"><pre class="highlight"><code><span class="p">(</span><span class="k">defn</span><span class="w"> </span><span class="n">fibo-tail-recursive</span><span class="w">
  </span><span class="p">([</span><span class="n">n</span><span class="p">]</span><span class="w">
   </span><span class="p">(</span><span class="k">if</span><span class="w"> </span><span class="p">(</span><span class="nb">&lt;=</span><span class="w"> </span><span class="n">n</span><span class="w"> </span><span class="mi">0</span><span class="p">)</span><span class="w">
     </span><span class="mi">0</span><span class="w">
     </span><span class="p">(</span><span class="nf">fibo-tail-recursive</span><span class="w"> </span><span class="n">n</span><span class="w"> </span><span class="mi">0</span><span class="w"> </span><span class="mi">1</span><span class="p">)))</span><span class="w">
  </span><span class="p">([</span><span class="n">n</span><span class="w"> </span><span class="n">prev</span><span class="w"> </span><span class="n">curr</span><span class="p">]</span><span class="w">
   </span><span class="p">(</span><span class="k">if</span><span class="w"> </span><span class="p">(</span><span class="nb">=</span><span class="w"> </span><span class="n">n</span><span class="w"> </span><span class="mi">1</span><span class="p">)</span><span class="w">
     </span><span class="n">curr</span><span class="w">
     </span><span class="p">(</span><span class="nf">recur</span><span class="w"> </span><span class="p">(</span><span class="nb">dec</span><span class="w"> </span><span class="n">n</span><span class="p">)</span><span class="w"> </span><span class="n">curr</span><span class="w"> </span><span class="p">(</span><span class="nb">+</span><span class="w"> </span><span class="n">prev</span><span class="w"> </span><span class="n">curr</span><span class="p">)))))</span><span class="w">
</span></code></pre></div></div>

<p>The above tail recursion examples involve a common pattern:</p>

<ul>
  <li>For each recursive call, we pass an accumulator parameter, in addition to the main argument.</li>
  <li>The initial value of this accumulator represents the base case</li>
  <li>At each recursive step, we modify the main argument as per the definition of the problem (in the case of <code class="language-plaintext highlighter-rouge">sum-of-natural-numbers-tail-recursive</code>, decrementing the value of <code class="language-plaintext highlighter-rouge">n</code>) and update the current value of the accumulator. We pass both these parameters along with the recursive call.</li>
  <li>The operations we were doing after the return of the non-tail recursive function, are now done before calling the tail recursive function and this is passed as the accumulator</li>
  <li>The value of the accumulator in the base-case, is the final result, which is returned by the base case.</li>
</ul>

<h2 id="takeaways">Takeaways</h2>

<ol>
  <li>Representing a problem in a recursive manner, involves breaking down the problem into a series of simpler sub-problems and providing a result for the simplest version of the problem</li>
  <li>Although recursion is intuitive and easy to reason about while solving computational problems, they take significantly more space than iterative processes</li>
  <li>A special kind of recursion, namely tail recursion, solves the problem of stack overflow, when we can express our recursive calls as tail calls.</li>
  <li>We can transform (ordinary) recursive functions to tail recursive functions, with the help of an additional accumulator parameter.</li>
</ol>]]></content><author><name></name></author><category term="conceptual" /><summary type="html"><![CDATA[In this post, I try to explain how tail call optimization can be used to make recursive functions (of certain kind) more efficient.]]></summary></entry><entry><title type="html">Preventing Phantom Meetings Using Transactions and Serializable Isolation</title><link href="https://otee.dev/2022/02/10/transactions-and-phantom-reads.html" rel="alternate" type="text/html" title="Preventing Phantom Meetings Using Transactions and Serializable Isolation" /><published>2022-02-10T00:00:00+00:00</published><updated>2022-02-10T00:00:00+00:00</updated><id>https://otee.dev/2022/02/10/transactions-and-phantom-reads</id><content type="html" xml:base="https://otee.dev/2022/02/10/transactions-and-phantom-reads.html"><![CDATA[<p>In this post, I discuss how time-slot collisions in a meeting scheduling application can be resolved. First, I discuss the business logic of determining a ‘time-slot conflict’. Second, I explain why we need transactions to prevent scheduling of concurrent conflicting meetings. Finally, I do a deep-dive on the different levels of isolation provided by database systems, to better understand why simply using transactions (with their default set-up) does not guarantee against conflicting meetings.</p>

<h2 id="project-scope-and-design-goals">Project Scope and Design Goals</h2>

<p>This project supports the following features:</p>

<ul>
  <li><strong>Add new users and rooms:</strong> The system allows for the addition of new users and rooms (they are treated as ‘entities’ in the data model). Once added, users and rooms can be included in future meetings.</li>
  <li><strong>Scheduling of meetings</strong>: The system allows for scheduling of new meetings involving one or more users at a given room.</li>
  <li><strong>Detect conflicts</strong>: While setting up a meeting, the system will check if there are any time-slot conflicts (explained below) involving any of the proposed participants or the proposed room.</li>
</ul>

<p>The system interacts with the user on the Command Line.</p>

<p>Here’s the GitHub Repository hosting the project: <a href="https://github.com/oitee/meetings">https://github.com/oitee/meetings</a></p>

<p>The system guarantees that a meeting should be permitted to be scheduled <strong>only if</strong> every participating user and the respective room have no time-slot conflict. Even if one entity has a conflict, the system will reject the request for setting up the meeting and prompt the user to try again.</p>

<p>For the purposes of time-slot conflict-resolution, the system treats users and rooms alike.</p>

<h3 id="resolving-time-slot-conflicts">Resolving Time-Slot Conflicts</h3>

<p>What constitutes a time-slot conflict? Simply put, it refers to a situation where a single user or room is assigned to more than one meeting at any given point of time.</p>

<p>With respect to a meeting for a given time-slot A (with a start-point ‘s’ and an end-point ‘e’), there can be five types of time-slot conflicts, as shown below.</p>

<ul>
  <li>
    <p>Case 1: A meeting which started before ‘s’, but is scheduled to complete after the ‘s’ (but before ‘e’).</p>

    <p><img src="https://user-images.githubusercontent.com/85887016/152988848-8511d267-124d-4b91-9833-0a3277d0e36f.png" width="30%" /></p>
  </li>
  <li>
    <p>Case 2: A meeting which started before ‘s’, and is scheduled to complete after ‘e’.</p>
  </li>
</ul>

<p><img src="https://user-images.githubusercontent.com/85887016/152996562-e19c564f-cb32-4a9c-b815-cd2795220b29.png" width="30%" /></p>

<ul>
  <li>Case 3: A meeting which has the same start and end points as time-slot A.</li>
</ul>

<p><img src="https://user-images.githubusercontent.com/85887016/152996595-c2658851-b00d-491c-a777-c939665b433e.png" width="30%" /></p>

<ul>
  <li>Case 4: A meeting which started and ended between points ‘s’ and ‘e’.</li>
</ul>

<p><img src="https://user-images.githubusercontent.com/85887016/152996634-f4a8cf78-7139-480a-b7a5-0a6a6d2b7108.png" width="30%" /></p>

<ul>
  <li>Case 5: A meeting which started after ‘s’ but before ‘e’.</li>
</ul>

<p><img src="https://user-images.githubusercontent.com/85887016/152997031-a6f03ac5-0482-4ff5-ac77-09a5e4c7aea2.png" width="30%" /></p>

<p>In each of these cases, there is a time-slot conflict, i.e., at least one point where there are two simultaneous meetings.</p>

<h3 id="how-to-resolve-time-slot-conflicts">How to Resolve Time-Slot Conflicts?</h3>

<p>Obviously, if the parties involved in two meetings with conflicting time-slots are distinct and separate, there is no issue. The system will allow both the meetings to continue.(<em>Note here that when we use ‘participants’, we include both users and rooms</em>).</p>

<p>Thus, only if there is at least one common participant between the two conflicting time-slots, do we need to be careful. Thus, at the time of scheduling each meeting, we need to check if there is any potential conflict with respect to any of the participants of the meeting. This can be done using the following SQL query:</p>

<div class="language-sql highlighter-rouge"><div class="highlight"><pre class="highlight"><code> <span class="k">SELECT</span> <span class="n">entity</span> <span class="k">FROM</span> <span class="n">bookings</span> <span class="k">WHERE</span> 
    <span class="n">entity</span> <span class="k">IN</span> <span class="p">(</span><span class="n">entity1</span><span class="p">,</span> <span class="n">entity2</span><span class="p">...</span> <span class="n">entityN</span><span class="p">)</span> 
    <span class="k">AND</span> <span class="p">(</span>
            <span class="p">(</span><span class="n">from_ts</span> <span class="o">&lt;=</span> <span class="n">to_timestamp</span><span class="p">(</span><span class="n">start_point</span><span class="p">)</span> <span class="k">AND</span> <span class="n">to_ts</span> <span class="o">&gt;=</span> <span class="n">to_timestamp</span><span class="p">(</span><span class="n">start_point</span><span class="p">))</span>
            <span class="k">OR</span>
            <span class="p">(</span><span class="n">from_ts</span> <span class="o">&gt;=</span> <span class="n">to_timestamp</span><span class="p">(</span><span class="n">start_point</span><span class="p">)</span> <span class="k">AND</span> <span class="n">from_ts</span> <span class="o">&lt;=</span> <span class="n">to_timestamp</span><span class="p">(</span><span class="n">end_point</span><span class="p">))</span>
        <span class="p">)</span>

</code></pre></div></div>
<p>In the above example, <code class="language-plaintext highlighter-rouge">(entity1, entity2... entityN)</code> represents the list of all the participating entities of a proposed meeting and <code class="language-plaintext highlighter-rouge">start_point</code> and <code class="language-plaintext highlighter-rouge">end_point</code> represent the two end-points of the time-slot of the proposed meeting.</p>

<p>At the time of creating a new meeting, we run this query on our database. If this returns a non-empty response, it will signify a conflict and the system will prevent the creation of the meeting</p>

<h2 id="need-for-transactions">Need for Transactions</h2>

<p>In an ideal world, we follow a two-step process while creating a new meeting:</p>
<ul>
  <li>First, check for conflicts</li>
  <li>Next, insert the new meeting.</li>
</ul>

<p>This approach has one downside: if there is more than one system trying to write to the database simultaneously, the database may change its state between step one and step two above. For example, let’s say there are two systems attempting to simultaneously schedule the same meeting with the same time-slot and entities. It is possible, that read-write sequence interleaves in the following manner:</p>

<div class="language-plaintext highlighter-rouge"><div class="highlight"><pre class="highlight"><code>System 1 reads the database ... (realizes that there is no conflict)
System 2 reads the database ... (realizes that there is no conflict)
System 1 writes the database ...(creates the meeting)
System 2 writes the database ... (creates the same conflicting meeting)
</code></pre></div></div>

<p>Thus, we need to take an all-or-nothing approach while reading and writing. This can be achieved by using transactions.</p>

<h2 id="what-is-a-transaction">What is a Transaction?</h2>

<p>Simply put, a transaction represents a single or <em>atomic</em> unit of work performed by a database management system. A transaction is typically used to group multiple reads and writes into one logical unit. Because of their atomic nature, transactions cannot be broken down into its constituent actions: if, in the middle of a transaction, an error or failure takes place which prevents the transaction from being successfully completed, the database will rollback all the intermediate operations of that transaction.</p>

<p>This is very useful for our use-case, as we can use transactions to ensure an all-or-nothing approach while scheduling meetings: if our reading and writing operations form part of a single transaction, we can potentially prevent partial failures, like the one discussed above.</p>

<h2 id="acid-properties">ACID Properties</h2>

<p>Every database transaction has four key properties: atomicity, consistency, isolation and durability (commonly referred to as ‘ACID’). These ACID properties guarantee data validity even in the events of failures, errors and other mishaps.</p>

<p><strong>Atomicity</strong>: Every operation in the transaction should either all succeed (also called ‘committed’) or all fail. Partial failure or partial success is disallowed. Without the atomicity guarantee, if an error or a failure takes place during a transaction, it can get very difficult to reason about which operations were successful and which need to be tried again.</p>

<p><strong>Consistency</strong>: If the database is consistent before execution of a transaction, it should remain consistent after the transaction has been committed. In other words, a transaction should take the database from one valid state to another. If there are any rules or <em>invariants</em> enforced on the data, they should continue to be respected after a transaction is completed. (In fact, consistency is a property of the application layer instead of the database system itself, as the latter cannot prevent the violation of invariants if the application feeds improper or erroneous data. For this reason, it is said that “<em>the letter C doesn’t really belong in ACID</em>” [1]).</p>

<p><strong>Isolation</strong>: Often, a database needs to execute multiple transactions concurrently. This property provides a guarantee that concurrent transactions will be executed <em>as if</em> they were sequentially or serially executed. In other words, the goal of isolation is to ensure that simultaneous transactions making writes on the same set of objects (rows) of a database should not step onto each other’s toes.</p>

<p><strong>Durability</strong>: Once a transaction is committed, it should persist on the database, even in the wake of a system failure. In the case of single-node databases, this is usually achieved by storing results of transactions on non-volatile memory(disk). In the case of replicated databases, this is achieved by copying the data written during a transaction to a certain number of nodes of that database.</p>

<h2 id="writing-transactions-in-postgresql">Writing Transactions in PostgreSQL</h2>

<p>To fold multiple queries into one transaction, we should place them between <code class="language-plaintext highlighter-rouge">BEGIN</code> and <code class="language-plaintext highlighter-rouge">COMMIT</code> commands. During the middle of a transaction, if our application layer needs to withdraw a transaction,we should use <code class="language-plaintext highlighter-rouge">ROLLBACK</code> instead of <code class="language-plaintext highlighter-rouge">COMMIT</code>.</p>

<p>Here’s how the SQL expressions for scheduling a meeting can be written as a part of one transaction:</p>

<div class="language-sql highlighter-rouge"><div class="highlight"><pre class="highlight"><code><span class="k">BEGIN</span>
<span class="k">SELECT</span> <span class="n">entity</span> <span class="k">FROM</span> <span class="n">bookings</span> <span class="k">WHERE</span>
    <span class="n">entity</span> <span class="k">IN</span> <span class="p">(</span><span class="n">entity1</span><span class="p">,</span> <span class="n">entity2</span><span class="p">...</span> <span class="n">entityN</span><span class="p">)</span>
    <span class="k">AND</span> <span class="p">(</span>
            <span class="p">(</span><span class="n">from_ts</span> <span class="o">&lt;=</span> <span class="n">to_timestamp</span><span class="p">(</span><span class="n">start_point</span><span class="p">)</span> <span class="k">AND</span> <span class="n">to_ts</span> <span class="o">&gt;=</span> <span class="n">to_timestamp</span><span class="p">(</span><span class="n">start_point</span><span class="p">))</span>
            <span class="k">OR</span>
            <span class="p">(</span><span class="n">from_ts</span> <span class="o">&gt;=</span> <span class="n">to_timestamp</span><span class="p">(</span><span class="n">start_point</span><span class="p">)</span> <span class="k">AND</span> <span class="n">from_ts</span> <span class="o">&lt;=</span> <span class="n">to_timestamp</span><span class="p">(</span><span class="n">end_point</span><span class="p">))</span>
        <span class="p">)</span>

<span class="c1">-- application layer logic: if rows.length &gt; 0 </span>
<span class="k">ROLLBACK</span><span class="p">;</span>

<span class="c1">-- application layer logic: else</span>
<span class="k">INSERT</span> <span class="k">INTO</span> <span class="n">bookings</span> <span class="p">(</span><span class="n">meeting_id</span><span class="p">,</span> <span class="n">entity</span><span class="p">,</span> <span class="n">from_ts</span><span class="p">,</span> <span class="n">to_ts</span><span class="p">,</span> <span class="n">created_at</span><span class="p">,</span> <span class="n">updated_at</span><span class="p">)</span> 
        <span class="k">VALUES</span> <span class="p">(...);</span>
<span class="k">COMMIT</span><span class="p">;</span>
</code></pre></div></div>

<h2 id="testing-with-concurrent-queries">Testing with Concurrent Queries</h2>

<p>Given the guarantees provided by transactions, we should expect that our application does not schedule conflicting meetings. To test this hypothesis, we can set up a test that makes concurrent and identical queries on the database. To implement this test, I’ve used the <a href="https://nodejs.org/api/worker_threads.html">worker threads</a> module, to create <code class="language-plaintext highlighter-rouge">n</code> number of worker threads that make the same query on the database. See the test here: <a href="https://github.com/oitee/meetings/blob/33aab6b/test/concurrent_requests.js">https://github.com/oitee/meetings/blob/33aab6b/test/concurrent_requests.js</a></p>

<p>When I ran this test for the first time, it passed. But when I ran the same test sequentially for ten times (using <code class="language-plaintext highlighter-rouge">for i in `seq 1 10`; do npm test; done</code>), it failed twice out of the ten times. For the next ten tests, it failed three times out of ten</p>

<iframe width="560" height="315" src="https://www.youtube.com/embed/Xp3qLWtQ4H8" title="YouTube video player" frameborder="0" allow="accelerometer; autoplay; clipboard-write; encrypted-media; gyroscope; picture-in-picture" allowfullscreen=""></iframe>

<div class="language-plaintext highlighter-rouge"><div class="highlight"><pre class="highlight"><code>              meeting_id              |        entity        |        from_ts         |         to_ts          |          created_at           |          updated_at           
--------------------------------------+----------------------+------------------------+------------------------+-------------------------------+-------------------------------
 5f4b0d41-4361-4771-b835-ab0414f570c3 | alice                | 2022-02-15 05:30:00+00 | 2022-02-15 06:30:00+00 | 2022-02-11 04:20:03.342489+00 | 2022-02-11 04:20:03.342489+00
 5f4b0d41-4361-4771-b835-ab0414f570c3 | bob                  | 2022-02-15 05:30:00+00 | 2022-02-15 06:30:00+00 | 2022-02-11 04:20:03.342489+00 | 2022-02-11 04:20:03.342489+00
 43f3e972-4b10-4ab5-8e6e-c621e05654e7 | cat                  | 2022-02-15 05:30:00+00 | 2022-02-15 06:30:00+00 | 2022-02-11 04:20:03.349369+00 | 2022-02-11 04:20:03.349369+00
 43f3e972-4b10-4ab5-8e6e-c621e05654e7 | dog                  | 2022-02-15 05:30:00+00 | 2022-02-15 06:30:00+00 | 2022-02-11 04:20:03.349369+00 | 2022-02-11 04:20:03.349369+00
 4d702995-95b1-4daf-a299-371686b64a5e | alice                | 2022-02-15 19:30:00+00 | 2022-02-15 20:30:00+00 | 2022-02-11 04:20:03.353343+00 | 2022-02-11 04:20:03.353343+00
 860f503e-de33-472c-bbce-63eee3d7afcb | bob                  | 2022-02-15 19:30:00+00 | 2022-02-15 20:30:00+00 | 2022-02-11 04:20:03.356832+00 | 2022-02-11 04:20:03.356832+00
 860f503e-de33-472c-bbce-63eee3d7afcb | cat                  | 2022-02-15 19:30:00+00 | 2022-02-15 20:30:00+00 | 2022-02-11 04:20:03.356832+00 | 2022-02-11 04:20:03.356832+00
 acc22da5-d046-48c7-bc19-6cb0a13d9426 | X_0.7775478561424221 | 2021-12-15 05:30:00+00 | 2021-12-15 07:30:00+00 | 2022-02-11 04:20:03.818958+00 | 2022-02-11 04:20:03.818958+00
 a68b8a42-0147-4044-8362-ac94400c5fe1 | X_0.7775478561424221 | 2021-12-15 05:30:00+00 | 2021-12-15 07:30:00+00 | 2022-02-11 04:20:03.824797+00 | 2022-02-11 04:20:03.824797+00
 e4e602ac-58d4-48de-858c-6f9c7491270a | X_0.7775478561424221 | 2021-12-15 05:30:00+00 | 2021-12-15 07:30:00+00 | 2022-02-11 04:20:03.806509+00 | 2022-02-11 04:20:03.806509+00
(10 rows)

</code></pre></div></div>

<p>When a test fails, the same meeting (as shown in the above schema) with the same time-slot (between <code class="language-plaintext highlighter-rouge">2021-12-15 05:30:00+00</code> and <code class="language-plaintext highlighter-rouge">2021-12-15 07:30:00+00</code>) gets inserted multiple times.  So, why did my tests fail <em>some of the times</em>? What happened to the ACID properties of transactions?</p>

<h2 id="different-levels-of-isolation">Different Levels of Isolation</h2>

<p>To better understand why my tests were failing sporadically, it is important to understand that databases enforce different degrees of isolation among concurrent transactions. Note that, ‘isolation’ was described above as a guarantee that the database system will execute concurrent transactions in such a manner that it will <em>appear as if</em> they were executed serially, i.e., one after the other. In fact, serial isolation (i.e., converting multiple concurrent transactions into a set of sequential transactions) is rarely used in practice. This is because serializable isolation has substantial performance costs which can slow down the response time of a database system. For this reason, most databases provide weaker levels of isolation:</p>

<blockquote>
  <p>“<em>Even on a single-node database, the penalties associated with providing serializability can be severe, including decreased concurrency, reduced performance, and the possibility of deadlock. Accordingly, since the earliest database systems such as System R in 1976, databases have provided a range of user configurable “weak isolation” properties. These properties do not guarantee serializability but offer benefits such as increased concurrency and ease of implementation.</em>” [<a href="http://www.bailis.org/papers/hat-hotos2013.pdf">1</a>].</p>
</blockquote>

<p>When two or more concurrent transactions try to write on the same object of a database or one transaction reads an object that is being concurrently modified by another concurrent transaction, we can have concurrency issues, which are also called ‘race conditions’. Each level of isolation provides guarantees against some or all race conditions.</p>

<h3 id="read-committed">Read Committed</h3>

<p>When a change made by a transaction has been committed, that change becomes permanent on the database and the transaction loses its right to ‘undo’ that change. However, uncommitted changes are always revocable. Working with uncommitted changes should ideally be avoided. Reading some other transaction’s uncommitted changes is called ‘dirty reads’. Writing on another transaction’s uncommitted changes is called ‘dirty writes’</p>

<p>‘Read committed’—the first (or weakest) level of isolation—provides guarantees against dirty reads and dirty writes. This is the default isolation level in PostgreSQL.</p>

<p>Dirty writes are prevented by locking relevant rows where writes take place. When a transaction needs to write a specific row, the database will lock that row. Only once the transaction is completed (aborted or committed) will this lock be opened. At a time, only one transaction can lock a row. So if there is a second transaction that needs to write on the same row, it needs to wait for the first transaction to be completed.</p>

<p>As for prevention of dirty reads, when a write lock is applied on a row, the database maintains two values for that row: the original value and the uncommitted value. Thus, read-only transactions can access the original value till the time the write lock is lifted.</p>

<p><strong>Read committed will not be adequate for our use-case, as our application does not rely on dirty reads or writes.</strong></p>

<h3 id="snapshot-isolation-and-repeatable-read">Snapshot Isolation and Repeatable Read</h3>

<p>In a snapshot isolation, each transaction works on a <em>consistent snapshot</em> of the database, i.e., the database as it stood at the beginning of the transaction.</p>

<p>Snapshot isolation is implemented by a technique called multi-version concurrency control (MVCC). The core principle of snapshot isolation is that for each transaction, they will read a consistent snapshot of the database, as it stood, when that transaction began. As a corollary, if the database progressed further (i.e., some uncommitted changes were committed during the course of a transaction), the transaction will not see those future changes. This ensures that writes do not block reads, and reads do not block writes. This can be especially useful for taking backups of a large database: the transaction making a copy of the database at a particular point in time (a read-only transaction) will not be impeded by other transactions that are writing on some of the rows of that database. However, note that snapshot isolation implements write locks as well, i.e., when a transaction is writing on a row, no other transaction can write it.</p>

<p>When we implement MVCC, the database may potentially need to maintain several versions of the database, each representing the ‘snapshot’ of the database when each ongoing transaction was initiated.</p>

<p>Snapshot isolation level is typically referred to as ‘repeatable read’ in SQL. However, these two terms are not exactly identical.</p>

<blockquote>
  <p>“<em>…it defines repeatable read, which looks superficially similar to snapshot isolation. PostgreSQL and MySQL call their snapshot isolation level repeatable read because it meets the requirements of the standard, and so they can claim standards compliance.</em></p>

  <p><em>Unfortunately, the SQL standard’s definition of isolation levels is flawed—it is ambiguous, imprecise, and not as implementation-independent as a standard should be. Even though several databases implement repeatable read, there are big differences in the guarantees they actually provide, despite being ostensibly standardized. There has been a formal definition of repeatable read in the research literature, but most implementations don’t satisfy that formal definition. And to top it off, IBM DB2 uses “repeatable read” to refer to serializability. As a result, nobody really knows what repeatable read means</em>”[1]</p>
</blockquote>

<p>In addition to preventing dirty reads and writes, snapshot isolation also prevents non-repeatable reads: re-reading the same set of rows will not yield a different result.</p>

<p>Also, PostgreSQL’s implementation of repeatable read automatically detects <em>lost update</em>. A lost update happens when two concurrent transactions read the same row(s), modify the data and write that modified data on that row(s) (<em>read-modify-write</em> cycle). When two such transactions are executed concurrently, one of the writes will be lost. Take the example of a database that maintains counters. Each transaction is required to read the data of the counter, and increment it by one and write the new data onto the database. Now if two transactions are fired at the same time, they will both read the same value, and they will both update the counter by one. So, while we made two queries for incrementing the value of the same counter, the value actually got increased once. (The other increment was ‘lost’). (<em>I had encountered this particular problem while generating counters for my URL shortening application. <a href="https://otee.dev/2021/12/20/twirl-link-shortening.html">Read here</a></em>).</p>

<p><img src="/assets/images/transactions_counters.png" width="100%" />
    <em>Source: Designing Data Intensive Applications [1]</em></p>
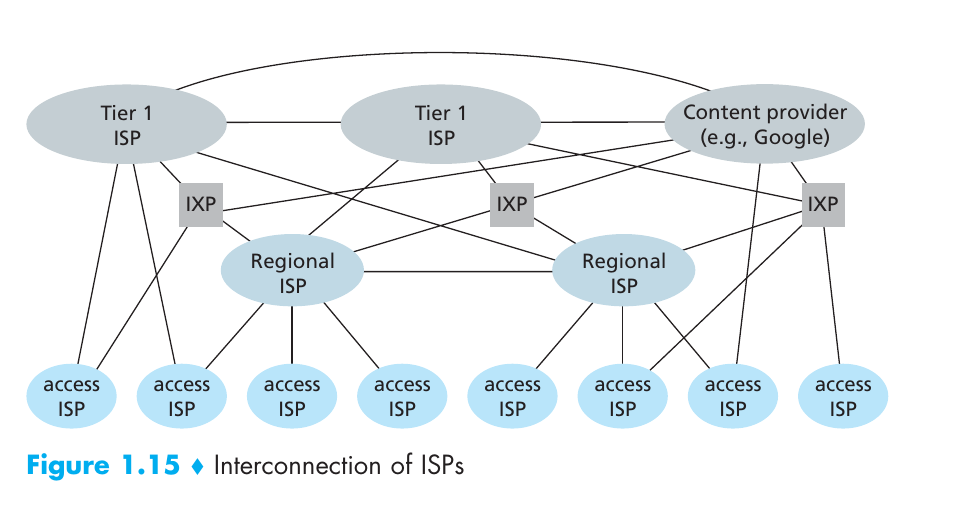
<p>There are two explicit ways to prevent lost updates. First, we can use atomic operations, i.e., we read, modify and write the data in one single query. Second, we use explicit locking. When we use explicit locking, we tell the database to prevent any other transaction from reading or writing on the rows on which our transaction is working on, till the present transaction is completed. This can be done by using <code class="language-plaintext highlighter-rouge">FOR UPDATE</code> at the end of the <code class="language-plaintext highlighter-rouge">SELECT</code> query.</p>

<p>Other than these explicit ways, PostgreSQL also automatically detects if there is a lost update during a repeatable read transaction.</p>

<p><strong>Snapshot isolation will not be adequate for our use-case, as working with consistent snapshots cannot prevent parallel (and concurrent) transactions from making the same writes.</strong> Lost update seems close enough to our use case. However, as our writing operation is akin to creating a new row (as opposed to updating an existing row), Postgres cannot automatically prevent concurrent insertions of the same meeting.</p>

<h3 id="serializable-isolation">Serializable Isolation</h3>

<p>Serializable isolation offers the highest degree of protection.</p>

<blockquote>
  <p>“<em>Serializable isolation is usually regarded as the strongest isolation level. It guarantees that even though transactions may execute in parallel, the end result is the same as if they had executed one at a time, serially, without any concurrency. Thus, the database guarantees that if the transactions behave correctly when run individually, they con‐ tinue to be correct when run concurrently—in other words, the database prevents all possible race conditions.</em>” [1]</p>
</blockquote>

<p>There are three alternative implementations of serializability:</p>

<ul>
  <li>
    <p>Serial Execution: Literally executing transactions serially, by using a single thread always.</p>
  </li>
  <li>
    <p>Two phase locking: Concurrent reads are permitted on rows where no write operation is underway. If any transaction is making a write operation, it will lock the relevant row and every other transaction that wants to either read or write on that row will need to wait till the first transaction is completed. This approach is also called a <em>pessimistic concurrency control</em> mechanism, because the database system assumes the worst, i.e., every concurrent write operation on a transaction will fail, and guards against that eventuality. (Of course, this is more optimistic than single-threaded serial execution)</p>
  </li>
  <li>
    <p>Serializable Snapshot Isolation: Unlike two-phase locking, in this approach, the database system allows for writes and reads to take place concurrently. At the time of committing a transaction, the database checks if there is any violation of isolation properties, in which case it will abort that transaction. This approach is referred to as the ‘optimistic concurrency’ approach.</p>
  </li>
</ul>

<p>In the case of lost updates (involving a read-modify-write cycle), an easy fix is to use explicit locks on the relevant rows. However, what happens when the first read operation looks for the <em>absence</em> of rows (meeting a certain criteria)? If this criterion is met, i.e., if no rows exist meeting a certain condition, we write the database by inserting a new row. In this case, there is no row we can explicitly lock to prevent a write skew or a lost update. <strong>These kinds of concurrency issues are called ‘phantom reads’ and this is exactly the reason why our tests often fail.</strong> Because of its nature and the guarantees it provides, serializable isolation can consistently prevent phantom reads.</p>

<h3 id="using-serializable-isolation-to-prevent-time-collisions">Using Serializable Isolation to Prevent Time Collisions</h3>

<p>Let’s summarize the different levels of isolation and the respective guarantees they provide:
<br /> <br /></p>

<table>
  <thead>
    <tr>
      <th>Isolation Level</th>
      <th>Dirty Reads and Writes</th>
      <th>Non-Repeatable Reads</th>
      <th>Lost Updates</th>
      <th>Phantom Reads</th>
    </tr>
  </thead>
  <tbody>
    <tr>
      <td>Read Committed</td>
      <td>Not possible</td>
      <td>Possible</td>
      <td>Possible</td>
      <td>Possible</td>
    </tr>
    <tr>
      <td>Snapshot isolation / Repeatable Read</td>
      <td>Not possible</td>
      <td>Not possible</td>
      <td>Not Possible (in Postgres)</td>
      <td>Possible</td>
    </tr>
    <tr>
      <td>Serializable Isolation</td>
      <td>Not possible</td>
      <td>Not possible</td>
      <td>Not possible</td>
      <td>Not Possible</td>
    </tr>
  </tbody>
</table>

<p><br /> <br /></p>

<p>We need to use serializable isolation for our meeting scheduling application, as we know that phantom reads are possible when concurrent transactions try to schedule meetings on the database. So, here’s the modified SQL query for inserting a new meeting on the database:</p>

<div class="language-sql highlighter-rouge"><div class="highlight"><pre class="highlight"><code><span class="k">BEGIN</span> <span class="n">TRANSACTION</span> <span class="k">ISOLATION</span> <span class="k">LEVEL</span> <span class="k">SERIALIZABLE</span><span class="p">;</span>
<span class="k">SELECT</span> <span class="n">entity</span> <span class="k">FROM</span> <span class="n">bookings</span> <span class="k">WHERE</span> 
    <span class="n">entity</span> <span class="k">IN</span> <span class="p">(</span><span class="n">entity1</span><span class="p">,</span> <span class="n">entity2</span><span class="p">...</span> <span class="n">entityN</span><span class="p">)</span> 
    <span class="k">AND</span> <span class="p">(</span>
            <span class="p">(</span><span class="n">from_ts</span> <span class="o">&lt;=</span> <span class="n">to_timestamp</span><span class="p">(</span><span class="n">start_point</span><span class="p">)</span> <span class="k">AND</span> <span class="n">to_ts</span> <span class="o">&gt;=</span> <span class="n">to_timestamp</span><span class="p">(</span><span class="n">start_point</span><span class="p">))</span>
            <span class="k">OR</span>
            <span class="p">(</span><span class="n">from_ts</span> <span class="o">&gt;=</span> <span class="n">to_timestamp</span><span class="p">(</span><span class="n">start_point</span><span class="p">)</span> <span class="k">AND</span> <span class="n">from_ts</span> <span class="o">&lt;=</span> <span class="n">to_timestamp</span><span class="p">(</span><span class="n">end_point</span><span class="p">))</span>
        <span class="p">);</span>
<span class="c1">-- if rows.length &gt; 0 </span>
<span class="k">ROLLBACK</span><span class="p">;</span>
<span class="c1">-- else</span>
<span class="k">INSERT</span> <span class="k">INTO</span> <span class="n">bookings</span> <span class="p">(</span><span class="n">meeting_id</span><span class="p">,</span> <span class="n">entity</span><span class="p">,</span> <span class="n">from_ts</span><span class="p">,</span> <span class="n">to_ts</span><span class="p">,</span> <span class="n">created_at</span><span class="p">,</span> <span class="n">updated_at</span><span class="p">)</span> 
        <span class="k">VALUES</span> <span class="p">(...);</span>
<span class="k">COMMIT</span><span class="p">;</span>

</code></pre></div></div>

<p>When we use the above query, our tests pass, consistently.</p>

<h2 id="references">References</h2>

<p>[1] Martin Kleppmann, Designing Data-Intensive Applications (2017), Ch. 7.</p>

<p>[2] Peter Bailis et al, HAT, not CAP: Towards Highly Available Transactions, <a href="http://www.bailis.org/papers/hat-hotos2013.pdf">http://www.bailis.org/papers/hat-hotos2013.pdf</a>.</p>

<p>[3] Michael Melanson, Transactions: the limits of isolation, <a href="https://www.michaelmelanson.net/posts/transactions-the-limits-of-isolation/">https://www.michaelmelanson.net/posts/transactions-the-limits-of-isolation/</a></p>]]></content><author><name></name></author><category term="conceptual" /><summary type="html"><![CDATA[In this post, I discuss how time-slot collisions in a meeting scheduling application can be resolved. First, I discuss the business logic of determining a ‘time-slot conflict’. Second, I explain why we need transactions to prevent scheduling of concurrent conflicting meetings. Finally, I do a deep-dive on the different levels of isolation provided by database systems, to better understand why simply using transactions (with their default set-up) does not guarantee against conflicting meetings.]]></summary><media:thumbnail xmlns:media="http://search.yahoo.com/mrss/" url="https://otee.dev/assets/images/transactions_counters.png" /><media:content medium="image" url="https://otee.dev/assets/images/transactions_counters.png" xmlns:media="http://search.yahoo.com/mrss/" /></entry><entry><title type="html">Kicking Around Packets: Understanding How the Internet Works</title><link href="https://otee.dev/2022/02/02/understanding-the-internet.html" rel="alternate" type="text/html" title="Kicking Around Packets: Understanding How the Internet Works" /><published>2022-02-02T00:00:00+00:00</published><updated>2022-02-02T00:00:00+00:00</updated><id>https://otee.dev/2022/02/02/understanding-the-internet</id><content type="html" xml:base="https://otee.dev/2022/02/02/understanding-the-internet.html"><![CDATA[<p>In this post, I try to answer the question “What is the internet and how does it really work?”</p>

<h2 id="key-terms">Key terms</h2>

<p>Before going into further details, here is a useful list of some of the key terms used in this article.</p>

<ul>
  <li><strong>End-system or host</strong>: This is a device (e.g., a computer) that actually wants to use the internet. It is the ultimate consumer of the communication services offered by the internet. It typically executes a network application on behalf of the user and uses the internet to that end. This article uses the terms ‘host’ and ‘end-system’ interchangeably.</li>
  <li><strong>Packet switches or routers</strong>: Different networks are interconnected to each other through a series of packet-switches. They are mainly responsible for forwarding packets of information from one node to another.  Packet switches are of two kinds: link-layer switches and routers (discussed below). For the most part, this article uses the term ‘routers’ to refer to packet-switches in general.</li>
  <li><strong>Communication links</strong>: These are the physical media that connect routers to one another. Packets travel from one router to the next via a communication link.</li>
</ul>

<h2 id="understanding-the-internet">Understanding the Internet</h2>

<p>The internet is a <strong>network of networks</strong>.</p>

<p>Each end-system accesses the internet through an <strong>Internet Service Provider</strong> (ISP). An ISP is typically a telecom company providing internet service to end-users.</p>

<p>The starting point of the internet is an access ISP. The access ISP is the network which connects a host with the rest of the internet.</p>

<p>Each ISP has its own network. The overarching goal of the internet is to enable any two end-systems to communicate with each other, irrespective of where they are situated. Thus, it is not practically feasible for one ISP to provide a direct line of communication between every pair of end-points. Instead, networks have inter-connections with each other. In other words, each network interacts with one or more networks to deliver a message.  Here’s how <a href="https://en.wikipedia.org/wiki/Internetworking">Wikipedia</a> defines ‘inter-networking’</p>

<blockquote>
  <p>“Internetworking is the practice of interconnecting multiple computer networks, such that any pair of hosts in the connected networks can exchange messages irrespective of their hardware-level networking technology. The resulting system of interconnected networks are called an internetwork, or simply an internet.”</p>

</blockquote>

<p>These interconnections can be direct, i.e., between two networks directly. This kind of interconnection is called <strong>peering</strong>, where two ISPs, at the same level of hierarchy, choose to mutually allow each other access to their respective networks. Most often, though, interconnections take place indirectly, i.e., to reach your destination end-system’s access ISP, you will have to go via one or more intermediary networks (which are typically larger networks with larger coverage). These kinds of indirect interconnections are called <strong>transit</strong>. Thus, typically, to pass on a message from one end-user to another the “<em>the traffic will often be transferred through several indirect interconnections to reach the end-user</em>” (<a href="https://arstechnica.com/features/2008/09/peering-and-transit/">source</a>)</p>

<p><img src="/assets/images/network_interconnections.png" width="90%" /></p>

<p><em>Source: <a href="https://eclass.teicrete.gr/modules/document/file.php/TP326/%CE%98%CE%B5%CF%89%CF%81%CE%AF%CE%B1%20(Lectures)/Computer_Networking_A_Top-Down_Approach.pdf">Computer Programming: A Top-Down Approach</a></em></p>

<h2 id="how-the-internet-works-kicking-around-packets">How the Internet Works: Kicking Around Packets</h2>

<p>Largely, this is how the internet works: when a piece of information needs to be sent from one end-system to another, the information is divided into several segments, called <strong>packets.</strong> These packets are then sent to the destination end-system through the internet, which comprises several <strong>communication links</strong> and <strong>packet switches</strong>.</p>

<p>Communication links are the physical media through which packets are transmitted. Examples include optical fibers and twisted copper wires.</p>

<p>Each packet switch has multiple communication links attached to it. Packet switches take each packet it receives on any one of its attached communication links and forwards them to another one of its attached communication links.  There are two main types of packet switches: routers and link-layer switches. While both forward packets towards the destination host, link-layer switches are used for connecting devices within a network. They are mostly used at the access network (for connecting a device to an access ISP). On the other hand, routers are used in the network core, i.e., for sending packets across networks. As both link-layers and routers do the fundamental task of forwarding packets towards the destination end-point, the rest of this article will refer to packet-switches as <strong>routers.</strong></p>

<svg id="Layer_1" data-name="Layer 1" xmlns="http://www.w3.org/2000/svg" viewBox="0 0 1480 542.51"><defs><style>.cls-1{fill:#404242;}</style></defs><path class="cls-1" d="M432.77,196a17.38,17.38,0,1,0-27.44,14.18,1.66,1.66,0,1,1-1.93,2.7,20.7,20.7,0,1,1,23.06.62,1.69,1.69,0,0,1-.89.25,1.64,1.64,0,0,1-1.4-.77,1.66,1.66,0,0,1,.51-2.29A17.3,17.3,0,0,0,432.77,196ZM398,222.3a1.72,1.72,0,0,0,.92.27,1.66,1.66,0,0,0,.92-3,28.17,28.17,0,1,1,31.4-.22,1.66,1.66,0,0,0,1.87,2.75,31.5,31.5,0,1,0-35.11.24Zm167.72,20.08v60a7.49,7.49,0,0,1-7.48,7.47H378.34a7.48,7.48,0,0,1-7.47-7.47v-60a7.49,7.49,0,0,1,7.47-7.48h33V206.74a4.15,4.15,0,0,1,8.3,0V234.9H558.25A7.49,7.49,0,0,1,565.73,242.38Zm-8.31.83H379.17v58.32H557.42Zm-48.19,36a6,6,0,1,0-6-6A6,6,0,0,0,509.23,279.17Zm19.31,0a6,6,0,1,0-6-6A6,6,0,0,0,528.54,279.17Zm-57.93,0a6,6,0,1,0-6-6A6,6,0,0,0,470.61,279.17Zm19.31,0a6,6,0,1,0-6-6A6,6,0,0,0,489.92,279.17Zm43.34,37.68H403.34a4.16,4.16,0,0,0,0,8.31H533.26a4.16,4.16,0,0,0,0-8.31Z" /><path class="cls-1" d="M1428.78,183.83V76a8.53,8.53,0,0,0-8.52-8.52H1257.72A8.53,8.53,0,0,0,1249.2,76V183.83h-11.37c1,7.7,6.35,13.63,12.76,13.63H1426.5c6.41,0,11.75-5.93,12.76-13.63ZM1258.94,77.2h160.11V183.83H1258.94Z" /><path class="cls-1" d="M1428.75,422V314.2a8.53,8.53,0,0,0-8.52-8.52H1257.69a8.52,8.52,0,0,0-8.51,8.52V422h-11.37c1,7.7,6.34,13.63,12.75,13.63h175.91c6.41,0,11.75-5.93,12.76-13.63ZM1258.91,315.41H1419V422H1258.91Z" /><path class="cls-1" d="M1069.94,121h-7.09v19.56h-3.93V121h-7v-3.19h18Z" /><path class="cls-1" d="M1080.39,127.08a9.7,9.7,0,0,0-1.54-.12,3.48,3.48,0,0,0-3.52,2v11.56h-3.8V123.61h3.63l.09,1.89a4.28,4.28,0,0,1,3.82-2.2,3.48,3.48,0,0,1,1.34.22Z" /><path class="cls-1" d="M1092.42,140.52a6,6,0,0,1-.43-1.58,6.4,6.4,0,0,1-8.6.44,4.67,4.67,0,0,1-1.61-3.6,4.78,4.78,0,0,1,2-4.14,9.68,9.68,0,0,1,5.74-1.45h2.33v-1.11a3,3,0,0,0-.73-2.1,2.91,2.91,0,0,0-2.24-.79,3.35,3.35,0,0,0-2.12.65,2,2,0,0,0-.83,1.65h-3.8a4.17,4.17,0,0,1,.93-2.6,6.13,6.13,0,0,1,2.5-1.9,8.8,8.8,0,0,1,3.54-.69,7.14,7.14,0,0,1,4.74,1.49,5.36,5.36,0,0,1,1.81,4.2v7.62a8.58,8.58,0,0,0,.64,3.64v.27Zm-4.17-2.74a4.37,4.37,0,0,0,2.12-.54,3.7,3.7,0,0,0,1.49-1.47v-3.19h-2a5.62,5.62,0,0,0-3.18.74,2.37,2.37,0,0,0-1.06,2.07,2.23,2.23,0,0,0,.73,1.75A2.8,2.8,0,0,0,1088.25,137.78Z" /><path class="cls-1" d="M1101,140.52v-14.1h-2.58v-2.81H1101v-1.54a5.82,5.82,0,0,1,1.56-4.35,6,6,0,0,1,4.38-1.53,8.59,8.59,0,0,1,2.12.28l-.09,3a7.79,7.79,0,0,0-1.45-.12c-1.82,0-2.72.93-2.72,2.79v1.5h3.44v2.81h-3.44v14.1Z" /><path class="cls-1" d="M1112.32,140.52v-14.1h-2.58v-2.81h2.58v-1.54a5.82,5.82,0,0,1,1.56-4.35,6,6,0,0,1,4.37-1.53,8.67,8.67,0,0,1,2.13.28l-.1,3a7.71,7.71,0,0,0-1.45-.12c-1.81,0-2.72.93-2.72,2.79v1.5h3.44v2.81h-3.44v14.1Z" /><path class="cls-1" d="M1122.33,119.22a2,2,0,0,1,.56-1.45,2,2,0,0,1,1.58-.58,2.12,2.12,0,0,1,1.6.58,2,2,0,0,1,.56,1.45,2,2,0,0,1-.56,1.43,2.16,2.16,0,0,1-1.6.57,2.08,2.08,0,0,1-1.58-.57A2,2,0,0,1,1122.33,119.22Zm4,21.3h-3.79V123.61h3.79Z" /><path class="cls-1" d="M1137.44,137.8a3.45,3.45,0,0,0,2.36-.83,2.83,2.83,0,0,0,1-2.05h3.58a5.51,5.51,0,0,1-1,3,6.36,6.36,0,0,1-2.5,2.16,7.31,7.31,0,0,1-3.4.8,7.19,7.19,0,0,1-5.63-2.3,9.12,9.12,0,0,1-2.08-6.34v-.39a9,9,0,0,1,2.07-6.18,7.12,7.12,0,0,1,5.62-2.32,7,7,0,0,1,4.92,1.76,6.3,6.3,0,0,1,2,4.61h-3.58a3.49,3.49,0,0,0-1-2.39,3.21,3.21,0,0,0-2.37-.93,3.32,3.32,0,0,0-2.84,1.33,6.79,6.79,0,0,0-1,4.06v.61a6.94,6.94,0,0,0,1,4.1A3.34,3.34,0,0,0,1137.44,137.8Z" /><path class="cls-1" d="M1160,119.5v4.11h3v2.81h-3v9.44a2.11,2.11,0,0,0,.38,1.4,1.78,1.78,0,0,0,1.37.43,5.56,5.56,0,0,0,1.33-.16v2.94a9.38,9.38,0,0,1-2.5.36q-4.38,0-4.38-4.83v-9.58h-2.78v-2.81h2.78V119.5Z" /><path class="cls-1" d="M1164.67,131.91a9.93,9.93,0,0,1,1-4.48,7.21,7.21,0,0,1,2.76-3.06,7.86,7.86,0,0,1,4.1-1.07,7.37,7.37,0,0,1,5.55,2.2,8.67,8.67,0,0,1,2.31,5.85v.89a10.12,10.12,0,0,1-1,4.47,7.06,7.06,0,0,1-2.75,3,7.83,7.83,0,0,1-4.13,1.08,7.32,7.32,0,0,1-5.73-2.38,9.15,9.15,0,0,1-2.15-6.35Zm3.8.33a6.77,6.77,0,0,0,1.08,4.08,3.5,3.5,0,0,0,3,1.48,3.46,3.46,0,0,0,3-1.5,7.54,7.54,0,0,0,1.07-4.39,6.67,6.67,0,0,0-1.1-4.06,3.51,3.51,0,0,0-3-1.5,3.47,3.47,0,0,0-3,1.47A7.4,7.4,0,0,0,1168.47,132.24Z" /><path class="cls-1" d="M1204.67,135.22h-8.81l-1.84,5.3h-4.11l8.59-22.75h3.55l8.61,22.75h-4.13ZM1197,132h6.6l-3.3-9.43Z" /><path class="cls-1" d="M1272.68,227.73a8.23,8.23,0,0,1-2.69,5.68,9.15,9.15,0,0,1-6.23,2,8.85,8.85,0,0,1-4.79-1.29,8.45,8.45,0,0,1-3.2-3.67,13.18,13.18,0,0,1-1.17-5.51v-2.13a13.35,13.35,0,0,1,1.14-5.67,8.65,8.65,0,0,1,3.27-3.78,9.21,9.21,0,0,1,4.93-1.33,8.83,8.83,0,0,1,6.07,2,8.54,8.54,0,0,1,2.67,5.77h-3.94a5.59,5.59,0,0,0-1.43-3.53,4.71,4.71,0,0,0-3.37-1.09,4.62,4.62,0,0,0-4,1.88,9.44,9.44,0,0,0-1.41,5.53v2a10,10,0,0,0,1.32,5.63,4.39,4.39,0,0,0,3.87,1.94,5.12,5.12,0,0,0,3.5-1,5.45,5.45,0,0,0,1.48-3.48Z" /><path class="cls-1" d="M1275.13,226.53a9.93,9.93,0,0,1,1-4.48,7.09,7.09,0,0,1,2.76-3.06,7.73,7.73,0,0,1,4.09-1.07,7.37,7.37,0,0,1,5.56,2.2,8.66,8.66,0,0,1,2.3,5.84l0,.89a10.05,10.05,0,0,1-1,4.47,7.15,7.15,0,0,1-2.75,3.05,7.83,7.83,0,0,1-4.13,1.08,7.33,7.33,0,0,1-5.73-2.39,9.11,9.11,0,0,1-2.15-6.35Zm3.8.32a6.83,6.83,0,0,0,1.08,4.09,3.76,3.76,0,0,0,6,0,7.56,7.56,0,0,0,1.07-4.39,6.78,6.78,0,0,0-1.1-4.07,3.54,3.54,0,0,0-3-1.5,3.47,3.47,0,0,0-3,1.48A7.37,7.37,0,0,0,1278.93,226.85Z" /><path class="cls-1" d="M1297.63,218.23l.11,1.76a6.1,6.1,0,0,1,4.88-2.07c2.26,0,3.8.86,4.64,2.59a6,6,0,0,1,5.18-2.59,5.28,5.28,0,0,1,4.17,1.54A6.89,6.89,0,0,1,1318,224v11.1h-3.8v-11a3.38,3.38,0,0,0-.7-2.35,3.09,3.09,0,0,0-2.33-.75,3.18,3.18,0,0,0-2.12.69,3.64,3.64,0,0,0-1.15,1.82l0,11.59h-3.8V224a2.71,2.71,0,0,0-3.05-3,3.34,3.34,0,0,0-3.23,1.85v12.25h-3.8v-16.9Z" /><path class="cls-1" d="M1336.71,226.85a10.05,10.05,0,0,1-1.78,6.26,6.19,6.19,0,0,1-9.24.51v8h-3.79v-23.4h3.5l.15,1.72a5.57,5.57,0,0,1,4.55-2,5.75,5.75,0,0,1,4.85,2.3,10.36,10.36,0,0,1,1.76,6.4Zm-3.78-.32a7.08,7.08,0,0,0-1-4A3.26,3.26,0,0,0,1329,221a3.5,3.5,0,0,0-3.35,1.92v7.5a3.54,3.54,0,0,0,3.38,2,3.25,3.25,0,0,0,2.83-1.47A7.67,7.67,0,0,0,1332.93,226.53Z" /><path class="cls-1" d="M1350.16,233.48a5.89,5.89,0,0,1-4.75,2,5.25,5.25,0,0,1-4.16-1.61,6.82,6.82,0,0,1-1.42-4.66v-11h3.8v10.9c0,2.15.89,3.22,2.67,3.22a3.76,3.76,0,0,0,3.74-2V218.23h3.79v16.9h-3.57Z" /><path class="cls-1" d="M1362.46,214.12v4.11h3V221h-3v9.44a2.13,2.13,0,0,0,.38,1.4,1.81,1.81,0,0,0,1.37.43,6.12,6.12,0,0,0,1.33-.16v2.94a9.38,9.38,0,0,1-2.5.36q-4.38,0-4.38-4.83V221h-2.78v-2.81h2.78v-4.11Z" /><path class="cls-1" d="M1375.79,235.45a7.83,7.83,0,0,1-5.85-2.28,8.21,8.21,0,0,1-2.25-6v-.47a10.11,10.11,0,0,1,1-4.52,7.39,7.39,0,0,1,2.74-3.1,7.26,7.26,0,0,1,3.94-1.11,6.65,6.65,0,0,1,5.34,2.2,9.35,9.35,0,0,1,1.88,6.23v1.53h-11a5.12,5.12,0,0,0,1.4,3.32,4.22,4.22,0,0,0,3.09,1.22,5.17,5.17,0,0,0,4.25-2.11l2,1.95a6.81,6.81,0,0,1-2.71,2.35A8.45,8.45,0,0,1,1375.79,235.45Zm-.46-14.49a3.19,3.19,0,0,0-2.52,1.1,5.68,5.68,0,0,0-1.23,3h7.24v-.28a4.61,4.61,0,0,0-1-2.88A3.16,3.16,0,0,0,1375.33,221Z" /><path class="cls-1" d="M1394.37,221.7a8.76,8.76,0,0,0-1.55-.13,3.5,3.5,0,0,0-3.52,2v11.56h-3.79v-16.9h3.62l.09,1.89a4.28,4.28,0,0,1,3.82-2.2,3.66,3.66,0,0,1,1.34.21Z" /><path class="cls-1" d="M1417.83,229.84H1409l-1.84,5.29h-4.11l8.59-22.75h3.55l8.61,22.75h-4.13Zm-7.7-3.19h6.59l-3.29-9.44Z" /><path class="cls-1" d="M1273.21,464.82a8.23,8.23,0,0,1-2.69,5.68,9.16,9.16,0,0,1-6.24,2,8.88,8.88,0,0,1-4.79-1.29,8.46,8.46,0,0,1-3.19-3.66,13.26,13.26,0,0,1-1.17-5.52V460a13.36,13.36,0,0,1,1.14-5.68,8.65,8.65,0,0,1,3.27-3.78,9.19,9.19,0,0,1,4.93-1.33,8.78,8.78,0,0,1,6.06,2,8.55,8.55,0,0,1,2.68,5.78h-3.94a5.65,5.65,0,0,0-1.43-3.54,4.71,4.71,0,0,0-3.37-1.09,4.61,4.61,0,0,0-4,1.89,9.42,9.42,0,0,0-1.41,5.53v2a10,10,0,0,0,1.32,5.63,4.36,4.36,0,0,0,3.86,1.94,5.13,5.13,0,0,0,3.5-1,5.48,5.48,0,0,0,1.49-3.49Z" /><path class="cls-1" d="M1275.66,463.62a10.06,10.06,0,0,1,1-4.48,7.17,7.17,0,0,1,2.77-3.06,7.82,7.82,0,0,1,4.09-1.07,7.4,7.4,0,0,1,5.56,2.2,8.66,8.66,0,0,1,2.3,5.85l0,.89a10,10,0,0,1-1,4.46,7.09,7.09,0,0,1-2.75,3,7.86,7.86,0,0,1-4.14,1.08,7.32,7.32,0,0,1-5.72-2.38,9.1,9.1,0,0,1-2.15-6.35Zm3.8.33a6.77,6.77,0,0,0,1.07,4.08,3.77,3.77,0,0,0,6,0,7.54,7.54,0,0,0,1.07-4.39,6.68,6.68,0,0,0-1.11-4.06,3.71,3.71,0,0,0-5.94,0A7.41,7.41,0,0,0,1279.46,464Z" /><path class="cls-1" d="M1298.16,455.32l.11,1.77a6.07,6.07,0,0,1,4.87-2.08q3.39,0,4.64,2.59A6,6,0,0,1,1313,455a5.22,5.22,0,0,1,4.16,1.55,6.75,6.75,0,0,1,1.4,4.56v11.11h-3.79v-11a3.35,3.35,0,0,0-.71-2.36,3.06,3.06,0,0,0-2.32-.75,3.16,3.16,0,0,0-2.12.69,3.68,3.68,0,0,0-1.15,1.82l0,11.6h-3.8V461.1a2.71,2.71,0,0,0-3.05-3,3.33,3.33,0,0,0-3.23,1.86v12.25h-3.8V455.32Z" /><path class="cls-1" d="M1337.24,464a10.08,10.08,0,0,1-1.78,6.25,6.19,6.19,0,0,1-9.24.51v8h-3.8V455.32h3.5l.16,1.72a5.58,5.58,0,0,1,4.55-2,5.77,5.77,0,0,1,4.85,2.3,10.36,10.36,0,0,1,1.76,6.4Zm-3.78-.33a7.08,7.08,0,0,0-1-4,3.28,3.28,0,0,0-2.89-1.48,3.49,3.49,0,0,0-3.34,1.92v7.5a3.53,3.53,0,0,0,3.38,2,3.28,3.28,0,0,0,2.83-1.46A7.79,7.79,0,0,0,1333.46,463.62Z" /><path class="cls-1" d="M1350.69,470.57a5.91,5.91,0,0,1-4.75,2,5.25,5.25,0,0,1-4.16-1.61,6.8,6.8,0,0,1-1.42-4.66V455.32h3.8v10.91c0,2.14.89,3.22,2.67,3.22a3.75,3.75,0,0,0,3.73-2V455.32h3.8v16.91h-3.58Z" /><path class="cls-1" d="M1363,451.21v4.11h3v2.81h-3v9.44a2.06,2.06,0,0,0,.38,1.4,1.76,1.76,0,0,0,1.37.43,5.48,5.48,0,0,0,1.32-.16v2.94a9.27,9.27,0,0,1-2.5.36q-4.36,0-4.37-4.83v-9.58h-2.78v-2.81h2.78v-4.11Z" /><path class="cls-1" d="M1376.31,472.54a7.89,7.89,0,0,1-5.85-2.27,8.29,8.29,0,0,1-2.24-6.06v-.47a10.17,10.17,0,0,1,1-4.52,7.39,7.39,0,0,1,2.74-3.1,7.26,7.26,0,0,1,3.94-1.11,6.61,6.61,0,0,1,5.33,2.2,9.31,9.31,0,0,1,1.89,6.24V465h-11a5,5,0,0,0,1.4,3.31,4.18,4.18,0,0,0,3.08,1.22,5.13,5.13,0,0,0,4.25-2.11l2,2a6.8,6.8,0,0,1-2.71,2.35A8.46,8.46,0,0,1,1376.31,472.54Zm-.45-14.48a3.19,3.19,0,0,0-2.52,1.09,5.69,5.69,0,0,0-1.23,3.05h7.24v-.29a4.67,4.67,0,0,0-1-2.88A3.17,3.17,0,0,0,1375.86,458.06Z" /><path class="cls-1" d="M1394.89,458.79a9.7,9.7,0,0,0-1.54-.13,3.49,3.49,0,0,0-3.52,2v11.57H1386V455.32h3.63l.09,1.89a4.28,4.28,0,0,1,3.81-2.2,3.5,3.5,0,0,1,1.35.22Z" /><path class="cls-1" d="M1405.63,472.23V449.48h7.79a9.52,9.52,0,0,1,5.88,1.54,5.47,5.47,0,0,1,2,4.61,5,5,0,0,1-.84,2.82,5.34,5.34,0,0,1-2.47,1.93,5,5,0,0,1,2.85,1.89,5.43,5.43,0,0,1,1,3.32,6.06,6.06,0,0,1-2,4.92,9,9,0,0,1-5.89,1.72Zm3.95-13.17h3.88a4.49,4.49,0,0,0,2.88-.84,2.88,2.88,0,0,0,1-2.37,2.92,2.92,0,0,0-1-2.44,4.87,4.87,0,0,0-3-.75h-3.84Zm0,2.9v7.11H1414a4.28,4.28,0,0,0,2.91-.92,3.26,3.26,0,0,0,1-2.56q0-3.55-3.62-3.63Z" /><path class="cls-1" d="M1069.94,394.66h-7.09v19.57h-3.93V394.66h-7v-3.18h18Z" /><path class="cls-1" d="M1080.39,400.79a9.7,9.7,0,0,0-1.54-.13,3.49,3.49,0,0,0-3.52,2v11.57h-3.8V397.32h3.63l.09,1.89a4.28,4.28,0,0,1,3.82-2.2,3.48,3.48,0,0,1,1.34.22Z" /><path class="cls-1" d="M1092.42,414.23a6.07,6.07,0,0,1-.43-1.58,6.4,6.4,0,0,1-8.6.44,4.67,4.67,0,0,1-1.61-3.6,4.81,4.81,0,0,1,2-4.15,9.75,9.75,0,0,1,5.74-1.44h2.33v-1.11a2.65,2.65,0,0,0-3-2.89,3.35,3.35,0,0,0-2.12.65,2,2,0,0,0-.83,1.65h-3.8a4.21,4.21,0,0,1,.93-2.61,6.11,6.11,0,0,1,2.5-1.89,8.8,8.8,0,0,1,3.54-.69,7.14,7.14,0,0,1,4.74,1.49,5.34,5.34,0,0,1,1.81,4.2v7.62a8.58,8.58,0,0,0,.64,3.64v.27Zm-4.17-2.74a4.37,4.37,0,0,0,2.12-.54,3.7,3.7,0,0,0,1.49-1.47v-3.19h-2a5.62,5.62,0,0,0-3.18.73,2.38,2.38,0,0,0-1.06,2.08,2.19,2.19,0,0,0,.73,1.74A2.76,2.76,0,0,0,1088.25,411.49Z" /><path class="cls-1" d="M1101,414.23v-14.1h-2.58v-2.81H1101v-1.55a5.81,5.81,0,0,1,1.56-4.34,6,6,0,0,1,4.38-1.53,8.59,8.59,0,0,1,2.12.28l-.09,3a7.73,7.73,0,0,0-1.45-.13c-1.82,0-2.72.94-2.72,2.8v1.5h3.44v2.81h-3.44v14.1Z" /><path class="cls-1" d="M1112.32,414.23v-14.1h-2.58v-2.81h2.58v-1.55a5.81,5.81,0,0,1,1.56-4.34,6,6,0,0,1,4.37-1.53,8.67,8.67,0,0,1,2.13.28l-.1,3a7.65,7.65,0,0,0-1.45-.13c-1.81,0-2.72.94-2.72,2.8v1.5h3.44v2.81h-3.44v14.1Z" /><path class="cls-1" d="M1122.33,392.93a2,2,0,0,1,.56-1.45,2,2,0,0,1,1.58-.58,2.12,2.12,0,0,1,1.6.58,2,2,0,0,1,.56,1.45,2,2,0,0,1-.56,1.43,2.16,2.16,0,0,1-1.6.57,2.08,2.08,0,0,1-1.58-.57A2,2,0,0,1,1122.33,392.93Zm4,21.3h-3.79V397.32h3.79Z" /><path class="cls-1" d="M1137.44,411.51a3.45,3.45,0,0,0,2.36-.83,2.83,2.83,0,0,0,1-2.05h3.58a5.51,5.51,0,0,1-1,2.95,6.36,6.36,0,0,1-2.5,2.16,7.43,7.43,0,0,1-3.4.8,7.22,7.22,0,0,1-5.63-2.3,9.12,9.12,0,0,1-2.08-6.34v-.39a9,9,0,0,1,2.07-6.18,7.12,7.12,0,0,1,5.62-2.32,6.93,6.93,0,0,1,4.92,1.76,6.3,6.3,0,0,1,2,4.61h-3.58a3.47,3.47,0,0,0-1-2.39,3.21,3.21,0,0,0-2.37-.93,3.32,3.32,0,0,0-2.84,1.33,6.79,6.79,0,0,0-1,4.06v.61a6.94,6.94,0,0,0,1,4.1A3.34,3.34,0,0,0,1137.44,411.51Z" /><path class="cls-1" d="M1160,393.21v4.11h3v2.81h-3v9.44a2.11,2.11,0,0,0,.38,1.4,1.78,1.78,0,0,0,1.37.43,5.56,5.56,0,0,0,1.33-.16v2.94a9.38,9.38,0,0,1-2.5.36q-4.38,0-4.38-4.83v-9.58h-2.78v-2.81h2.78v-4.11Z" /><path class="cls-1" d="M1164.67,405.62a9.93,9.93,0,0,1,1-4.48,7.21,7.21,0,0,1,2.76-3.06,7.86,7.86,0,0,1,4.1-1.07,7.37,7.37,0,0,1,5.55,2.2,8.67,8.67,0,0,1,2.31,5.85V406a10,10,0,0,1-1,4.46,7,7,0,0,1-2.75,3,7.83,7.83,0,0,1-4.13,1.08,7.32,7.32,0,0,1-5.73-2.38,9.15,9.15,0,0,1-2.15-6.35Zm3.8.33a6.77,6.77,0,0,0,1.08,4.08,3.5,3.5,0,0,0,3,1.48,3.46,3.46,0,0,0,3-1.5,7.54,7.54,0,0,0,1.07-4.39,6.67,6.67,0,0,0-1.1-4.06,3.51,3.51,0,0,0-3-1.5,3.47,3.47,0,0,0-3,1.47A7.4,7.4,0,0,0,1168.47,406Z" /><path class="cls-1" d="M1191.94,414.23V391.48h7.8a9.51,9.51,0,0,1,5.87,1.54,5.45,5.45,0,0,1,2,4.61,4.88,4.88,0,0,1-.85,2.82,5.36,5.36,0,0,1-2.46,1.93,5,5,0,0,1,2.85,1.89,5.49,5.49,0,0,1,1,3.32,6.06,6.06,0,0,1-2.05,4.92,9,9,0,0,1-5.88,1.72Zm4-13.17h3.88a4.45,4.45,0,0,0,2.88-.84,2.88,2.88,0,0,0,1-2.37,2.92,2.92,0,0,0-1-2.44,4.85,4.85,0,0,0-3-.75h-3.85Zm0,2.9v7.11h4.39a4.28,4.28,0,0,0,2.91-.92,3.24,3.24,0,0,0,1-2.56q0-3.55-3.63-3.63Z" /><path class="cls-1" d="M933.88,321.4h-185a3.5,3.5,0,0,1-3.5-3.5v-57a3.5,3.5,0,0,1,3.5-3.5h185a3.5,3.5,0,0,1,3.5,3.5v57A3.5,3.5,0,0,1,933.88,321.4Zm-181.49-7h178v-50h-178Z" /><path class="cls-1" d="M933.88,264.42h-185a3.49,3.49,0,0,1-2.28-6.15l33.24-28.49a3.46,3.46,0,0,1,2.28-.85h58.65a3.83,3.83,0,0,1,.6,0,4.07,4.07,0,0,1,.61,0h58.65a3.5,3.5,0,0,1,2.28.85l33.24,28.49a3.5,3.5,0,0,1-2.28,6.15Zm-175.53-7H924.42l-25.08-21.49H842a3.08,3.08,0,0,1-.61-.05,2.92,2.92,0,0,1-.6.05H783.42Z" /><rect class="cls-1" x="779.29" y="284.92" width="16.16" height="16.16" /><rect class="cls-1" x="782.29" y="281.96" width="10.17" height="5.91" /><rect class="cls-1" x="806.3" y="284.92" width="16.16" height="16.16" /><rect class="cls-1" x="809.29" y="281.96" width="10.17" height="5.91" /><rect class="cls-1" x="833.3" y="284.92" width="16.16" height="16.16" /><rect class="cls-1" x="836.3" y="281.96" width="10.17" height="5.91" /><rect class="cls-1" x="860.31" y="284.92" width="16.16" height="16.16" /><rect class="cls-1" x="863.3" y="281.96" width="10.17" height="5.91" /><rect class="cls-1" x="887.31" y="284.92" width="16.16" height="16.16" /><rect class="cls-1" x="890.31" y="281.96" width="10.17" height="5.91" /><path class="cls-1" d="M80.88,385.51H76.94V362.76h3.94Z" /><path class="cls-1" d="M88.9,368.6l.11,2a6.08,6.08,0,0,1,4.92-2.27q5.28,0,5.37,6v11.17H95.51V374.56a3.52,3.52,0,0,0-.7-2.39,2.93,2.93,0,0,0-2.27-.77,3.67,3.67,0,0,0-3.43,2.08v12H85.32V368.6Z" /><path class="cls-1" d="M107.93,364.49v4.11h3v2.82h-3v9.43a2,2,0,0,0,.38,1.4,1.77,1.77,0,0,0,1.37.43,6.16,6.16,0,0,0,1.33-.15v2.93a9.38,9.38,0,0,1-2.5.36q-4.38,0-4.38-4.83v-9.57h-2.78V368.6h2.78v-4.11Z" /><path class="cls-1" d="M121.26,385.82a7.9,7.9,0,0,1-5.86-2.27,8.27,8.27,0,0,1-2.24-6.06V377a10.19,10.19,0,0,1,1-4.53,7.39,7.39,0,0,1,2.74-3.1,7.26,7.26,0,0,1,3.94-1.11,6.64,6.64,0,0,1,5.33,2.2,9.31,9.31,0,0,1,1.89,6.24v1.53H117a5,5,0,0,0,1.4,3.31,4.16,4.16,0,0,0,3.08,1.22,5.13,5.13,0,0,0,4.25-2.11l2,2a6.87,6.87,0,0,1-2.71,2.35A8.58,8.58,0,0,1,121.26,385.82Zm-.46-14.48a3.19,3.19,0,0,0-2.52,1.09,5.72,5.72,0,0,0-1.23,3.05h7.24v-.28a4.72,4.72,0,0,0-1-2.89A3.17,3.17,0,0,0,120.8,371.34Z" /><path class="cls-1" d="M139.83,372.07a9.7,9.7,0,0,0-1.54-.12,3.48,3.48,0,0,0-3.52,2v11.56H131V368.6h3.63l.09,1.89a4.3,4.3,0,0,1,3.82-2.2,3.48,3.48,0,0,1,1.34.22Z" /><path class="cls-1" d="M145.76,368.6l.1,2a6.1,6.1,0,0,1,4.93-2.27q5.28,0,5.37,6v11.17h-3.8V374.56a3.52,3.52,0,0,0-.69-2.39,2.93,2.93,0,0,0-2.27-.77,3.66,3.66,0,0,0-3.43,2.08v12h-3.79V368.6Z" /><path class="cls-1" d="M167.47,385.82a7.89,7.89,0,0,1-5.85-2.27,8.27,8.27,0,0,1-2.24-6.06V377a10.19,10.19,0,0,1,1-4.53,7.39,7.39,0,0,1,2.74-3.1,7.26,7.26,0,0,1,3.94-1.11,6.64,6.64,0,0,1,5.33,2.2,9.31,9.31,0,0,1,1.89,6.24v1.53h-11a5,5,0,0,0,1.4,3.31,4.14,4.14,0,0,0,3.08,1.22,5.13,5.13,0,0,0,4.25-2.11l2.05,2a6.87,6.87,0,0,1-2.71,2.35A8.59,8.59,0,0,1,167.47,385.82ZM167,371.34a3.19,3.19,0,0,0-2.52,1.09,5.72,5.72,0,0,0-1.23,3.05h7.24v-.28a4.72,4.72,0,0,0-1-2.89A3.17,3.17,0,0,0,167,371.34Z" /><path class="cls-1" d="M182,364.49v4.11h3v2.82h-3v9.43a2.09,2.09,0,0,0,.38,1.4,1.77,1.77,0,0,0,1.37.43,6.1,6.1,0,0,0,1.33-.15v2.93a9.38,9.38,0,0,1-2.5.36q-4.38,0-4.38-4.83v-9.57h-2.78V368.6h2.78v-4.11Z" /><path class="cls-1" d="M807.74,379.65a2.75,2.75,0,0,0-1-2.31,12.73,12.73,0,0,0-3.81-1.64,18.11,18.11,0,0,1-4.37-1.85,5.82,5.82,0,0,1-3.11-5.09,5.56,5.56,0,0,1,2.24-4.53,9.06,9.06,0,0,1,5.82-1.78,9.92,9.92,0,0,1,4.24.87,7.12,7.12,0,0,1,2.92,2.49,6.4,6.4,0,0,1,1.06,3.59h-3.94a3.57,3.57,0,0,0-1.11-2.79,4.65,4.65,0,0,0-3.2-1,4.83,4.83,0,0,0-3,.83,2.77,2.77,0,0,0-1.07,2.31,2.5,2.5,0,0,0,1.16,2.09,13.32,13.32,0,0,0,3.81,1.63,17.56,17.56,0,0,1,4.27,1.79,6.88,6.88,0,0,1,2.36,2.31,6.06,6.06,0,0,1,.75,3.06,5.41,5.41,0,0,1-2.18,4.52,9.48,9.48,0,0,1-5.92,1.68,11.12,11.12,0,0,1-4.54-.91,7.68,7.68,0,0,1-3.22-2.52,6.35,6.35,0,0,1-1.14-3.75h3.95a3.7,3.7,0,0,0,1.28,3,5.65,5.65,0,0,0,3.67,1.06,4.84,4.84,0,0,0,3.1-.84A2.66,2.66,0,0,0,807.74,379.65Z" /><path class="cls-1" d="M829.65,380.28l2.69-11.68H836l-4.61,16.91H828.3l-3.62-11.61-3.56,11.61H818l-4.62-16.91h3.7l2.73,11.55,3.47-11.55h2.86Z" /><path class="cls-1" d="M838.59,364.21a2,2,0,0,1,.55-1.45,2.47,2.47,0,0,1,3.18,0,2,2,0,0,1,.56,1.45,1.92,1.92,0,0,1-.56,1.43,2.5,2.5,0,0,1-3.18,0A2,2,0,0,1,838.59,364.21Zm4,21.3h-3.8V368.6h3.8Z" /><path class="cls-1" d="M851.51,364.49v4.11h3v2.82h-3v9.43a2,2,0,0,0,.38,1.4,1.77,1.77,0,0,0,1.37.43,6.1,6.1,0,0,0,1.33-.15v2.93a9.38,9.38,0,0,1-2.5.36q-4.38,0-4.38-4.83v-9.57h-2.78V368.6h2.78v-4.11Z" /><path class="cls-1" d="M864.34,382.79a3.42,3.42,0,0,0,2.36-.83,2.86,2.86,0,0,0,1-2h3.57a5.58,5.58,0,0,1-1,2.94,6.61,6.61,0,0,1-2.5,2.17,7.47,7.47,0,0,1-3.41.79,7.2,7.2,0,0,1-5.62-2.29,9.12,9.12,0,0,1-2.08-6.35v-.39a9,9,0,0,1,2.06-6.18,7.14,7.14,0,0,1,5.63-2.32,6.94,6.94,0,0,1,4.91,1.76,6.27,6.27,0,0,1,2,4.62H867.7a3.51,3.51,0,0,0-1-2.39,3.17,3.17,0,0,0-2.36-.94,3.35,3.35,0,0,0-2.85,1.33,6.89,6.89,0,0,0-1,4.06v.61a6.94,6.94,0,0,0,1,4.1A3.34,3.34,0,0,0,864.34,382.79Z" /><path class="cls-1" d="M877.88,370.45a6,6,0,0,1,4.71-2.16q5.4,0,5.48,6.17v11.05h-3.8V374.6a3.35,3.35,0,0,0-.75-2.47,3.09,3.09,0,0,0-2.23-.73,3.67,3.67,0,0,0-3.41,2v12.08h-3.79v-24h3.79Z" /><path class="cls-1" d="M430.52,376.76h-4.41v8.75h-3.95V362.76h8a9.32,9.32,0,0,1,6.08,1.77,6.27,6.27,0,0,1,2.14,5.11,6.35,6.35,0,0,1-1.11,3.82,6.9,6.9,0,0,1-3.07,2.37l5.11,9.48v.2h-4.23Zm-4.41-3.19h4.06a4.48,4.48,0,0,0,3.13-1,3.5,3.5,0,0,0,1.12-2.75,3.72,3.72,0,0,0-1-2.83,4.38,4.38,0,0,0-3.1-1h-4.17Z" /><path class="cls-1" d="M441.05,376.9a10.06,10.06,0,0,1,1-4.48,7.29,7.29,0,0,1,2.77-3.06,7.82,7.82,0,0,1,4.09-1.07,7.44,7.44,0,0,1,5.56,2.2,8.66,8.66,0,0,1,2.3,5.85l0,.89a10.05,10.05,0,0,1-1,4.47,7.06,7.06,0,0,1-2.75,3,7.86,7.86,0,0,1-4.14,1.08,7.32,7.32,0,0,1-5.72-2.38,9.1,9.1,0,0,1-2.15-6.35Zm3.8.33a6.77,6.77,0,0,0,1.07,4.08,3.77,3.77,0,0,0,6,0A7.54,7.54,0,0,0,453,376.9a6.68,6.68,0,0,0-1.11-4.06,3.71,3.71,0,0,0-5.94,0A7.41,7.41,0,0,0,444.85,377.23Z" /><path class="cls-1" d="M470.22,383.85a5.88,5.88,0,0,1-4.75,2,5.22,5.22,0,0,1-4.16-1.61,6.79,6.79,0,0,1-1.42-4.65v-11h3.8v10.91c0,2.15.89,3.22,2.67,3.22a3.76,3.76,0,0,0,3.74-2V368.6h3.79v16.91h-3.58Z" /><path class="cls-1" d="M482.52,364.49v4.11h3v2.82h-3v9.43a2,2,0,0,0,.38,1.4,1.76,1.76,0,0,0,1.37.43,6.16,6.16,0,0,0,1.33-.15v2.93a9.38,9.38,0,0,1-2.5.36q-4.38,0-4.38-4.83v-9.57h-2.78V368.6h2.78v-4.11Z" /><path class="cls-1" d="M495.85,385.82a7.9,7.9,0,0,1-5.86-2.27,8.27,8.27,0,0,1-2.24-6.06V377a10.19,10.19,0,0,1,1-4.53,7.39,7.39,0,0,1,2.74-3.1,7.26,7.26,0,0,1,3.94-1.11,6.64,6.64,0,0,1,5.33,2.2,9.31,9.31,0,0,1,1.89,6.24v1.53H491.58a5,5,0,0,0,1.4,3.31,4.16,4.16,0,0,0,3.08,1.22,5.13,5.13,0,0,0,4.25-2.11l2.05,2a6.87,6.87,0,0,1-2.71,2.35A8.58,8.58,0,0,1,495.85,385.82Zm-.46-14.48a3.19,3.19,0,0,0-2.52,1.09,5.72,5.72,0,0,0-1.23,3.05h7.24v-.28a4.72,4.72,0,0,0-1-2.89A3.17,3.17,0,0,0,495.39,371.34Z" /><path class="cls-1" d="M514.42,372.07a9.7,9.7,0,0,0-1.54-.12,3.48,3.48,0,0,0-3.52,2v11.56h-3.8V368.6h3.63l.09,1.89a4.3,4.3,0,0,1,3.82-2.2,3.48,3.48,0,0,1,1.34.22Z" /><path class="cls-1" d="M131,174.35a85.81,85.81,0,1,0,85.81,85.81A85.9,85.9,0,0,0,131,174.35ZM197.7,299.82H171.84a145.82,145.82,0,0,0,5-33.72h31.54A77.23,77.23,0,0,1,197.7,299.82Zm-43.77,34.51c6.17-6.46,11.41-15.47,15.32-26.34h22.82A77.83,77.83,0,0,1,153.93,334.33ZM69.91,308H92.72c3.92,10.87,9.16,19.88,15.33,26.34A77.9,77.9,0,0,1,69.91,308ZM53.6,266.1H85.14a145.82,145.82,0,0,0,5,33.72H64.28A77.23,77.23,0,0,1,53.6,266.1Zm9.61-43.74H89.63a149.31,149.31,0,0,0-4.58,35.57H53.41A77,77,0,0,1,63.21,222.36ZM108.05,186c-6.52,6.82-12,16.51-16,28.2H68.48A78,78,0,0,1,108.05,186Zm85.45,28.2H169.89c-4-11.69-9.44-21.38-16-28.2A77.94,77.94,0,0,1,193.5,214.18Zm-24.74,43.75H93.22a138.84,138.84,0,0,1,5-35.57h65.5A138.84,138.84,0,0,1,168.76,257.93Zm-5.55,41.89H98.77a136,136,0,0,1-5.45-33.72h75.34A136.47,136.47,0,0,1,163.21,299.82ZM160.36,308c-7,17.68-17.66,29.21-29.37,29.21S108.61,325.67,101.62,308ZM100.9,214.18c7-18.72,18-31.07,30.09-31.07s23.12,12.35,30.09,31.07Zm76,43.75a149.83,149.83,0,0,0-4.58-35.57h26.42a77,77,0,0,1,9.8,35.57Z" /><rect class="cls-1" x="237.69" y="264.61" width="109.58" height="5" /><polygon class="cls-1" points="337.31 275.58 345.79 267.11 337.31 258.63 344.5 258.63 352.98 267.11 344.5 275.58 337.31 275.58" /><rect class="cls-1" x="584.34" y="264.61" width="135.99" height="5" /><polygon class="cls-1" points="710.37 275.58 718.85 267.11 710.37 258.63 717.57 258.63 726.05 267.11 717.57 275.58 710.37 275.58" /><polygon class="cls-1" points="1062.57 259.61 956.26 259.61 956.26 254.61 1057.57 254.61 1057.57 159.13 1200.03 159.13 1200.03 164.13 1062.57 164.13 1062.57 259.61" /><polygon class="cls-1" points="1190.07 170.11 1198.55 161.63 1190.07 153.16 1197.27 153.16 1205.74 161.63 1197.27 170.11 1190.07 170.11" /><polygon class="cls-1" points="1200.03 366.2 1057.57 366.2 1057.57 280.73 956.26 280.73 956.26 275.73 1062.57 275.73 1062.57 361.2 1200.03 361.2 1200.03 366.2" /><polygon class="cls-1" points="1190.07 372.18 1198.55 363.7 1190.07 355.23 1197.27 355.23 1205.74 363.7 1197.27 372.18 1190.07 372.18" /><path class="cls-1" d="M624.36,304h-3l-7.61-12.11V304h-3V287h3l7.63,12.16V287h2.94Z" /><path class="cls-1" d="M633.17,304.26a5.9,5.9,0,0,1-4.38-1.7A6.17,6.17,0,0,1,627.1,298v-.35a7.61,7.61,0,0,1,.74-3.39,5.44,5.44,0,0,1,5-3.16,5,5,0,0,1,4,1.65,7,7,0,0,1,1.41,4.68v1.15H630a3.83,3.83,0,0,0,1,2.48,3.17,3.17,0,0,0,2.32.92,3.88,3.88,0,0,0,3.19-1.58l1.53,1.46a5.1,5.1,0,0,1-2,1.76A6.36,6.36,0,0,1,633.17,304.26Zm-.34-10.86a2.38,2.38,0,0,0-1.89.82,4.21,4.21,0,0,0-.92,2.28h5.43v-.21a3.54,3.54,0,0,0-.76-2.16A2.4,2.4,0,0,0,632.83,293.4Z" /><path class="cls-1" d="M644,288.26v3.09h2.24v2.11H644v7.07a1.55,1.55,0,0,0,.28,1.05,1.34,1.34,0,0,0,1,.33,4.34,4.34,0,0,0,1-.12V304a7.06,7.06,0,0,1-1.88.27q-3.29,0-3.28-3.62v-7.18H639.1v-2.11h2.09v-3.09Z" /><path class="cls-1" d="M659.59,300.1l2-8.75h2.78L660.92,304h-2.34l-2.72-8.71L653.19,304h-2.34l-3.47-12.68h2.77l2.06,8.66,2.6-8.66H657Z" /><path class="cls-1" d="M665.75,297.57a7.54,7.54,0,0,1,.74-3.36,5.44,5.44,0,0,1,2.07-2.3,5.93,5.93,0,0,1,3.07-.8,5.54,5.54,0,0,1,4.17,1.65,6.54,6.54,0,0,1,1.73,4.39v.67a7.56,7.56,0,0,1-.72,3.35,5.36,5.36,0,0,1-2.06,2.28,5.9,5.9,0,0,1-3.1.81,5.52,5.52,0,0,1-4.3-1.79,6.86,6.86,0,0,1-1.61-4.76Zm2.85.25a5.1,5.1,0,0,0,.81,3.06,2.63,2.63,0,0,0,2.25,1.11,2.59,2.59,0,0,0,2.24-1.13,5.6,5.6,0,0,0,.81-3.29,5.06,5.06,0,0,0-.83-3.05,2.8,2.8,0,0,0-4.46,0A5.55,5.55,0,0,0,668.6,297.82Z" /><path class="cls-1" d="M686.59,294a7.36,7.36,0,0,0-1.16-.1,2.61,2.61,0,0,0-2.64,1.5V304h-2.85V291.35h2.72l.07,1.41a3.21,3.21,0,0,1,2.86-1.65,2.66,2.66,0,0,1,1,.17Z" /><path class="cls-1" d="M692.51,298.59l-1.27,1.3V304h-2.85V286h2.85v10.38l.89-1.11,3.5-3.95h3.43l-4.71,5.28,5.21,7.4h-3.29Z" /><path class="cls-1" d="M634.05,314h-5.32v14.67h-2.94V314h-5.28v-2.39h13.54Z" /><path class="cls-1" d="M641.89,318.6a7.46,7.46,0,0,0-1.16-.09,2.61,2.61,0,0,0-2.64,1.5v8.67h-2.85V316H638l.07,1.42a3.21,3.21,0,0,1,2.86-1.65,2.67,2.67,0,0,1,1,.16Z" /><path class="cls-1" d="M650.91,328.68a4.87,4.87,0,0,1-.33-1.18,4.79,4.79,0,0,1-6.44.32,3.45,3.45,0,0,1-1.21-2.69,3.59,3.59,0,0,1,1.51-3.11,7.28,7.28,0,0,1,4.3-1.09h1.75v-.83a2.24,2.24,0,0,0-.55-1.57,2.18,2.18,0,0,0-1.68-.6,2.51,2.51,0,0,0-1.59.49,1.49,1.49,0,0,0-.62,1.24H643.2a3.14,3.14,0,0,1,.69-2,4.64,4.64,0,0,1,1.88-1.43,6.68,6.68,0,0,1,2.66-.51,5.32,5.32,0,0,1,3.55,1.12,4,4,0,0,1,1.36,3.14v5.72a6.49,6.49,0,0,0,.48,2.73v.2Zm-3.13-2.05a3.3,3.3,0,0,0,1.59-.41,2.7,2.7,0,0,0,1.12-1.1v-2.39H649a4.21,4.21,0,0,0-2.38.55,1.77,1.77,0,0,0-.79,1.56,1.66,1.66,0,0,0,.54,1.3A2.1,2.1,0,0,0,647.78,326.63Z" /><path class="cls-1" d="M657.32,328.68V318.11h-1.93V316h1.93v-1.16a4.37,4.37,0,0,1,1.17-3.26,4.52,4.52,0,0,1,3.28-1.15,6.71,6.71,0,0,1,1.6.21l-.07,2.23a5.93,5.93,0,0,0-1.09-.09,1.83,1.83,0,0,0-2,2.1V316h2.58v2.11h-2.58v10.57Z" /><path class="cls-1" d="M665.83,328.68V318.11h-1.94V316h1.94v-1.16a4.37,4.37,0,0,1,1.17-3.26,4.5,4.5,0,0,1,3.28-1.15,6.56,6.56,0,0,1,1.59.21l-.07,2.23a5.77,5.77,0,0,0-1.09-.09,1.83,1.83,0,0,0-2,2.1V316h2.57v2.11h-2.57v10.57Z" /><path class="cls-1" d="M673.34,312.71a1.5,1.5,0,0,1,.42-1.09,1.55,1.55,0,0,1,1.19-.44,1.58,1.58,0,0,1,1.19.44,1.5,1.5,0,0,1,.42,1.09,1.47,1.47,0,0,1-.42,1.07,1.62,1.62,0,0,1-1.19.43,1.59,1.59,0,0,1-1.19-.43A1.47,1.47,0,0,1,673.34,312.71Zm3,16h-2.84V316h2.84Z" /><path class="cls-1" d="M684.67,326.64a2.6,2.6,0,0,0,1.77-.62,2.11,2.11,0,0,0,.75-1.54h2.68a4.16,4.16,0,0,1-.73,2.21,4.82,4.82,0,0,1-1.88,1.63,5.56,5.56,0,0,1-2.55.59,5.39,5.39,0,0,1-4.22-1.72,6.83,6.83,0,0,1-1.56-4.76v-.29a6.71,6.71,0,0,1,1.55-4.63,5.35,5.35,0,0,1,4.22-1.74,5.24,5.24,0,0,1,3.68,1.31,4.71,4.71,0,0,1,1.49,3.47h-2.68a2.63,2.63,0,0,0-.74-1.8,2.44,2.44,0,0,0-1.78-.7,2.52,2.52,0,0,0-2.13,1,5.13,5.13,0,0,0-.76,3v.46a5.26,5.26,0,0,0,.74,3.08A2.52,2.52,0,0,0,684.67,326.64Z" /></svg>

<p><em>Source: <a href="https://www.cloudflare.com/en-in/learning/network-layer/what-is-a-network-switch/">Cloudflare</a></em></p>

<p>How does a router know which communication link to forward a given packet to? Every message transmitted by a source host will contain the IP address of the destination host. An IP address is hierarchical in nature and by looking at a specific part of the packet’s IP address and consulting its own <strong>forwarding table</strong> (which maps IP addresses to outbound communication links), it determines the correct communication link to forward the packet to.</p>

<p>On the destination end-system, the original message is re-composed by re-assembling all the packets. <strong>This is similar to how cargo gets delivered over roads.</strong> First, you divide the delivery goods into small packets and load them onto trucks. Then each of these trucks travel on high-ways (communication links) and at each intersection (packet switches) they are redirected to the next highway, which will eventually take them to their destination.</p>

<p>To ensure consistency, each actor involved in the exchange of information over the internet, are governed by a set of <strong>protocols</strong>. Two of the most fundamental protocols are the <strong>Internet Protocol (IP) and Transfer Control Protocol (TCP).</strong></p>

<p>Here’s a brief description of how a bit gets “kicked around” between two end-systems:</p>

<blockquote>
  <p>“Consider a bit traveling from one end system, through a series of links and routers, to another end system. This poor bit gets kicked around and transmitted many, many times! The source end system first transmits the bit, and shortly thereafter the first router in the series receives the bit; the first router then transmits the bit, and shortly thereafter the second router receives the bit; and so on. Thus our bit, when traveling from source to destination, passes through a series of transmitter-receiver pairs” (<a href="https://eclass.teicrete.gr/modules/document/file.php/TP326/%CE%98%CE%B5%CF%89%CF%81%CE%AF%CE%B1%20(Lectures)/Computer_Networking_A_Top-Down_Approach.pdf">Source</a>)</p>
</blockquote>

<h2 id="a-layered-approach-to-understanding-the-internet">A layered approach to Understanding the Internet</h2>

<p>Given the complexity and the numerous moving parts involved in the working of the internet, it is more elegant to organise the many happenings between two hosts, as a series of top-down layers of protocols.</p>

<blockquote>
  <p>“To provide structure to the design of network protocols, network designers organize protocols—and the network hardware and software that implement the protocols— in layers.”(<a href="https://eclass.teicrete.gr/modules/document/file.php/TP326/%CE%98%CE%B5%CF%89%CF%81%CE%AF%CE%B1%20(Lectures)/Computer_Networking_A_Top-Down_Approach.pdf">Source</a>)</p>
</blockquote>

<p>To understand this layered architecture, it is important to note that at each layer, the protocol provides some service to the layer above, by performing certain actions and by utilising the services provided by the layer immediately below it</p>

<p>A layered architecture provides the advantage of simplifying the architecture of the internet by breaking it down into specific, well-defined parts, each of which performs a specific task by depending on the service provided by the layer beneath it. More importantly, it adds modularity to the entire system, thereby allowing one to modify the implementation of the service provided by a specific layer, without affecting the rest of the system (so long as the modified implementation provides the same service and depends on the same layer to provide that service).</p>

<p>A protocol layer can be composed solely of software (application and transport layer), hardware (physical layer and data link layer) or a mixture of both (network link)</p>

<p>When taken together, the protocols of the various layers are called the <strong>protocol stack</strong>. According to the the TCP/IP architecture, the Internet protocol stack consists of five layers: the application layer, the transport layer, the network layer, the link layer and the physical layer.</p>

<p>Here’s a brief summary of what each of the protocol layers do:</p>

<ul>
  <li><strong>Application layer:</strong> This layer provides services to the end-user, by executing an application that uses the internet. It does this by sending and receiving a series of messages from and to another host(s). It hides the complexities of how the network is laid out.</li>
  <li><strong>Transport layer:</strong>  This layer provides services to the application layer, by ensuring that the application layer messages are transported to and from the correct destination. It hides how the underlying network is managed (e.g., how packets of information is actually delivered to the correct destination).</li>
  <li><strong>Network layer:</strong> This layer provides services to the transport layer by finding a “best effort” path via multiple routers, to deliver packets of information from the source host to the destination host. It hides how each router forwards packets to the successive router.</li>
  <li><strong>Link layer:</strong> It provides services to the network layer by actually determining how to deliver packets of information between two given routers.</li>
  <li><strong>Physical layer:</strong> It provides the service of physically transmitting “bits” of information to the next router, in a way that the receiver can understand and reconstruct the same.</li>
</ul>

<h3 id="heres-an-analogy-involving-a-king-and-a-queen">Here’s an Analogy involving a King and a Queen</h3>

<p>Before moving forward and delving into the details of each protocol layer, it would be convenient to take an analogy to better understand the services provided by each layer. Let’s go back to a time before the advent of modern communication technologies: a world where one relied on postal services to send messages over a large distance. Now let’s imagine the King of a distant kingdom—presently at the battlefield—wishes to send a letter to his beloved Queen—presently residing at the Royal Palace.  Let’s follow how the letter gets delivered to the Queen, from the prism of the five network protocol layers.</p>

<ol>
  <li><strong>Application Layer:</strong> The King at the battlefield dictates the letter to his personal assistant, who writes its out and sends it to the Royal Secretary to deliver the letter he has written.
    <ul>
      <li>Here, the King represents the <strong>user</strong>,  the battlefield is the <strong>end-system,</strong> the King’s personal assistant represents the <strong>application layer</strong> and the Royal Secretary represents the <strong>transport layer</strong>.</li>
    </ul>
  </li>
  <li><strong>Transport Layer:</strong> The Royal Secretary puts the Royal Seal, adds the address of the Royal Palace and hands it over to the local post office.
    <ul>
      <li>Here, the local post office represents the <strong>first router</strong> in the network layer and the Royal Palace is the destination end-system.</li>
    </ul>
  </li>
  <li><strong>Network Layer:</strong> The postal officer realizes that the destination is far-off and that there is no direct route to the Royal Palace. But, looking at the address, the postal officer understands that the Royal Palace is due East. So, they deliver the letter to the next postal caravan moving East.</li>
  <li><strong>Link Layer:</strong> The caravan carries a load of postal traffic from this postal office to the next postal office in the East. The caravan leader draws out the route to the next postal office in the eastward direction.
    <ul>
      <li>Here, the caravan leader is the link layer, connecting the first postal office (a router) to the next postal office (another router).</li>
    </ul>
  </li>
  <li><strong>Physical Layer:</strong> The caravan leader employs their trusted nephew to carry the King’s letter. The nephew, along with their camel-driven carriage, carries the King’s letter, following the route drawn by the caravan leader.
    <ul>
      <li>The nephew and their carriage, is the physical layer, physically carrying the postal traffic from one postal office (router) to the next.</li>
    </ul>

    <p><img src="/assets/images/network_stack_analogy.png" width="120%" /></p>
  </li>
  <li><strong>Physical Layer:</strong> Once the carriage reaches the next postal office, the nephew off-loads its load from their carriage.</li>
  <li><strong>Link Layer:</strong> The guard at the next postal office unpacks the postal load and hands over all its contents to the postal officer of that postal office.
    <ul>
      <li>The guard is the link layer, passing on the load received from the carriage driven by the nephew (physical layer). The postal officer is the second router.</li>
    </ul>
  </li>
  <li><strong>Network Layer:</strong> The postal officer at the next postal office, receives the postal load delivered by the caravan leader and examines it. They find the King’s letter, and realize that the Royal Post Office is in the next town (it is only natural that the Royal Family has a post office of their own!). However, they have to find a way to physically transport the letter to the Royal Post Office. Luckily, they have a local pigeon sender who regularly delivers mail locally.  The postal officer delivers the King’s letter to the local pigeon sender.
    <ul>
      <li>Here, the local pigeon sender is the link layer and the pigeon is the physical layer.</li>
    </ul>
  </li>
  <li><strong>Link Layer:</strong> The pigeon sender knows the way to the Royal Post Office. They instruct the pigeon to fly to the Royal Post Office.</li>
  <li><strong>Physical Layer:</strong> The pigeon flies away towards the Royal Post Office.</li>
  <li><strong>Physical Layer:</strong> The pigeon successfully lands at the entrance of the Royal Pigeon Receiver at the Royal Post Office.</li>
  <li><strong>Link Layer:</strong> The Royal Pigeon Receiver at the Royal Post Office receives the pigeon’s parcel, cleans it up and hands it over to the postal officer at the Royal Post Office.
    <ul>
      <li>Here, the Royal Guard represents the link layer, which hands over the information received from the pigeon (physical layer) to the postal office (network layer).</li>
    </ul>
  </li>
  <li><strong>Network Layer:</strong> The postal officer at the Royal Post Office accepts the mail from the Royal Pigeon Receiver. They pass on the King’s letter to the Queen’s Secretary.
    <ul>
      <li>The postal officer represents the network layer, while the Queen’s Secretary is the transport layer.</li>
    </ul>
  </li>
  <li><strong>Transport Layer:</strong> The Queen’s Secretary receives the King’s letter from the Royal Post Office, verifies the Royal Seal, ensures that it is complete and hands it over to the Queen’s personal assistant.
    <ul>
      <li>Here, the Queen’s personal assistant represents the application layer, accepting the message delivered by the Queen’s Secretary (transport layer)</li>
    </ul>
  </li>
  <li><strong>Application Layer:</strong> The Queen’s personal assistant knock’s on the Queen’s room and reads out loud what the King had to say. The Queen is delighted to hear from the King!</li>
</ol>

<p>Now, let’s try to understand how each of these layers actually work.</p>

<h3 id="application-layer">Application layer</h3>

<p>First, it is important to understand what a ‘network application’ is. It is a program that runs on one host and communicates with another host, using the internet. In fact, programs running on different hosts, communicating over the internet are called <strong>processes:</strong></p>

<blockquote>
  <p>“In the jargon of operating systems, it is not actually programs but processes that communicate. A process can be thought of as a program that is running within an end system” (<a href="https://eclass.teicrete.gr/modules/document/file.php/TP326/%CE%98%CE%B5%CF%89%CF%81%CE%AF%CE%B1%20(Lectures)/Computer_Networking_A_Top-Down_Approach.pdf">Source</a>)</p>
</blockquote>

<p>Processes on different hosts communicate with each other via <strong>messages</strong>. Typically, a network application consists of two different processes running on two different hosts, that send messages to each other (eg., server and client process on the web).</p>

<p>Now each process sends and receives messages over the internet by using a programming interface called the <strong>socket</strong>. Sockets act like doors- when the network application needs to send a message across the internet, it simply  delivers it across the door, with the expectation that the rest will be taken care of by the network. Sockets in an end-system are identified by port numbers</p>

<p>In fact, sockets are the interface between the application layer and the transport layer.</p>

<p>Now, coming back to the application layer itself, it is defined as the “<em>communications protocols and interface methods used in process-to-process communications across an Internet Protocol (IP) computer network</em>”(<a href="https://en.wikipedia.org/wiki/Application_layer">source</a>). Mainly, the application layer protocol standardized the manner in which data should be exchanged between two hosts. It does not deal with how this data will, in fact, be transferred.</p>

<p>Examples of application layer protocol include: HTTP(Hyper Text Transfer Protocol), FTP (File Transfer Protocol), SMTP (Simple Mail Transfer Protocol).</p>

<h3 id="transport-layer">Transport layer</h3>

<p>The transport layer transports the application-layer messages (received over the socket) between two application end-points (or hosts).  The main objective of this layer is to provide <strong>logical communication</strong> between two application processes. This means that this layer will abstract out the details of the internet before the application layer, giving the impression to the application that it is directly connected to the other end-system’s application.</p>

<p>It is important to note that the transport layer protocols are implemented in the end-systems (or hosts). They are not implemented by intermediate routers or communication links.</p>

<p>In the internet, there are two transport layer protocols both of which can transport application layer messages:</p>

<ul>
  <li>Transmission Control Protocol (TCP): TCP provides <strong>reliable data transfer</strong>. It guarantees delivery of messages and manages flow control. The latter ensures that messages are delivered in the correct order. It also provides congestion control, by preventing over-congestion of traffic on routers and links between two hosts. This is done by dividing messages into smaller segments, and reducing the transmission rate when the network is congested.</li>
  <li>User Datagram Protocol (UDP): UDP provides a <strong>connectionless service</strong>. It provides no  guarantees towards reliability, flow control, or congestion control.</li>
</ul>

<p>The transport layer protocols convert each application layer message into several transport layer packets called <strong>segments</strong> each of which is then sent across the network layer, via the routers and links.</p>

<h3 id="network-layer">Network layer</h3>

<p>The network layer receives a transport layer segment and a destination address from the transport layer protocol of the source host. The network layer provides the service of delivering this segment to the correct destination host’s transport layer.</p>

<p>The <strong>Internet Protocol (IP)</strong> is the only network layer protocol of the internet. The IP implements a <strong>best effort</strong> service, meaning that while it makes a “best effort” to deliver segments between hosts, it does not make any guarantees regarding their delivery, i.e., the IP cannot guarantee the eventual delivery of a packet. Neither can it assure that the packets will be delivered in an orderly fashion nor that there will not be any tampering of the packets in the process of transmission.</p>

<p>The network layer protocol converts the transport layer segments into network layer segments called “datagrams”. Each datagram contains the address of the destination host. Once this is done, the source host pops each datagram into the network, i.e., it sends the datagram to its nearby router. For this datagram to reach the ultimate destination host, it needs to traverse through several routers. Each router forwards a datagram that it receives in any of its input links to the next appropriate router. The determination of which router to forward the datagram to, is done by looking at the destination address and its own forwarding table. Thus, to send one packet from one host to another, each router has to make a local decision that is compatible with its next router. In this way, we get a <strong>global convergence on packet delivery</strong> using a series of local decisions at the router-level.</p>

<p>Note that routing, i.e., the route or path that a packet will traverse within the network layer, is implemented by each router and is not determined by the end-systems. This is very convenient, as it insulates the host application from the changes in the internet’s routing architecture.  (<a href="https://datatracker.ietf.org/doc/html/rfc1122#section-1.1.1">RFC</a>1122) This is a direct consequence of having a modular protocol stack.</p>

<p>Also, as another corollary of the modular architecture of the protocol stack, routers remain stateless. They do not maintain any state of the end-to-end flow of information. Each router inspects the IP address of the destination of a packet, and determines the next router to forward it to. This enables the effective utilization of redundant paths: two packets headed for the same destination, may take two different routes.(<a href="https://datatracker.ietf.org/doc/html/rfc1122#section-1.1.1">RFC</a>1122)</p>

<p><img src="/assets/images/network_redundant_paths.gif" width="100%" border="1px" /></p>

<p><em>Source: <a href="https://upload.wikimedia.org/wikipedia/commons/f/f6/Packet_Switching.gif">Wikipedia</a></em></p>

<h3 id="link-layer">Link Layer</h3>

<p>The network layer provides the service of transporting packets between two end-systems, via a series of routers. The link layer protocols provide the service of actually transporting packets from one node (a host, or a router) to another node (a router or a host). This is done by establishing connectivity with the next router and breaking up network layer datagrams into “frames” to transmit them to the next router. In other words, link layer protocols provide the service of converting datagrams into frames and transporting them across each individual link connecting two specific nodes. At each node, the network layer (after determining the next forwarding router/host) passes the Network Layer datagram to the respective link layer protocol, which sends it across to the next node. At the next node, the link layer protocol hands over the packet to the network layer protocol of that node.</p>

<p>Examples of link layer protocols include WiFi, Ethernet and  Point-to-Point protocol.</p>

<h3 id="physical-layer">Physical Layer</h3>

<p>The physical layer provides the service of transporting each individual bit of a given frame from one node to the next. The protocol of this layer will depend on the actual link connecting the two nodes. In other words, physical layer protocols determine how to encode digital information and transmit them across a communication link.</p>

<h2 id="end-to-end-argument">End-to-End Argument</h2>

<p>As shown above, the network layer does not make any guarantees regarding delivery of messages. It is the job of the end-systems (transfer layer and application layer) to ensure integrity, encryption and orderly delivery of information. Thus, as lower layers of the protocol stack do not implement complex functionalities, the internet is designed as a “dumb” network that relies on “smart” end-systems to carry out complex tasks. To put it in another way, the lower level actors (routers) perform simple tasks efficiently, while higher level actors are expected to use the services of the lower level actors to perform complex tasks. By pushing the complexity to the edges, the internet can be scaled to be compatible with any kind of network or device.</p>]]></content><author><name></name></author><category term="conceptual" /><summary type="html"><![CDATA[In this post, I try to answer the question “What is the internet and how does it really work?”]]></summary><media:thumbnail xmlns:media="http://search.yahoo.com/mrss/" url="https://otee.dev/assets/images/network_packet_switch.png" /><media:content medium="image" url="https://otee.dev/assets/images/network_packet_switch.png" xmlns:media="http://search.yahoo.com/mrss/" /></entry><entry><title type="html">Recurse Center: Week Three</title><link href="https://otee.dev/2022/01/26/recurse-center-week-three.html" rel="alternate" type="text/html" title="Recurse Center: Week Three" /><published>2022-01-26T00:00:00+00:00</published><updated>2022-01-26T00:00:00+00:00</updated><id>https://otee.dev/2022/01/26/recurse-center-week-three</id><content type="html" xml:base="https://otee.dev/2022/01/26/recurse-center-week-three.html"><![CDATA[<p>This post is about my third week at the <a href="https://www.recurse.com">Recurse Center</a>.</p>

<h2 id="functional-programming-and-clojure">Functional Programming and Clojure</h2>

<p>During this week, I continued reading Clojure for the Brave and True, and completed the next two chapters (<a href="https://www.braveclojure.com/read-and-eval/">Clojure Alchemy: Reading, Evaluation, and Macros</a>, and <a href="https://www.braveclojure.com/writing-macros/">Writing Macros</a>). Reading about how Clojure syntax is read and evaluated was very interesting! It reminded me of my first project, <a href="https://github.com/oitee/crisp">Crisp: a simple Lisp interpreter</a>.</p>

<p>During the previous week, while reading Brave Clojure’s 4th and 5th chapters, I was briefly introduced to some of the key tenets of functional programming. I found these concepts very fascinating. This week, I spent a considerable amount of time reading about them. While I would like to write a separate post on my findings, here are some of the points I have taken on my notebook:</p>
<ul>
  <li>Functional programming is characterized by its use of pure functions.</li>
  <li>A pure function is one that has no side effects.</li>
  <li>The values evaluated by a pure function are solely dependent on its arguments. The return value for a given set of arguments, will always be the same, irrespective of the number of times the function is called or when it is being invoked. This makes it easier to <a href="https://purelyfunctional.tv/issues/purelyfunctional-tv-newsletter-340-fewer-side-effects-is-better-than-more/">do parallel programming, testing, and using higher-order functions</a></li>
  <li>Because of their deterministic nature, a pure function can be replaced with its return value, in an expression (referential transparency)</li>
  <li>The use of impure functions is not prohibited. But as a functional programmer, it is important to be <a href="https://twitter.com/ericnormand/status/1384860792013705218?s=20">wary of using side effects</a>.</li>
  <li>As changing the value of a data-structure can cause side effects, functional programming emphasizes the use of immutable data-structures.</li>
  <li>As we need to need to <a href="https://dzone.com/articles/functional-programming-recursion">change the state of local variables</a> to run a loop, recursion should be preferred over loops</li>
</ul>

<h2 id="remindme-my-first-clojure-app">RemindMe: My First Clojure App</h2>

<p>Now that I was getting slightly familiar with the world of Clojure, I thought it would be the perfect time to embark on a journey to build my very first app using Clojure. I decided to build an online version of flash cards, called <strong>RemindMe</strong>.</p>

<p>Given that it would be my first project in Clojure, I thought it would be useful to first build the app using JavaScript, the language I am most familiar with.</p>

<p>So, I spent a day writing the server-side logic of <strong>RemindMe</strong>, using Node.js. I then proceeded to build the front-end part of the project. To implement the front-end part, I used the Bootstrap framework. This <a href="https://www.youtube.com/watch?v=4sosXZsdy-s&amp;">Bootstrap tutorial</a> was very helpful, to get started. (<em>Side note: Long after finishing the front-end part, I realized that the hamburger menu on the navigation bar is not working on a mobile display. I’ll need to fix this; would love to pair with anyone who is good with Bootstrap/CSS!</em>).</p>

<p>The Node.js version of RemindMe is hosted on <a href="https://github.com/oitee/remind-me">this GitHub repository</a>.</p>

<p>After completing the app in Node.js, I proceeded to re-implement the backend of RemindMe, using Clojure. I used the Ring framework and it’s jetty-adaptor to build my web service. I chose Compojure as a routing library, for better handling of requests.</p>

<p><strong>RemindMe is deployed here:</strong> <a href="https://remind.otee.dev">https://remind.otee.dev</a>.</p>

<p>Here’s a detailed account of how I built RemindMe, using Clojure, Ring and Compojure: <a href="/2022/01/25/clojure-backend-using-ring-jetty-compojure.html">https://otee.dev/2022/01/25/clojure-backend-using-ring-jetty-compojure.html</a></p>

<h2 id="others">Others</h2>

<ul>
  <li>I solved these LeetCode problems during this week: <a href="https://leetcode.com/problems/calculate-money-in-leetcode-bank/">Calculate Money in LeetCode Bank</a> (<a href="https://github.com/oitee/whiteboard/blob/main/leetCode/75_calculate_money_in_Leetcode_bank.js">my solution</a>), <a href="https://leetcode.com/problems/determine-color-of-a-chessboard-square/">Determine Color of a Chessboard Square</a> (<a href="https://github.com/oitee/whiteboard/blob/main/leetCode/76_determine_color_of_a_chessboard_square.js">my solution</a>) <a href="https://leetcode.com/problems/longest-increasing-subsequence/">Longest Increasing Subsequence</a>(<a href="https://github.com/oitee/whiteboard/blob/main/leetCode/78_longest_increasing_subsequence.js">my solution</a>), <a href="https://leetcode.com/problems/maximal-square/">Maximal Square</a>(<a href="https://github.com/oitee/whiteboard/blob/main/leetCode/77_maximal_square.js">my solution</a>)</li>
  <li>My article on <a href="https://otee.dev/2022/01/17/lazy-clojure.html">Lazy Sequences in Clojure</a> got featured on <strong><a href="https://clojure.org/news/2022/01/21/deref">Clojure Deref</a></strong>!</li>
  <li>This article was also a part of Recurse Center’s <a href="https://joy.recurse.com/posts/1446-who-moved-my-cheese-laziness-in-clojure">Joy of Computing Blog</a>!</li>
</ul>]]></content><author><name></name></author><category term="personal" /><summary type="html"><![CDATA[This post is about my third week at the Recurse Center.]]></summary></entry><entry><title type="html">My First Clojure Backend Using Ring, Jetty and Compojure</title><link href="https://otee.dev/2022/01/25/clojure-backend-using-ring-jetty-compojure.html" rel="alternate" type="text/html" title="My First Clojure Backend Using Ring, Jetty and Compojure" /><published>2022-01-25T00:00:00+00:00</published><updated>2022-01-25T00:00:00+00:00</updated><id>https://otee.dev/2022/01/25/clojure-backend-using-ring-jetty-compojure</id><content type="html" xml:base="https://otee.dev/2022/01/25/clojure-backend-using-ring-jetty-compojure.html"><![CDATA[<p>In this post I discuss how I built my first web-app, RemindMe, using Clojure! The app is deployed here: <a href="https://remind.otee.dev/">https://remind.otee.dev</a></p>

<h2 id="project-scope">Project Scope</h2>

<p>The <strong>RemindMe</strong> app aims to replicate how flash cards work in the real world. Quoting from <a href="https://en.wikipedia.org/wiki/Flashcard">Wikipedia</a>:</p>

<blockquote>
  <p>A flashcard or flash card (also known as an index card) is a card bearing information on both sides, which is intended to be used as an aid in memorization. Each flashcard bears a question on one side and an answer on the other</p>
</blockquote>

<p>Similar to real world flash cards, RemindMe displays a question, which is selected randomly from a set of questions. The user has the option to see a hint or go to the next question (which will again be randomly selected from the question pool).  If the user chooses to the see the hint, the hint to that question will be displayed and the user will again have the choice to either proceed to the next question or see the solution. Lastly, if the user chooses to see the solution, the relevant solution is displayed along with the option to proceed to the next question.</p>

<p>I wanted to build <strong>RemindMe</strong>, as a <strong>tool to recall my solutions to LeetCode problems</strong>. For this reason, the app describes each question as a ‘problem’. Also, while the text of each problem is lifted from LeetCode, the hints and solutions are mine. (Always happy to update my solutions with more optimal ones. Pull requests are welcome!)</p>

<p>The app reads a JSON file (<code class="language-plaintext highlighter-rouge">data.txt</code>) to access the set of problems, solutions and hints. When we want to add a new problem, we will need to update the JSON file.</p>

<p>Here are the routes supported by this app:</p>

<ul>
  <li><code class="language-plaintext highlighter-rouge">/problem/:id</code>: This route loads the problem corresponding to the <code class="language-plaintext highlighter-rouge">id</code> path parameter.</li>
  <li><code class="language-plaintext highlighter-rouge">/next</code>: This route redirects to a randomly selected <code class="language-plaintext highlighter-rouge">/problem/:id</code> route</li>
  <li><code class="language-plaintext highlighter-rouge">/</code>: Same as <code class="language-plaintext highlighter-rouge">/next</code>, it redirects to a new problem route</li>
  <li><code class="language-plaintext highlighter-rouge">/hint/:id</code>: Generates a JSON payload containing the hint for the respective problem (to be used by client-side JavaScript).</li>
  <li><code class="language-plaintext highlighter-rouge">:/solution/:id</code>: Generates a JSON payload containing the hint and solution for the respective problem (to be used by client-side JavaScript).</li>
</ul>

<p>Here’s a demo of the <strong>RemindMe</strong></p>

<iframe width="560" height="315" src="https://www.youtube.com/embed/a-iC6HBRuTw" title="YouTube video player" frameborder="0" allow="accelerometer; autoplay; clipboard-write; encrypted-media; gyroscope; picture-in-picture" allowfullscreen=""></iframe>

<h2 id="goal">Goal</h2>

<p>The primary goal is to learn how to build and deploy a project using Clojure. But before embarking on this journey, <strong>I first built an identical app using Node.js and the Express framework</strong>. This was helpful, as I did not have to spend much time focusing on the core business logic of the app and its front-end, while working with Clojure and the Ring framework. The Node.js version of the application is hosted on this GitHub Repository: <a href="https://github.com/oitee/remind-me">https://github.com/oitee/remind-me</a></p>

<p>Thus, the goal of this project is to <strong>re-implement the backend of RemindMe, using Clojure, and the Ring framework</strong>. This project is hosted on a separate repository, called <a href="https://github.com/oitee/aspire">aspire</a>.</p>

<h2 id="step-0-adding-dependencies-to-a-leiningen-project">Step 0: Adding Dependencies to a Leiningen Project</h2>

<p>In a Leiningen project, dependencies and versions are added to the <code class="language-plaintext highlighter-rouge">project.clj</code>  file (similar to the <code class="language-plaintext highlighter-rouge">package.JSON</code> file in Node projects). Each time we add or remove any dependency, we should run <code class="language-plaintext highlighter-rouge">lein deps</code> to install/remove the project’s dependencies.</p>

<p>For this project, we will need three dependencies:</p>

<ul>
  <li>
    <p><strong>Ring</strong>: Ring is a web-framework which is analogous to Express in Node.js. It is used for easier management of HTTP requests, through routes, handlers and middlewares. To quote from its own <a href="https://github.com/ring-clojure/ring">documentation</a>,</p>

    <blockquote>
      <p><em>By abstracting the details of HTTP into a simple, unified API, Ring allows web applications to be constructed of modular components that can be shared among a variety of applications, web servers, and web frameworks.</em></p>

    </blockquote>
  </li>
  <li>
    <p><strong>Ring-Jetty</strong>: Since Clojure does not come with a built-in HTTP server, unlike Node.js, we need to implement a HTTP server. Ring comes with a default support for Jetty, a Java web-server.</p>

    <blockquote>
      <p><em>Ring-Jetty is the web server that comes with Ring. It is a Clojure wrapper around Jetty. It is perfectly fine and acceptable and has the easiest setup in my opinion. If you are going to use Ring, it’s the best option. In addition, it is well-maintained and has a lot of users. (<a href="https://purelyfunctional.tv/mini-guide/clojure-web-servers/">Eric Normand</a>)</em></p>

    </blockquote>

    <p>We will use Ring-Jetty in this project. We can do this by including <code class="language-plaintext highlighter-rouge">ring-jetty-adapter</code> in our dependencies.</p>
  </li>
  <li>
    <p><strong>Compojure</strong>: This is a routing library for Ring that allows for easy handling of routes.</p>
  </li>
</ul>

<p><img src="/assets/images/clojure_ring_vs_node_express.png" border="1px" width="50%" /></p>

<p>Once the above three dependencies are added, the <code class="language-plaintext highlighter-rouge">project.clj</code> will look like this:</p>

<div class="language-clojure highlighter-rouge"><div class="highlight"><pre class="highlight"><code><span class="p">(</span><span class="nf">defproject</span><span class="w"> </span><span class="n">aspire</span><span class="w"> </span><span class="s">"0.1.0-SNAPSHOT"</span><span class="w">
  </span><span class="no">:description</span><span class="w"> </span><span class="s">"FIXME: write description"</span><span class="w">
  </span><span class="no">:url</span><span class="w"> </span><span class="s">"http://example.com/FIXME"</span><span class="w">
  </span><span class="no">:license</span><span class="w"> </span><span class="p">{</span><span class="no">:name</span><span class="w"> </span><span class="s">"EPL-2.0 OR GPL-2.0-or-later WITH Classpath-exception-2.0"</span><span class="w">
            </span><span class="no">:url</span><span class="w"> </span><span class="s">"https://www.eclipse.org/legal/epl-2.0/"</span><span class="p">}</span><span class="w">
  </span><span class="no">:dependencies</span><span class="w"> </span><span class="p">[[</span><span class="n">org.clojure/clojure</span><span class="w"> </span><span class="s">"1.10.0"</span><span class="p">]</span><span class="w">
                 </span><span class="p">[</span><span class="n">ring/ring-core</span><span class="w"> </span><span class="s">"1.9.5"</span><span class="p">]</span><span class="w">
                 </span><span class="p">[</span><span class="n">ring/ring-jetty-adapter</span><span class="w"> </span><span class="s">"1.9.5"</span><span class="p">]</span><span class="w">
                 </span><span class="p">[</span><span class="n">compojure</span><span class="w"> </span><span class="s">"1.6.2"</span><span class="p">]]</span><span class="w">
  </span><span class="no">:main</span><span class="w"> </span><span class="o">^</span><span class="no">:skip-aot</span><span class="w"> </span><span class="n">aspire.core</span><span class="w">
  </span><span class="no">:target-path</span><span class="w"> </span><span class="s">"target/%s"</span><span class="w">
  </span><span class="no">:profiles</span><span class="w"> </span><span class="p">{</span><span class="no">:uberjar</span><span class="w"> </span><span class="p">{</span><span class="no">:aot</span><span class="w"> </span><span class="no">:all</span><span class="p">}})</span><span class="w">
</span></code></pre></div></div>

<p>Now, we need to run <code class="language-plaintext highlighter-rouge">lein deps</code> on Linux command line:</p>

<p><img src="/assets/images/lein_deps.png" width="90%" /></p>

<p>Beware: it may download the entire internet, when we first run <code class="language-plaintext highlighter-rouge">lein deps</code>. 😛</p>

<h2 id="step-1-starting-a-hello-world-server">Step 1: Starting a ‘hello world’ server</h2>

<p>To start a simple “hello world” server, we need to first write a handler function that will respond to every request.(<a href="https://github.com/ring-clojure/ring/wiki/Getting-Started">documentation</a>)</p>

<p>We then pass this handler to the <code class="language-plaintext highlighter-rouge">run-jetty</code> function to respond to requests. The <code class="language-plaintext highlighter-rouge">run-jetty</code> function starts an HTTP server that listens on a port and when a request is received on this port, calls the handler function. Later on, when we write more complicated code, the handler function will decide (based on request parameters, routes, methods etc) on how to respond to a certain request. In short, <code class="language-plaintext highlighter-rouge">jetty</code> is the HTTP server, <code class="language-plaintext highlighter-rouge">run-jetty</code> converts Clojure functions to work well with the Java <code class="language-plaintext highlighter-rouge">jetty</code> library.</p>

<div class="language-clojure highlighter-rouge"><div class="highlight"><pre class="highlight"><code><span class="p">(</span><span class="nf">ns</span><span class="w"> </span><span class="n">aspire.core</span><span class="w">
  </span><span class="p">(</span><span class="no">:gen-class</span><span class="p">)</span><span class="w">
  </span><span class="p">(</span><span class="no">:require</span><span class="w"> </span><span class="p">[</span><span class="n">ring.adapter.jetty</span><span class="w"> </span><span class="no">:as</span><span class="w"> </span><span class="n">jetty</span><span class="p">]</span><span class="w">
            </span><span class="p">[</span><span class="n">clojure.pprint</span><span class="p">]))</span><span class="w">

</span><span class="p">(</span><span class="k">defn</span><span class="w"> </span><span class="n">handler</span><span class="w"> </span><span class="p">[</span><span class="n">request</span><span class="p">]</span><span class="w">
  </span><span class="p">(</span><span class="nf">clojure.pprint/pprint</span><span class="w"> </span><span class="n">request</span><span class="p">)</span><span class="w">
  </span><span class="p">{</span><span class="no">:status</span><span class="w"> </span><span class="mi">200</span><span class="w">
   </span><span class="no">:headers</span><span class="w"> </span><span class="p">{</span><span class="s">"Content-Type"</span><span class="w"> </span><span class="s">"text/html"</span><span class="p">}</span><span class="w">
   </span><span class="no">:body</span><span class="w"> </span><span class="s">"Hello World"</span><span class="p">})</span><span class="w">

</span><span class="p">(</span><span class="k">defn</span><span class="w"> </span><span class="n">-main</span><span class="w">
  </span><span class="p">[</span><span class="o">&amp;</span><span class="w"> </span><span class="n">args</span><span class="p">]</span><span class="w">
  </span><span class="p">(</span><span class="nf">jetty/run-jetty</span><span class="w"> </span><span class="n">handler</span><span class="w">
                   </span><span class="p">{</span><span class="no">:port</span><span class="w"> </span><span class="mi">3000</span><span class="w">
                    </span><span class="no">:join?</span><span class="w"> </span><span class="n">true</span><span class="p">}))</span><span class="w">
</span></code></pre></div></div>

<p>Note that we always respond with <code class="language-plaintext highlighter-rouge">hello world</code>, and therefore requests to any path will receive the same response. If we print the request object, we can see all the necessary information that will be required for routing requests (eg. URI).</p>

<div class="language-bash highlighter-rouge"><div class="highlight"><pre class="highlight"><code><span class="o">{</span>:ssl-client-cert nil,
 :protocol <span class="s2">"HTTP/1.1"</span>,
 :remote-addr <span class="s2">"[0:0:0:0:0:0:0:1]"</span>,
 :headers
 <span class="o">{</span><span class="s2">"sec-fetch-site"</span> <span class="s2">"none"</span>,
  <span class="s2">"host"</span> <span class="s2">"localhost:3000"</span>,
  <span class="s2">"user-agent"</span>
  <span class="s2">"Mozilla/5.0 (X11; Linux x86_64) AppleWebKit/537.36 (KHTML, like Gecko) Chrome/97.0.4692.71 Safari/537.36"</span>,
  ...
  <span class="s2">"sec-gpc"</span> <span class="s2">"1"</span><span class="o">}</span>,
 :server-port 3000,
 :content-length nil,
 :content-type nil,
 :character-encoding nil,
 :uri <span class="s2">"/aaa"</span>,
 :server-name <span class="s2">"localhost"</span>,
 :query-string nil,
 :body
 <span class="c">#object[org.eclipse.jetty.server.HttpInputOverHTTP 0x2c9dcdc6 "HttpInputOverHTTP@2c9dcdc6[c=0,q=0,[0]=null,s=STREAM]"],</span>
 :scheme :http,
 :request-method :get<span class="o">}</span>
</code></pre></div></div>

<h2 id="step-2-routing">Step 2: Routing</h2>

<p>In the above snippet, we used one function to respond to all requests. However, this would be hard while managing requests with different HTTP methods and/or paths.</p>

<p>As our project supports multiple routes, we will use routes provided by <code class="language-plaintext highlighter-rouge">compojure</code> to determine how a request on a certain route should be responded to (similar to an Express.js app).</p>

<p>So, the previous <code class="language-plaintext highlighter-rouge">handler</code> function should be replaced with <code class="language-plaintext highlighter-rouge">app</code>:</p>

<div class="language-clojure highlighter-rouge"><div class="highlight"><pre class="highlight"><code><span class="p">(</span><span class="nf">ns</span><span class="w"> </span><span class="n">aspire.core</span><span class="w">
  </span><span class="p">(</span><span class="no">:gen-class</span><span class="p">)</span><span class="w">
  </span><span class="p">(</span><span class="no">:require</span><span class="w"> </span><span class="p">[</span><span class="n">ring.adapter.jetty</span><span class="w"> </span><span class="no">:as</span><span class="w"> </span><span class="n">jetty</span><span class="p">]</span><span class="w">
            </span><span class="p">[</span><span class="n">clojure.pprint</span><span class="p">]</span><span class="w">
            </span><span class="p">[</span><span class="n">compojure.core</span><span class="w"> </span><span class="no">:as</span><span class="w"> </span><span class="n">compojure</span><span class="p">]</span><span class="w">
            </span><span class="p">[</span><span class="n">compojure.route</span><span class="w"> </span><span class="no">:as</span><span class="w"> </span><span class="n">compojure-route</span><span class="p">]))</span><span class="w">

 </span><span class="p">(</span><span class="nf">compojure/defroutes</span><span class="w"> </span><span class="n">app</span><span class="w">
  </span><span class="p">(</span><span class="nf">compojure/GET</span><span class="w"> </span><span class="s">"/"</span><span class="w"> </span><span class="p">[]</span><span class="w"> </span><span class="s">"Hello World"</span><span class="p">)</span><span class="w">
  </span><span class="p">(</span><span class="nf">compojure-route/not-found</span><span class="w"> </span><span class="s">"Page not found"</span><span class="p">))</span><span class="w">

</span><span class="p">(</span><span class="k">defn</span><span class="w"> </span><span class="n">-main</span><span class="w">
  </span><span class="p">[</span><span class="o">&amp;</span><span class="w"> </span><span class="n">args</span><span class="p">]</span><span class="w">
  </span><span class="p">(</span><span class="nf">jetty/run-jetty</span><span class="w"> </span><span class="n">app</span><span class="w">
                   </span><span class="p">{</span><span class="no">:port</span><span class="w"> </span><span class="mi">3000</span><span class="w">
                    </span><span class="no">:join?</span><span class="w"> </span><span class="n">true</span><span class="p">}))</span><span class="w">
</span></code></pre></div></div>

<p>Note that:</p>

<ul>
  <li><code class="language-plaintext highlighter-rouge">defroutes</code> is a macro that returns a Ring handler function. It allows us to define and combine multiple routes under one umbrella (rather, handler).</li>
  <li>Individual <code class="language-plaintext highlighter-rouge">compojure</code> routes are macros as well (and they can be used on a stand-alone basis, i.e., without <code class="language-plaintext highlighter-rouge">defroutes</code>)</li>
  <li><code class="language-plaintext highlighter-rouge">compojure</code> route macros are based on HTTP methods, i.e., <code class="language-plaintext highlighter-rouge">GET</code> <code class="language-plaintext highlighter-rouge">PUT</code> etc.</li>
  <li>The path of a request is matched with the first argument of a route macro (notice the <code class="language-plaintext highlighter-rouge">"/"</code> after <code class="language-plaintext highlighter-rouge">compojure/GET</code>)</li>
  <li>The last argument forms the response for that specific route. Once the HTTP method and path match, this argument will form the response. Instead of being a data value, it can be a function as well, which will have access to the incoming request to form the response.</li>
  <li>The second argument in the <code class="language-plaintext highlighter-rouge">GET</code> macro is used for parameters: form and query parameters (we will not be using it for this project)</li>
  <li>There is a way to have a fall-back route, i.e., <code class="language-plaintext highlighter-rouge">not-found</code>, to send a response when none of the routes match (here, we are using the <code class="language-plaintext highlighter-rouge">Page not found</code> response, when nothing matches).</li>
</ul>

<h2 id="step-3-adding-routes-of-remindme">Step 3: Adding Routes of ‘RemindMe’</h2>

<p>These are the routes used in the <a href="https://github.com/oitee/remind-me/blob/5580d93/src/routes.js">Node.js version of the project</a>:</p>

<div class="language-jsx highlighter-rouge"><div class="highlight"><pre class="highlight"><code><span class="nx">router</span><span class="p">.</span><span class="kd">get</span><span class="p">(</span><span class="dl">"</span><span class="s2">/</span><span class="dl">"</span><span class="p">,</span> <span class="nx">renderHome</span><span class="p">);</span>
<span class="nx">router</span><span class="p">.</span><span class="kd">get</span><span class="p">(</span><span class="dl">"</span><span class="s2">/problem/:id</span><span class="dl">"</span><span class="p">,</span> <span class="nx">getProblem</span><span class="p">);</span>
<span class="nx">router</span><span class="p">.</span><span class="kd">get</span><span class="p">(</span><span class="dl">"</span><span class="s2">/next</span><span class="dl">"</span><span class="p">,</span> <span class="nx">goToNext</span><span class="p">);</span>
<span class="nx">router</span><span class="p">.</span><span class="kd">get</span><span class="p">(</span><span class="dl">"</span><span class="s2">/hint/:id</span><span class="dl">"</span><span class="p">,</span> <span class="nx">getHint</span><span class="p">);</span>
<span class="nx">router</span><span class="p">.</span><span class="kd">get</span><span class="p">(</span><span class="dl">"</span><span class="s2">/solution/:id</span><span class="dl">"</span><span class="p">,</span> <span class="nx">getSolution</span><span class="p">);</span>
</code></pre></div></div>

<p>We can re-write these routes using <code class="language-plaintext highlighter-rouge">compojure</code> and provide specific route handler functions for each route:</p>

<div class="language-clojure highlighter-rouge"><div class="highlight"><pre class="highlight"><code><span class="p">(</span><span class="nf">compojure/defroutes</span><span class="w"> </span><span class="n">app</span><span class="w">
  </span><span class="p">(</span><span class="nf">compojure/GET</span><span class="w"> </span><span class="s">"/"</span><span class="w"> </span><span class="n">params</span><span class="w"> </span><span class="n">home</span><span class="p">)</span><span class="w">
  </span><span class="p">(</span><span class="nf">compojure/GET</span><span class="w"> </span><span class="s">"/problem/:id"</span><span class="w"> </span><span class="n">params</span><span class="w"> </span><span class="n">problem-by-id</span><span class="p">)</span><span class="w">
  </span><span class="p">(</span><span class="nf">compojure/GET</span><span class="w"> </span><span class="s">"/next"</span><span class="w"> </span><span class="n">params</span><span class="w"> </span><span class="n">next-problem</span><span class="p">)</span><span class="w">
  </span><span class="p">(</span><span class="nf">compojure/GET</span><span class="w"> </span><span class="s">"/hint/:id"</span><span class="w"> </span><span class="n">params</span><span class="w"> </span><span class="n">hint</span><span class="p">)</span><span class="w">
  </span><span class="p">(</span><span class="nf">compojure/GET</span><span class="w"> </span><span class="s">"/solution/:id"</span><span class="w"> </span><span class="n">params</span><span class="w"> </span><span class="n">solution</span><span class="p">)</span><span class="w">

  </span><span class="p">(</span><span class="nf">compojure-route/not-found</span><span class="w"> </span><span class="s">"Page not found"</span><span class="p">))</span><span class="w">
</span></code></pre></div></div>

<p>There are two things to note here:</p>

<ul>
  <li>If the URL has a parameter in the path, we can use <code class="language-plaintext highlighter-rouge">:</code> to refer to that parameter in the route. This kind of route definition is similar to that of Express.js.</li>
  <li>The second argument to <code class="language-plaintext highlighter-rouge">GET</code> is not a vector any more; we are just giving it a name (<code class="language-plaintext highlighter-rouge">params</code>) although we may not use it.</li>
</ul>

<p>Now, let’s write the route handlers (i.e., the third argument to each <code class="language-plaintext highlighter-rouge">compojure</code> route). Let’s start with <code class="language-plaintext highlighter-rouge">problem-by-id</code>. Note that we need to access the parameter in the URL path. This can be accessed from the request map. We can print the request map to see the relevant <code class="language-plaintext highlighter-rouge">params</code> key.</p>

<div class="language-clojure highlighter-rouge"><div class="highlight"><pre class="highlight"><code><span class="p">(</span><span class="k">defn</span><span class="w"> </span><span class="n">problem-by-id</span><span class="w">
  </span><span class="p">[</span><span class="n">request</span><span class="p">]</span><span class="w">
  </span><span class="p">(</span><span class="nf">clojure.pprint/pprint</span><span class="w"> </span><span class="n">request</span><span class="p">)</span><span class="w">
  </span><span class="s">"Problem Page"</span><span class="p">)</span><span class="w">
</span></code></pre></div></div>

<p>Once we send a request to the path <code class="language-plaintext highlighter-rouge">/problem/foo</code>, we can see the entire request map:</p>

<div class="language-clojure highlighter-rouge"><div class="highlight"><pre class="highlight"><code><span class="p">{</span><span class="no">:ssl-client-cert</span><span class="w"> </span><span class="n">nil,</span><span class="w">
 </span><span class="no">:protocol</span><span class="w"> </span><span class="s">"HTTP/1.1"</span><span class="n">,</span><span class="w">
 </span><span class="no">:remote-addr</span><span class="w"> </span><span class="s">"[0:0:0:0:0:0:0:1]"</span><span class="n">,</span><span class="w">
 </span><span class="no">:params</span><span class="w"> </span><span class="p">{</span><span class="no">:id</span><span class="w"> </span><span class="s">"foo"</span><span class="p">}</span><span class="n">,</span><span class="w">
</span><span class="n">...</span><span class="w">
 </span><span class="no">:scheme</span><span class="w"> </span><span class="no">:http,</span><span class="w">
 </span><span class="no">:request-method</span><span class="w"> </span><span class="no">:get</span><span class="p">}</span><span class="w">
</span></code></pre></div></div>

<p>We can access the <code class="language-plaintext highlighter-rouge">params</code> key to see the value of our path parameter and write our handlers accordingly:</p>

<div class="language-clojure highlighter-rouge"><div class="highlight"><pre class="highlight"><code><span class="p">(</span><span class="k">defn</span><span class="w"> </span><span class="n">home</span><span class="w">
  </span><span class="p">[</span><span class="n">request</span><span class="p">]</span><span class="w">
  </span><span class="s">"Home Page"</span><span class="p">)</span><span class="w">

</span><span class="p">(</span><span class="k">defn</span><span class="w"> </span><span class="n">problem-by-id</span><span class="w">
  </span><span class="p">[</span><span class="n">request</span><span class="p">]</span><span class="w">
  </span><span class="p">(</span><span class="k">let</span><span class="w"> </span><span class="p">[</span><span class="n">id</span><span class="w"> </span><span class="p">(</span><span class="no">:id</span><span class="w"> </span><span class="p">(</span><span class="no">:params</span><span class="w"> </span><span class="n">request</span><span class="p">))]</span><span class="w">
    </span><span class="p">(</span><span class="nb">str</span><span class="w"> </span><span class="s">"Problem Page for "</span><span class="w"> </span><span class="n">id</span><span class="p">)))</span><span class="w">

</span><span class="p">(</span><span class="k">defn</span><span class="w"> </span><span class="n">next-problem</span><span class="w">
  </span><span class="p">[</span><span class="n">request</span><span class="p">]</span><span class="w">
  </span><span class="s">"Next Problem Page"</span><span class="p">)</span><span class="w">

</span><span class="p">(</span><span class="k">defn</span><span class="w"> </span><span class="n">hint</span><span class="w">
  </span><span class="p">[</span><span class="n">request</span><span class="p">]</span><span class="w">
  </span><span class="p">(</span><span class="k">let</span><span class="w"> </span><span class="p">[</span><span class="n">id</span><span class="w"> </span><span class="p">(</span><span class="no">:id</span><span class="w"> </span><span class="p">(</span><span class="no">:params</span><span class="w"> </span><span class="n">request</span><span class="p">))]</span><span class="w">
    </span><span class="p">(</span><span class="nb">str</span><span class="w"> </span><span class="s">"Hint for "</span><span class="w"> </span><span class="n">id</span><span class="p">)))</span><span class="w">

</span><span class="p">(</span><span class="k">defn</span><span class="w"> </span><span class="n">solution</span><span class="w">
  </span><span class="p">[</span><span class="n">request</span><span class="p">]</span><span class="w">
  </span><span class="p">(</span><span class="k">let</span><span class="w"> </span><span class="p">[</span><span class="n">id</span><span class="w"> </span><span class="p">(</span><span class="no">:id</span><span class="w"> </span><span class="p">(</span><span class="no">:params</span><span class="w"> </span><span class="n">request</span><span class="p">))]</span><span class="w">
    </span><span class="p">(</span><span class="nb">str</span><span class="w"> </span><span class="s">"Solution for "</span><span class="w"> </span><span class="n">id</span><span class="p">)))</span><span class="w">
</span></code></pre></div></div>

<p>Each of the above functions are mentioned in our <code class="language-plaintext highlighter-rouge">compojure</code> routes, such that when the request path and method match, the relevant function will be invoked.</p>

<h2 id="step-4-code-reorganisation">Step 4: Code Reorganisation</h2>

<p>Currently, all the handlers and routes are in the same namespace. We can split them into three namespaces: one for starting the server, one for defining the routes, and one for the route handlers:</p>

<ul>
  <li><code class="language-plaintext highlighter-rouge">aspire.core</code>: This will start the server</li>
  <li><code class="language-plaintext highlighter-rouge">aspire.routes</code>: This will define the routes</li>
  <li><code class="language-plaintext highlighter-rouge">aspire.handlers</code>: This will have the route handler functions</li>
</ul>

<p>At this point, the project structure looks like this:</p>

<div class="language-bash highlighter-rouge"><div class="highlight"><pre class="highlight"><code><span class="nb">.</span>
├── LICENSE
├── project.clj
├── README.md
├── resources
├── src
│   └── aspire
│       ├── core.clj
│       ├── handlers.clj
│       └── routes.clj
└── <span class="nb">test</span>
    └── aspire
        └── core_test.clj
</code></pre></div></div>

<p><code class="language-plaintext highlighter-rouge">aspire.core</code> contains the server launching code:</p>

<div class="language-clojure highlighter-rouge"><div class="highlight"><pre class="highlight"><code><span class="p">(</span><span class="nf">ns</span><span class="w"> </span><span class="n">aspire.core</span><span class="w">
  </span><span class="p">(</span><span class="no">:gen-class</span><span class="p">)</span><span class="w">
  </span><span class="p">(</span><span class="no">:require</span><span class="w"> </span><span class="p">[</span><span class="n">ring.adapter.jetty</span><span class="w"> </span><span class="no">:as</span><span class="w"> </span><span class="n">jetty</span><span class="p">]</span><span class="w">
            </span><span class="p">[</span><span class="n">clojure.pprint</span><span class="p">]</span><span class="w">
            </span><span class="p">[</span><span class="n">aspire.routes</span><span class="w"> </span><span class="no">:as</span><span class="w"> </span><span class="n">routes</span><span class="p">]))</span><span class="w">

</span><span class="p">(</span><span class="k">defn</span><span class="w"> </span><span class="n">-main</span><span class="w">
  </span><span class="p">[</span><span class="o">&amp;</span><span class="w"> </span><span class="n">args</span><span class="p">]</span><span class="w">
  </span><span class="p">(</span><span class="nf">jetty/run-jetty</span><span class="w"> </span><span class="n">routes/app</span><span class="w">
                   </span><span class="p">{</span><span class="no">:port</span><span class="w"> </span><span class="mi">3000</span><span class="w">
                    </span><span class="no">:join?</span><span class="w"> </span><span class="n">true</span><span class="p">}))</span><span class="w">
</span></code></pre></div></div>

<p><code class="language-plaintext highlighter-rouge">aspire.routes</code> contains the route definitions:</p>

<div class="language-clojure highlighter-rouge"><div class="highlight"><pre class="highlight"><code><span class="p">(</span><span class="nf">ns</span><span class="w"> </span><span class="n">aspire.routes</span><span class="w">
  </span><span class="p">(</span><span class="no">:require</span><span class="w"> </span><span class="p">[</span><span class="n">compojure.core</span><span class="w"> </span><span class="no">:as</span><span class="w"> </span><span class="n">compojure</span><span class="p">]</span><span class="w">
            </span><span class="p">[</span><span class="n">compojure.route</span><span class="w"> </span><span class="no">:as</span><span class="w"> </span><span class="n">compojure-route</span><span class="p">]</span><span class="w">
            </span><span class="p">[</span><span class="n">aspire.handlers</span><span class="w"> </span><span class="no">:as</span><span class="w"> </span><span class="n">handlers</span><span class="p">]))</span><span class="w">

</span><span class="p">(</span><span class="nf">compojure/defroutes</span><span class="w"> </span><span class="n">app</span><span class="w">
  </span><span class="p">(</span><span class="nf">compojure/GET</span><span class="w"> </span><span class="s">"/"</span><span class="w"> </span><span class="n">params</span><span class="w"> </span><span class="n">handlers/home</span><span class="p">)</span><span class="w">
  </span><span class="p">(</span><span class="nf">compojure/GET</span><span class="w"> </span><span class="s">"/problem/:id"</span><span class="w"> </span><span class="n">params</span><span class="w"> </span><span class="n">handlers/problem-by-id</span><span class="p">)</span><span class="w">
  </span><span class="p">(</span><span class="nf">compojure/GET</span><span class="w"> </span><span class="s">"/next"</span><span class="w"> </span><span class="n">params</span><span class="w"> </span><span class="n">handlers/next-problem</span><span class="p">)</span><span class="w">
  </span><span class="p">(</span><span class="nf">compojure/GET</span><span class="w"> </span><span class="s">"/hint/:id"</span><span class="w"> </span><span class="n">params</span><span class="w"> </span><span class="n">handlers/hint</span><span class="p">)</span><span class="w">
  </span><span class="p">(</span><span class="nf">compojure/GET</span><span class="w"> </span><span class="s">"/solution/:id"</span><span class="w"> </span><span class="n">params</span><span class="w"> </span><span class="n">handlers/solution</span><span class="p">)</span><span class="w">

  </span><span class="p">(</span><span class="nf">compojure-route/not-found</span><span class="w"> </span><span class="n">handlers/not-found</span><span class="p">))</span><span class="w">
</span></code></pre></div></div>

<p><code class="language-plaintext highlighter-rouge">aspire.handlers</code> contains the route handler functions:</p>

<div class="language-clojure highlighter-rouge"><div class="highlight"><pre class="highlight"><code><span class="p">(</span><span class="nf">ns</span><span class="w"> </span><span class="n">aspire.handlers</span><span class="p">)</span><span class="w">

</span><span class="p">(</span><span class="k">defn</span><span class="w"> </span><span class="n">home</span><span class="w">
  </span><span class="p">[</span><span class="n">request</span><span class="p">]</span><span class="w">
  </span><span class="s">"Home Page"</span><span class="p">)</span><span class="w">

</span><span class="p">(</span><span class="k">defn</span><span class="w"> </span><span class="n">problem-by-id</span><span class="w">
  </span><span class="p">[</span><span class="n">request</span><span class="p">]</span><span class="w">
  </span><span class="p">(</span><span class="k">let</span><span class="w"> </span><span class="p">[</span><span class="n">id</span><span class="w"> </span><span class="p">(</span><span class="no">:id</span><span class="w"> </span><span class="p">(</span><span class="no">:params</span><span class="w"> </span><span class="n">request</span><span class="p">))]</span><span class="w">
    </span><span class="p">(</span><span class="nb">str</span><span class="w"> </span><span class="s">"Problem Page for "</span><span class="w"> </span><span class="n">id</span><span class="p">)))</span><span class="w">

</span><span class="p">(</span><span class="k">defn</span><span class="w"> </span><span class="n">next-problem</span><span class="w">
  </span><span class="p">[</span><span class="n">request</span><span class="p">]</span><span class="w">
  </span><span class="s">"Next Problem Page"</span><span class="p">)</span><span class="w">

</span><span class="p">(</span><span class="k">defn</span><span class="w"> </span><span class="n">hint</span><span class="w">
  </span><span class="p">[</span><span class="n">request</span><span class="p">]</span><span class="w">
  </span><span class="p">(</span><span class="k">let</span><span class="w"> </span><span class="p">[</span><span class="n">id</span><span class="w"> </span><span class="p">(</span><span class="no">:id</span><span class="w"> </span><span class="p">(</span><span class="no">:params</span><span class="w"> </span><span class="n">request</span><span class="p">))]</span><span class="w">
    </span><span class="p">(</span><span class="nb">str</span><span class="w"> </span><span class="s">"Hint for "</span><span class="w"> </span><span class="n">id</span><span class="p">)))</span><span class="w">

</span><span class="p">(</span><span class="k">defn</span><span class="w"> </span><span class="n">solution</span><span class="w">
  </span><span class="p">[</span><span class="n">request</span><span class="p">]</span><span class="w">
  </span><span class="p">(</span><span class="k">let</span><span class="w"> </span><span class="p">[</span><span class="n">id</span><span class="w"> </span><span class="p">(</span><span class="no">:id</span><span class="w"> </span><span class="p">(</span><span class="no">:params</span><span class="w"> </span><span class="n">request</span><span class="p">))]</span><span class="w">
    </span><span class="p">(</span><span class="nb">str</span><span class="w"> </span><span class="s">"Solution for "</span><span class="w"> </span><span class="n">id</span><span class="p">)))</span><span class="w">

</span><span class="p">(</span><span class="k">defn</span><span class="w"> </span><span class="n">not-found</span><span class="w">
  </span><span class="p">[</span><span class="n">request</span><span class="p">]</span><span class="w">
  </span><span class="s">"404: Page not Found"</span><span class="p">)</span><span class="w">
</span></code></pre></div></div>

<h2 id="step-5-implementing-the-business-logic">Step 5: Implementing the Business Logic</h2>

<p>Now that we have up the web server, defined our routes and route-handlers, we can build the actual product features, by appropriately defining the route handler functions. To do this, we need a templating engine and a way to read data from a JSON file.</p>

<ul>
  <li><strong>Templating Engine</strong>: The <a href="https://github.com/oitee/remind-me">Node.js version of the app</a> used Mustache templating engine. So, we need to support Mustache in Clojure as well. This will ensure that the front-end remains un-changed. For this, we can use <code class="language-plaintext highlighter-rouge">de.ubercode.clostache/clostache</code> as a dependency (<a href="https://github.com/fhd/clostache">documentation</a>)</li>
  <li><strong>Data reading</strong>: The actual contents of the project (such as descriptions and solutions of problems etc) are stored in a JSON file which we need to read for serving the request. For this, we can use <code class="language-plaintext highlighter-rouge">org.clojure/data.json</code> as a dependency (<a href="https://github.com/clojure/data.json">documentation</a>)</li>
</ul>

<h3 id="model-component">Model Component</h3>

<p>The JSON file containing the problem sets looks like this:</p>

<div class="language-json highlighter-rouge"><div class="highlight"><pre class="highlight"><code><span class="p">[</span><span class="w">
  </span><span class="p">{</span><span class="w">
    </span><span class="nl">"id"</span><span class="p">:</span><span class="w"> </span><span class="s2">"find-peak-element"</span><span class="p">,</span><span class="w">
    </span><span class="nl">"problemTitle"</span><span class="p">:</span><span class="w"> </span><span class="s2">"Find Peak Element"</span><span class="p">,</span><span class="w">
    </span><span class="nl">"problemDescription"</span><span class="p">:</span><span class="w"> </span><span class="s2">"A peak element is an element that is strictly greater than its neighbors. Given an integer array nums, find a peak element, and return its index. If the array contains multiple peaks, return the index to any of the peaks. You may imagine that nums[-1] = nums[n] = -∞. You must write an algorithm that runs in O(log n) time."</span><span class="p">,</span><span class="w">
    </span><span class="nl">"hint"</span><span class="p">:</span><span class="w"> </span><span class="s2">"Start with the middle element"</span><span class="p">,</span><span class="w">
    </span><span class="nl">"solution"</span><span class="p">:</span><span class="w"> </span><span class="s2">"Start with mid element.</span><span class="se">\n</span><span class="s2">        If this is a peak, then return it.</span><span class="se">\n</span><span class="s2">        If this element is less than the next element, it means this element is part of an asceding slope. So, make lo = mid + 1,</span><span class="se">\n</span><span class="s2">        If this element is less than the earlier element, move to the earlier sub-array, ie, hi = mid - 1</span><span class="se">\n</span><span class="s2">        At the end, if lo === hi, lo is the peak element. Because it would mean we have reached the end of the array. And edges are peaks, if their adjacent element are smaller than them."</span><span class="w">
  </span><span class="p">},</span><span class="w">
  </span><span class="p">{</span><span class="w">
    </span><span class="nl">"id"</span><span class="p">:</span><span class="w"> </span><span class="s2">"boats-to-save-people"</span><span class="p">,</span><span class="w">
    </span><span class="nl">"problemTitle"</span><span class="p">:</span><span class="w"> </span><span class="s2">"Boats to Save People"</span><span class="p">,</span><span class="w">
    </span><span class="nl">"problemDescription"</span><span class="p">:</span><span class="w"> </span><span class="s2">"You are given an array people where people[i] is the weight of the ith person, and an infinite number of boats where each boat can carry a maximum weight of limit. Each boat carries at most two people at the same time, provided the sum of the weight of those people is at most limit.</span><span class="se">\n\n</span><span class="s2">        Return the minimum number of boats to carry every given person.</span><span class="se">\n</span><span class="s2">        "</span><span class="p">,</span><span class="w">
    </span><span class="nl">"hint"</span><span class="p">:</span><span class="w"> </span><span class="s2">"Start with sorting the array"</span><span class="p">,</span><span class="w">
    </span><span class="nl">"solution"</span><span class="p">:</span><span class="w"> </span><span class="s2">"Sort the array.</span><span class="se">\n</span><span class="s2">        For each people[hi] + people[lo] &gt; limit, hi-- and boats++.</span><span class="se">\n</span><span class="s2">        For others, hi-- lo++ boats++</span><span class="se">\n</span><span class="s2">        At the end, if hi == lo (indicating that there was an odd number of elements), boats++"</span><span class="w">
  </span><span class="p">},</span><span class="w">
</span><span class="err">...</span><span class="w">
</span><span class="p">]</span><span class="w">
</span></code></pre></div></div>

<p>We need to parse this JSON file by using <code class="language-plaintext highlighter-rouge">clojure.data.json</code></p>

<div class="language-clojure highlighter-rouge"><div class="highlight"><pre class="highlight"><code><span class="p">(</span><span class="nf">ns</span><span class="w"> </span><span class="n">aspire.db</span><span class="w">
  </span><span class="p">(</span><span class="no">:require</span><span class="w"> </span><span class="p">[</span><span class="n">clojure.data.json</span><span class="w"> </span><span class="no">:as</span><span class="w"> </span><span class="n">json</span><span class="p">]))</span><span class="w">

</span><span class="p">(</span><span class="k">def</span><span class="w"> </span><span class="n">data</span><span class="w">
  </span><span class="p">(</span><span class="nf">json/read-str</span><span class="w"> </span><span class="p">(</span><span class="nb">slurp</span><span class="w"> </span><span class="s">"resources/data.txt"</span><span class="p">)</span><span class="w">
                 </span><span class="no">:key-fn</span><span class="w"> </span><span class="nb">keyword</span><span class="p">))</span><span class="w">
</span></code></pre></div></div>

<p>The <code class="language-plaintext highlighter-rouge">read-str</code> function (from the namespace <code class="language-plaintext highlighter-rouge">clojure.data.json</code>), takes a JSON string and converts it into a valid Clojure data-structure. Owing to the nature of the data contained in the JSON file, <code class="language-plaintext highlighter-rouge">data</code> will be a vector of hash-maps.</p>

<p>Note that we pass an additional argument to <code class="language-plaintext highlighter-rouge">read-str</code>, called <code class="language-plaintext highlighter-rouge">:key-fn keyword</code>. This ensures that the keys of the hash-maps generated by <code class="language-plaintext highlighter-rouge">read-str</code> are keywords instead of strings.  Here’s how the hash-map looks like:</p>

<div class="language-clojure highlighter-rouge"><div class="highlight"><pre class="highlight"><code><span class="p">[{</span><span class="no">:id</span><span class="w"> </span><span class="s">"find-peak-element"</span><span class="n">,</span><span class="w">
  </span><span class="no">:problemTitle</span><span class="w"> </span><span class="s">"Find Peak Element"</span><span class="n">,</span><span class="w">
  </span><span class="no">:problemDescription</span><span class="w">
  </span><span class="s">"A peak element is an element that is strictly greater than its neighbors. Given an integer array nums, find a peak element, and return its index. If the array contains multiple peaks, return the index to any of the peaks. You may imagine that nums[-1] = nums[n] = -∞. You must write an algorithm that runs in O(log n) time."</span><span class="n">,</span><span class="w">
  </span><span class="no">:hint</span><span class="w">
  </span><span class="s">"Start with the middle element"</span><span class="n">,</span><span class="w">
  </span><span class="no">:solution</span><span class="w">
  </span><span class="s">"Start with mid element.\n        If this is a peak, then return it.\n        If this element is less than the next element, it means this element is part of an asceding slope. So, make lo = mid + 1,\n        If this element is less than the earlier element, move to the earlier sub-array, ie, hi = mid - 1\n        At the end, if lo === hi, lo is the peak element. Because it would mean we have reached the end of the array. And edges are peaks, if their adjacent element are smaller than them."</span><span class="p">}</span><span class="w">
 </span><span class="p">{</span><span class="no">:id</span><span class="w"> </span><span class="s">"boats-to-save-people"</span><span class="n">,</span><span class="w">
  </span><span class="no">:problemTitle</span><span class="w"> </span><span class="s">"Boats to Save People"</span><span class="n">,</span><span class="w">
  </span><span class="no">:problemDescription</span><span class="w">
  </span><span class="s">"You are given an array people where people[i] is the weight of the ith person, and an infinite number of boats where each boat can carry a maximum weight of limit. Each boat carries at most two people at the same time, provided the sum of the weight of those people is at most limit.\n\n        Return the minimum number of boats to carry every given person.\n        "</span><span class="n">,</span><span class="w">
  </span><span class="no">:hint</span><span class="w"> </span><span class="s">"Start with sorting the array"</span><span class="n">,</span><span class="w">
  </span><span class="no">:solution</span><span class="w">
  </span><span class="s">"Sort the array.\n        For each people[hi] + people[lo] &gt; limit, hi-- and boats++.\n        For others, hi-- lo++ boats++\n        At the end, if hi == lo (indicating that there was an odd number of elements), boats++"</span><span class="p">}</span><span class="w">
</span><span class="n">...</span><span class="w">
</span><span class="p">]</span><span class="w">
</span></code></pre></div></div>

<p>Now, we need to convert this vector into a hash-map, where each <code class="language-plaintext highlighter-rouge">id</code> will map to the respective hash-map (representing a problem set)</p>

<div class="language-clojure highlighter-rouge"><div class="highlight"><pre class="highlight"><code><span class="p">(</span><span class="k">def</span><span class="w"> </span><span class="n">data-map</span><span class="w">
  </span><span class="p">(</span><span class="nb">reduce</span><span class="w">
   </span><span class="p">(</span><span class="k">fn</span><span class="w">
     </span><span class="p">[</span><span class="n">accumulator</span><span class="w"> </span><span class="n">element</span><span class="p">]</span><span class="w">
     </span><span class="p">(</span><span class="k">let</span><span class="w"> </span><span class="p">[</span><span class="n">id</span><span class="w"> </span><span class="p">(</span><span class="no">:id</span><span class="w"> </span><span class="n">element</span><span class="p">)]</span><span class="w">
       </span><span class="p">(</span><span class="nb">assoc</span><span class="w"> </span><span class="n">accumulator</span><span class="w"> </span><span class="n">id</span><span class="w"> </span><span class="n">element</span><span class="p">)))</span><span class="w">
   </span><span class="p">{}</span><span class="w">
   </span><span class="n">data</span><span class="p">))</span><span class="w">
</span></code></pre></div></div>

<p><code class="language-plaintext highlighter-rouge">data-map</code> is an id-to-problem-set hash-map. This will help in retrieving problems from their respective ids.</p>

<p>Also, we need two additional functions for our route-handlers:</p>

<ul>
  <li><code class="language-plaintext highlighter-rouge">get</code>: to get a problem set from an <code class="language-plaintext highlighter-rouge">id</code>, and</li>
  <li><code class="language-plaintext highlighter-rouge">random-id</code>: for returning a randomly chosen <code class="language-plaintext highlighter-rouge">id</code>  from the <code class="language-plaintext highlighter-rouge">data-map</code></li>
</ul>

<div class="language-clojure highlighter-rouge"><div class="highlight"><pre class="highlight"><code><span class="p">(</span><span class="k">defn</span><span class="w"> </span><span class="nb">get</span><span class="w">
  </span><span class="p">[</span><span class="n">id</span><span class="p">]</span><span class="w">
  </span><span class="p">(</span><span class="nf">data-map</span><span class="w"> </span><span class="n">id</span><span class="p">))</span><span class="w">

</span><span class="p">(</span><span class="k">defn</span><span class="w"> </span><span class="n">random-id</span><span class="w">
  </span><span class="p">[]</span><span class="w">
  </span><span class="p">(</span><span class="no">:id</span><span class="w"> </span><span class="p">(</span><span class="nf">rand-nth</span><span class="w"> </span><span class="n">data</span><span class="p">)))</span><span class="w">
</span></code></pre></div></div>

<h3 id="route-handlers">Route Handlers</h3>

<p>We need to write the route handlers for each route. Let’s start with the route handler for <code class="language-plaintext highlighter-rouge">/problem/:id</code></p>

<p>If the <code class="language-plaintext highlighter-rouge">id</code> parameter is correct, this route handler should generate the home page, with the necessary details of the respective problem set.</p>

<p>To achieve this, we need to render a template file (<code class="language-plaintext highlighter-rouge">home.mustache</code>), using <code class="language-plaintext highlighter-rouge">clostache</code></p>

<div class="language-clojure highlighter-rouge"><div class="highlight"><pre class="highlight"><code><span class="p">(</span><span class="nf">ns</span><span class="w"> </span><span class="n">aspire.handlers</span><span class="w">
  </span><span class="p">(</span><span class="no">:require</span><span class="w"> </span><span class="p">[</span><span class="n">clostache.parser</span><span class="w"> </span><span class="no">:as</span><span class="w"> </span><span class="n">mustache</span><span class="p">]</span><span class="w">
            </span><span class="p">[</span><span class="n">aspire.db</span><span class="w"> </span><span class="no">:as</span><span class="w"> </span><span class="n">db</span><span class="p">]))</span><span class="w">

</span><span class="p">(</span><span class="k">defn</span><span class="w"> </span><span class="n">problem-by-id</span><span class="w">
  </span><span class="p">[</span><span class="n">request</span><span class="p">]</span><span class="w">
  </span><span class="p">(</span><span class="k">let</span><span class="w"> </span><span class="p">[</span><span class="n">id</span><span class="w"> </span><span class="p">(</span><span class="no">:id</span><span class="w"> </span><span class="p">(</span><span class="no">:params</span><span class="w"> </span><span class="n">request</span><span class="p">))</span><span class="w">
        </span><span class="n">data</span><span class="w"> </span><span class="p">(</span><span class="nf">db/get</span><span class="w"> </span><span class="n">id</span><span class="p">)]</span><span class="w">
    </span><span class="p">(</span><span class="nf">if-not</span><span class="w"> </span><span class="n">data</span><span class="w">
      </span><span class="p">(</span><span class="nb">str</span><span class="w"> </span><span class="s">"Problem cannot be loaded, as ID is not valid "</span><span class="w"> </span><span class="n">id</span><span class="p">)</span><span class="w">
      </span><span class="p">(</span><span class="nf">mustache/render-resource</span><span class="w"> </span><span class="s">"templates/home.mustache"</span><span class="w">
                                </span><span class="p">{</span><span class="no">:title</span><span class="w"> </span><span class="p">(</span><span class="no">:problemTitle</span><span class="w"> </span><span class="n">data</span><span class="p">)</span><span class="w">
                                 </span><span class="no">:description</span><span class="w"> </span><span class="p">(</span><span class="no">:problemDescription</span><span class="w"> </span><span class="n">data</span><span class="p">)}))))</span><span class="w">
</span></code></pre></div></div>

<p>The <code class="language-plaintext highlighter-rouge">render-resource</code> function of <code class="language-plaintext highlighter-rouge">clostache.parser</code> is a templating engine. The first argument should be the location of the template file. As per its documentation, <code class="language-plaintext highlighter-rouge">render-resource</code> can “<em>render a resource from the <strong>classpath</strong></em>”.</p>

<p>A classpath is a “<em>a sequence of paths that Clojure (or Java) <a href="https://lambdaisland.com/blog/2021-08-25-classpath-is-a-lie">checks when looking for a Clojure source file</a></em>”. In a Leiningen project, the following directories are included in the classpath by default: the <code class="language-plaintext highlighter-rouge">src</code>, <code class="language-plaintext highlighter-rouge">test</code>, <code class="language-plaintext highlighter-rouge">classes</code>, <code class="language-plaintext highlighter-rouge">test-resources</code>, and <code class="language-plaintext highlighter-rouge">resources</code> directories(<a href="https://8thlight.com/blog/colin-jones/2010/11/26/a-leiningen-tutorial.html">source</a>). This means that our template file should be placed in any of these directories, to allow <code class="language-plaintext highlighter-rouge">render-resource</code> to access it. Accordingly, the template file (<code class="language-plaintext highlighter-rouge">home.mustache</code>) is placed in a sub-directory (<code class="language-plaintext highlighter-rouge">templates</code>) inside the <code class="language-plaintext highlighter-rouge">resources</code> directory of the project.</p>

<p>To write the route-handler for <code class="language-plaintext highlighter-rouge">/next</code>, we need to know how to send a redirection response. For this, we need to require <code class="language-plaintext highlighter-rouge">ring.util.response</code> name-space and use the <code class="language-plaintext highlighter-rouge">redirect</code> function therein:</p>

<div class="language-clojure highlighter-rouge"><div class="highlight"><pre class="highlight"><code><span class="p">(</span><span class="nf">ns</span><span class="w"> </span><span class="n">aspire.handlers</span><span class="w">
  </span><span class="p">(</span><span class="no">:require</span><span class="w"> </span><span class="p">[</span><span class="n">clostache.parser</span><span class="w"> </span><span class="no">:as</span><span class="w"> </span><span class="n">mustache</span><span class="p">]</span><span class="w">
            </span><span class="p">[</span><span class="n">aspire.db</span><span class="w"> </span><span class="no">:as</span><span class="w"> </span><span class="n">db</span><span class="p">]</span><span class="w">
            </span><span class="p">[</span><span class="n">ring.util.response</span><span class="w"> </span><span class="no">:as</span><span class="w"> </span><span class="n">ring-response</span><span class="p">]))</span><span class="w">

</span><span class="p">(</span><span class="k">defn</span><span class="w"> </span><span class="n">next-problem</span><span class="w">
  </span><span class="p">[</span><span class="n">request</span><span class="p">]</span><span class="w">
  </span><span class="p">(</span><span class="nf">ring-response/redirect</span><span class="w"> </span><span class="p">(</span><span class="nb">str</span><span class="w"> </span><span class="s">"/problem/"</span><span class="w"> </span><span class="p">(</span><span class="nf">db/random-id</span><span class="p">))))</span><span class="w">
</span></code></pre></div></div>

<p>The other route handlers are similarly constructed. (see the <a href="https://github.com/oitee/aspire/blob/0cd4fca/src/aspire/handlers.clj">code here</a>).</p>

<h2 id="deployment">Deployment</h2>

<p>In order this to run this project on our <a href="/2021/12/31/deploying-to-google-cloud-compute.html">Google Cloud Platform (GCP) VM</a>, we have to complete the following steps:</p>

<ul>
  <li>Compile the code into a Java JAR</li>
  <li>Register our program as a service with <code class="language-plaintext highlighter-rouge">Systemd</code></li>
  <li>Install an NGINX config file and set up a DNS entry</li>
</ul>

<h3 id="compiling-the-code-to-jar">Compiling the Code to JAR</h3>

<p>Because Clojure is hosted on the Java Virtual Machine, Clojure applications are run the same way as Java applications are run.</p>

<p>How does Java source code get complied?</p>

<ul>
  <li>First, the Java Compiler converts the source code to Java Byte Code</li>
  <li>Once a program is converted into Java Byte Code, it can be executed by the Java Virtual Machine, which is the runtime environment for Java (<a href="https://en.wikibooks.org/wiki/Java_Programming/Byte_Code">Source</a>)</li>
  <li>The Java Byte Code gets stored in class files; a Java ARchive file, also called JAR, can store a collection of class files (<a href="https://www.ibm.com/docs/en/i/7.4?topic=java-platform">source</a>)</li>
</ul>

<p>Clojure source code gets converted to a specific JAR which can be executed by the JVM.</p>

<p>As our project is built using Leiningen, we can use <code class="language-plaintext highlighter-rouge">lein jar</code> to create the JAR file of our project. This file will be stored in the <code class="language-plaintext highlighter-rouge">target</code> directory of our project. Instead of simply using <code class="language-plaintext highlighter-rouge">lein jar</code>, we can use <code class="language-plaintext highlighter-rouge">lein uberjar</code>, which will create a JAR file containing the source code of our project, <strong>along with all its dependencies.</strong> A uberjar is a “a <a href="https://github.com/technomancy/leiningen/blob/master/doc/TUTORIAL.md#what-to-do-with-it">single standalone executable jar</a> file”, which makes it easier to deploy. Once a uberjar is prepared, we can run it by simply using <code class="language-plaintext highlighter-rouge">java -jar</code> command. Optionally, we can use <code class="language-plaintext highlighter-rouge">lein clean</code> to clean our <code class="language-plaintext highlighter-rouge">target</code> directory. To run multiple commands successively, we can use <code class="language-plaintext highlighter-rouge">lein do</code>. So, here is how we first clean our <code class="language-plaintext highlighter-rouge">target</code> directory and then compile our project into a single JAR file:</p>

<div class="language-bash highlighter-rouge"><div class="highlight"><pre class="highlight"><code><span class="nv">$ </span>lein <span class="k">do </span>clean, uberjar

Java HotSpot<span class="o">(</span>TM<span class="o">)</span> 64-Bit Server VM warning: Options <span class="nt">-Xverify</span>:none and <span class="nt">-noverify</span> were deprecated <span class="k">in </span>JDK 13 and will likely be removed <span class="k">in </span>a future release.
Compiling aspire.core
2022-01-24 18:38:32.790:INFO::main: Logging initialized @1495ms to org.eclipse.jetty.util.log.StdErrLog
WARNING: seqable? already refers to: <span class="c">#'clojure.core/seqable? in namespace: clojure.core.incubator, being replaced by: #'clojure.core.incubator/seqable?</span>
WARNING: seqable? already refers to: <span class="c">#'clojure.core/seqable? in namespace: clostache.parser, being replaced by: #'clojure.core.incubator/seqable?</span>
WARNING: get already refers to: <span class="c">#'clojure.core/get in namespace: aspire.db, being replaced by: #'aspire.db/get</span>
Compiling aspire.db
WARNING: get already refers to: <span class="c">#'clojure.core/get in namespace: aspire.db, being replaced by: #'aspire.db/get</span>
Compiling aspire.handlers
Compiling aspire.routes
Created /home/otee/projects/aspire/target/uberjar/aspire-0.1.0-SNAPSHOT.jar
Created /home/otee/projects/aspire/target/uberjar/aspire-0.1.0-SNAPSHOT-standalone.jar
</code></pre></div></div>

<p>In order to run the project from a JAR, we need to ensure that we are not reading any files from the local file system. In the present project, all the non-Clojure files are read from the classpath. In the case of <code class="language-plaintext highlighter-rouge">data.txt</code>, which hosts the JSON data-set, we cannot directly use the file-path while slurping it. Instead, we have to use the <code class="language-plaintext highlighter-rouge">resource</code> method to <a href="https://clojuredocs.org/clojure.java.io/resource">read file from the classpath</a> instead:</p>

<div class="language-bash highlighter-rouge"><div class="highlight"><pre class="highlight"><code><span class="o">(</span>slurp <span class="o">(</span>clojure.java.io/resource <span class="s2">"data.txt"</span><span class="o">))</span>
</code></pre></div></div>

<h4 id="deploying-the-uberjar-to-gcp-vm">Deploying the uberjar to GCP VM</h4>

<p>Now that we have our JAR file, we need to send it across to our VM on GCP (alias <code class="language-plaintext highlighter-rouge">calculus</code>). We can do this by using the <code class="language-plaintext highlighter-rouge">rsync</code> command, which enables the transfer of files over SSH. Interestingly, it <a href="https://phoenixnap.com/kb/how-to-rsync-over-ssh">synchronizes the data being transferred</a> between the different machines: ensuring that only those files are transferred which are new or updated.</p>

<div class="language-bash highlighter-rouge"><div class="highlight"><pre class="highlight"><code>rsync /home/otee/projects/aspire/target/uberjar/aspire-0.1.0-SNAPSHOT-standalone.jar calculus:/home/oitee.codes/projects
</code></pre></div></div>

<p>Once the JAR is deployed, we can run it on the VM using:</p>

<div class="language-bash highlighter-rouge"><div class="highlight"><pre class="highlight"><code>java <span class="nt">-jar</span> <span class="nt">-Xmx32m</span> /home/oitee.codes/projects/aspire-0.1.0-SNAPSHOT-standalone.jar
</code></pre></div></div>

<p>The <code class="language-plaintext highlighter-rouge">-Xmx</code> flag is used to specify the maximum heap memory allocation for running a Java program. When we use <code class="language-plaintext highlighter-rouge">-Xmx32m</code>, we restrict the memory allocation to 32 MB.</p>

<h3 id="registering-with-systemd">Registering with systemd</h3>

<p>We need to use <code class="language-plaintext highlighter-rouge">systemd</code>, to ensure that our application runs consistently. To set up <code class="language-plaintext highlighter-rouge">systemd</code> for our application, we need to write a new configuration file (<code class="language-plaintext highlighter-rouge">remind.service</code>) in <code class="language-plaintext highlighter-rouge">/lib/systemd/system</code>.</p>

<div class="language-bash highlighter-rouge"><div class="highlight"><pre class="highlight"><code><span class="nb">sudo </span>nano /lib/systemd/system/remind.service
</code></pre></div></div>

<p>This file should contain the following details:</p>

<div class="language-bash highlighter-rouge"><div class="highlight"><pre class="highlight"><code><span class="o">[</span>Unit]
<span class="nv">Description</span><span class="o">=</span>remind
<span class="nv">Documentation</span><span class="o">=</span>https://github.com/oitee/aspire#readme
<span class="nv">After</span><span class="o">=</span>network.target

<span class="o">[</span>Service]
<span class="nv">Environment</span><span class="o">=</span><span class="nv">PORT</span><span class="o">=</span>4003
<span class="nv">Type</span><span class="o">=</span>simple
<span class="nv">User</span><span class="o">=</span>oitee.codes
<span class="nv">ExecStart</span><span class="o">=</span>/usr/bin/java <span class="nt">-Xmx32m</span> <span class="nt">-jar</span> /home/oitee.codes/projects/aspire-0.1.0-SNAPSHOT-standalone.jar
<span class="nv">Restart</span><span class="o">=</span>on-failure

<span class="o">[</span>Install]
<span class="nv">WantedBy</span><span class="o">=</span>multi-user.target
</code></pre></div></div>

<p><em>For a more detailed explanation of each of these terms, see this <a href="https://nodesource.com/blog/running-your-node-js-app-with-systemd-part-1/">useful post</a> or my <a href="/2021/12/31/deploying-to-google-cloud-compute.html">earlier post on setting up my VM on Google Cloud Compute</a>.</em></p>

<p>Note that we need to specify the value of the internal port(<code class="language-plaintext highlighter-rouge">PORT=4003</code>) where our server will be listening under the <code class="language-plaintext highlighter-rouge">Environment</code> entry. Also, under the <code class="language-plaintext highlighter-rouge">ExecStart</code> entry, we cannot use <code class="language-plaintext highlighter-rouge">java</code>; instead we have to mention the location of the executable Java file, i.e., <code class="language-plaintext highlighter-rouge">/usr/bin/java</code>. (<code class="language-plaintext highlighter-rouge">/usr/bin</code> is the “<em><a href="https://www.pathname.com/fhs/pub/fhs-2.3.html#USRBINMOSTUSERCOMMANDS">primary directory</a> of executable commands on the system</em>”).</p>

<p>Now, we need to run the following commands, to have <code class="language-plaintext highlighter-rouge">systemd</code> run our application (for more on this, read <a href="/2021/12/31/deploying-to-google-cloud-compute.html">this previous post</a>):</p>

<div class="language-bash highlighter-rouge"><div class="highlight"><pre class="highlight"><code><span class="nb">sudo </span>systemctl daemon-reload
<span class="nb">sudo </span>systemctl start remind.service
<span class="nb">sudo </span>systemctl <span class="nb">enable </span>remind.service
</code></pre></div></div>

<p>This should run our application. To see the status of the status of our application, we can use the following command:</p>

<div class="language-bash highlighter-rouge"><div class="highlight"><pre class="highlight"><code><span class="nb">sudo </span>systemctl status remind.service

● remind.service - remind
     Loaded: loaded <span class="o">(</span>/lib/systemd/system/remind.service<span class="p">;</span> enabled<span class="p">;</span> vendor preset: enabled<span class="o">)</span>
     Active: active <span class="o">(</span>running<span class="o">)</span> since Mon 2022-01-24 09:25:30 UTC<span class="p">;</span> 18s ago
       Docs: https://github.com/oitee/aspire#readme
   Main PID: 178875 <span class="o">(</span>java<span class="o">)</span>
      Tasks: 22 <span class="o">(</span>limit: 1159<span class="o">)</span>
     Memory: 119.4M
     CGroup: /system.slice/remind.service
             └─178875 /usr/bin/java <span class="nt">-Xmx32m</span> <span class="nt">-jar</span> /home/oitee.codes/projects/aspire-0.1.0-SNAPSHOT-standalone.jar

Jan 24 09:25:30 calculus systemd[1]: Started remind.
Jan 24 09:25:33 calculus java[178875]: 2022-01-24 09:25:33.385:INFO::main: Logging initialized @2707ms to org.eclipse.jetty.util.log.StdErrLog
Jan 24 09:25:35 calculus java[178875]: WARNING: seqable? already refers to: <span class="c">#'clojure.core/seqable? in namespace: clojure.core.incubator, being replaced by: #'clojure.core.incubator/seqable?</span>
Jan 24 09:25:35 calculus java[178875]: WARNING: seqable? already refers to: <span class="c">#'clojure.core/seqable? in namespace: clostache.parser, being replaced by: #'clojure.core.incubator/seqable?</span>
Jan 24 09:25:35 calculus java[178875]: WARNING: get already refers to: <span class="c">#'clojure.core/get in namespace: aspire.db, being replaced by: #'aspire.db/get</span>
Jan 24 09:25:35 calculus java[178875]: 2022-01-24 09:25:35.264:INFO:oejs.Server:main: jetty-9.4.44.v20210927<span class="p">;</span> built: 2021-09-27T23:02:44.612Z<span class="p">;</span> git: 8da83308eeca865e495e53ef315a249d63ba9332<span class="p">;</span> jvm 17.0.1+12-Ubuntu-120.04
Jan 24 09:25:35 calculus java[178875]: 2022-01-24 09:25:35.454:INFO:oejs.AbstractConnector:main: Started ServerConnector@4052913c<span class="o">{</span>HTTP/1.1, <span class="o">(</span>http/1.1<span class="o">)}{</span>0.0.0.0:4003<span class="o">}</span>
Jan 24 09:25:35 calculus java[178875]: 2022-01-24 09:25:35.456:INFO:oejs.Server:main: Started @4815ms
</code></pre></div></div>

<h3 id="using-nginx-to-redirect-traffic-from-port-80">Using NGINX to redirect traffic from Port 80</h3>

<p>To redirect requests to port 80 of our VM to the specific internal port our server will be listening to (<code class="language-plaintext highlighter-rouge">4003</code>) , we need to write a configuration file for NGINX. First, we should add a configuration file <code class="language-plaintext highlighter-rouge">remind.otee.dev</code> to the <code class="language-plaintext highlighter-rouge">/etc/nginx/sites-available</code>.</p>

<div class="language-bash highlighter-rouge"><div class="highlight"><pre class="highlight"><code><span class="nb">sudo </span>nano /etc/nginx/sites-available/remind.otee.dev
</code></pre></div></div>

<p>This file should contain the following details:</p>

<div class="language-bash highlighter-rouge"><div class="highlight"><pre class="highlight"><code>server <span class="o">{</span>
        listen 80<span class="p">;</span>
        listen <span class="o">[</span>::]:80<span class="p">;</span>
        server_name remind.otee.dev<span class="p">;</span>
        location / <span class="o">{</span>
        proxy_pass http://127.0.0.1:4003<span class="p">;</span>
        <span class="o">}</span>
<span class="o">}</span>
</code></pre></div></div>

<p>Now, we need to enable this configuration by adding a symbolic link to it in the <code class="language-plaintext highlighter-rouge">/etc/nginx/sites-available</code> directory:</p>

<div class="language-bash highlighter-rouge"><div class="highlight"><pre class="highlight"><code><span class="nb">sudo ln</span> <span class="nt">-s</span> /etc/nginx/sites-available/remind.otee.dev /etc/nginx/sites-enabled/remind.otee.dev
</code></pre></div></div>

<p>Next, we should restart NGINX:</p>

<div class="language-bash highlighter-rouge"><div class="highlight"><pre class="highlight"><code><span class="nb">sudo </span>systemctl status nginx
<span class="nb">sudo </span>systemctl restart nginx
</code></pre></div></div>

<p>Now that NGINX has been configured to redirect requests to <a href="http://remind.otee.dev">remind.otee.dev</a> to the internal port <code class="language-plaintext highlighter-rouge">4003</code>, we need to set up the custom domain <code class="language-plaintext highlighter-rouge">remind.otee.dev</code> and then enforce HTTPS, by using the freely available <a href="https://certbot.eff.org/">Certbot</a> tool provided by <a href="https://letsencrypt.org/getting-started/">Lets Encrypt</a>.</p>

<p>This concludes the deployment!🎉</p>

<p>The project is live at: <a href="https://remind.otee.dev">https://remind.otee.dev</a></p>

<h2 id="further-improvements">Further Improvements</h2>

<p>Here are some of the improvements that can be added in future:</p>

<ul>
  <li>Move the data-set to SQLite. This will allow us to write data on the file. For example, to track analytics of our app: the number of views, requests for hints and solutions</li>
  <li>Enable adding of new problem sets from the UI:
    <ul>
      <li>This can be done by creating a ‘users’ table, with admin usernames and passwords (using good password storage principles as we did with Twirl)</li>
      <li>Maintaining sessions on addition routes (Middleware for cookie parsing)</li>
    </ul>
  </li>
</ul>]]></content><author><name></name></author><category term="project" /><summary type="html"><![CDATA[In this post I discuss how I built my first web-app, RemindMe, using Clojure! The app is deployed here: https://remind.otee.dev]]></summary><media:thumbnail xmlns:media="http://search.yahoo.com/mrss/" url="https://otee.dev/assets/images/remind_me.png" /><media:content medium="image" url="https://otee.dev/assets/images/remind_me.png" xmlns:media="http://search.yahoo.com/mrss/" /></entry></feed>